Escrow Module
The Escrow feature in PayMoney enables secure business contracts with multiple milestones between two users. The contract creator can act as the buyer or seller and may invite unregistered users via email. Invited users must register to access and accept the contract. For each milestone, the buyer deposits funds, and the seller submits proof of completion. Once confirmed by the buyer, the payment is released to the seller. Both parties can raise disputes over payments or proof at any stage.
Admin Panel
Escrow Contracts
1. The admin can view the list of escrow contracts from the admin panel. To access the list, navigate to Escrow Payments >> Escrow Contracts. Here, the admin can see escrow contracts submitted by different users. The list can be filtered using various options, including Date Range, Currency, Status and User. Additionally, the contracts list data can be downloaded in CSV or PDF format. Each contract has an eye icon; clicking on it displays the details of the specific contract.
2. After clicking the eye icon, the admin can view the details of the specific contract.
Escrow Payments
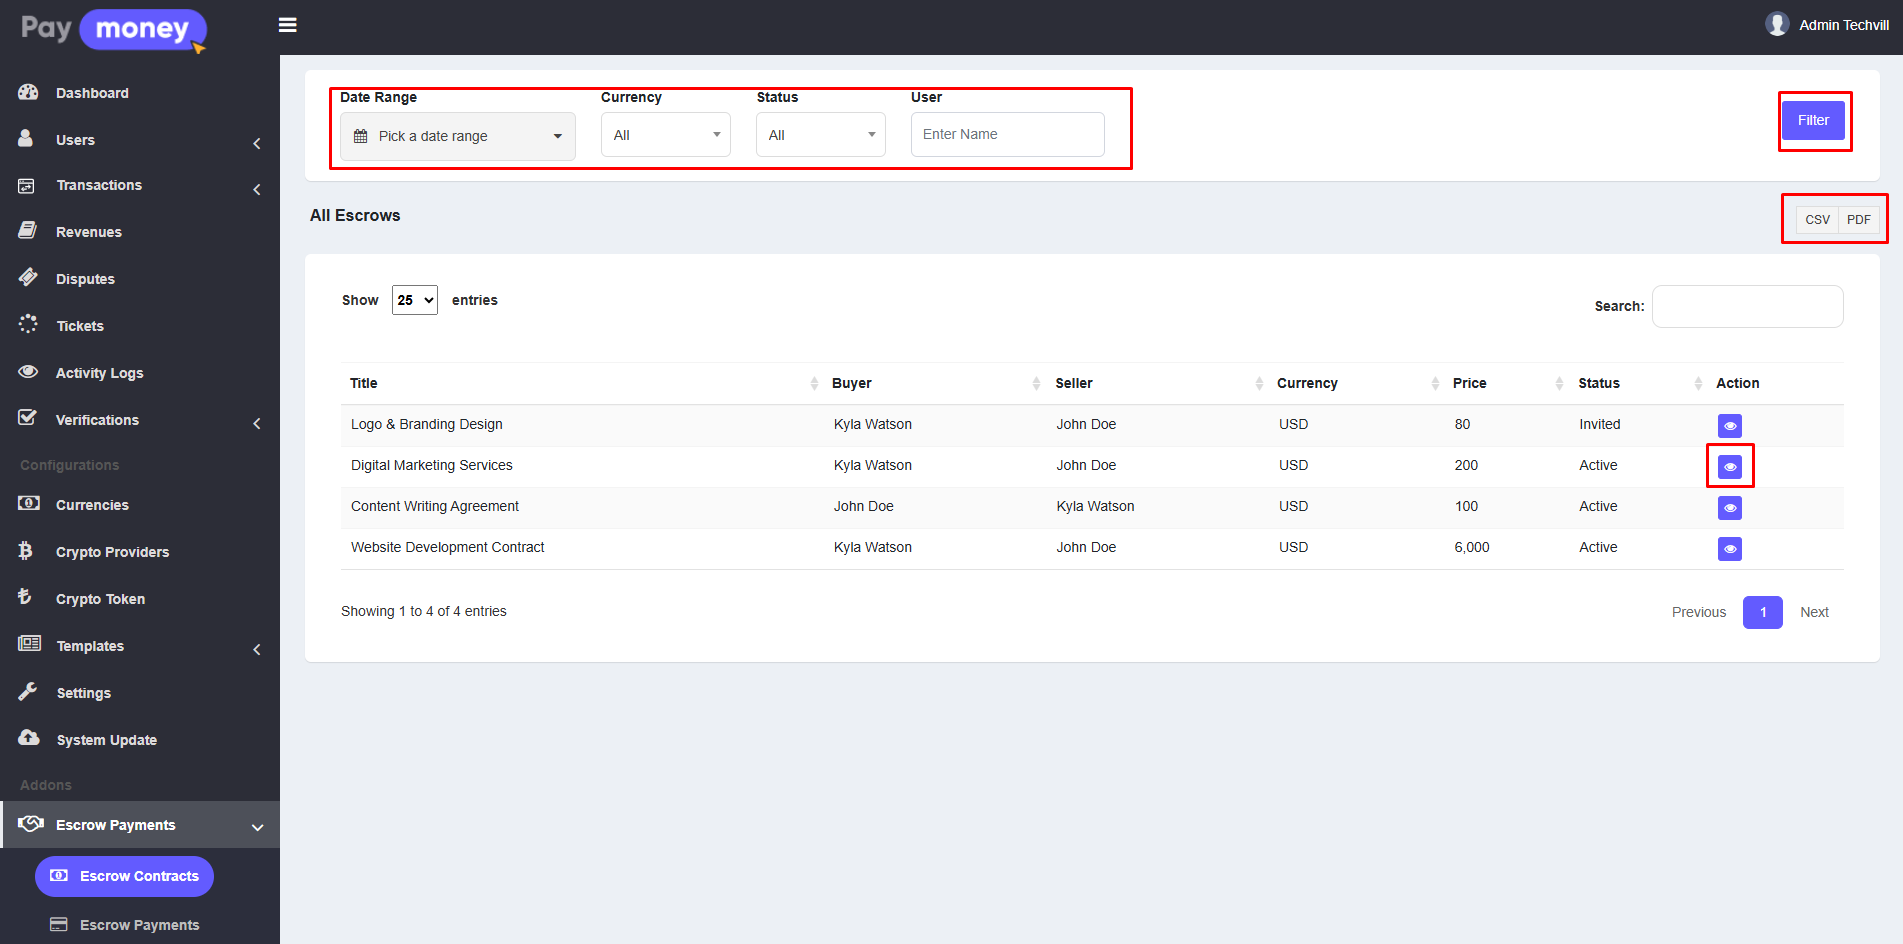
1. The admin can view the list of escrow payments from the admin panel. To access the list, navigate to Escrow Payments >> Escrow Payments. Here, the admin can see escrow payments submitted by different users. The list can be filtered using various options, including Date Range, Status and User. Additionally, the payments list data can be downloaded in CSV or PDF format. Each contract payment has an eye icon; clicking on it displays the details of the specific contract payment.
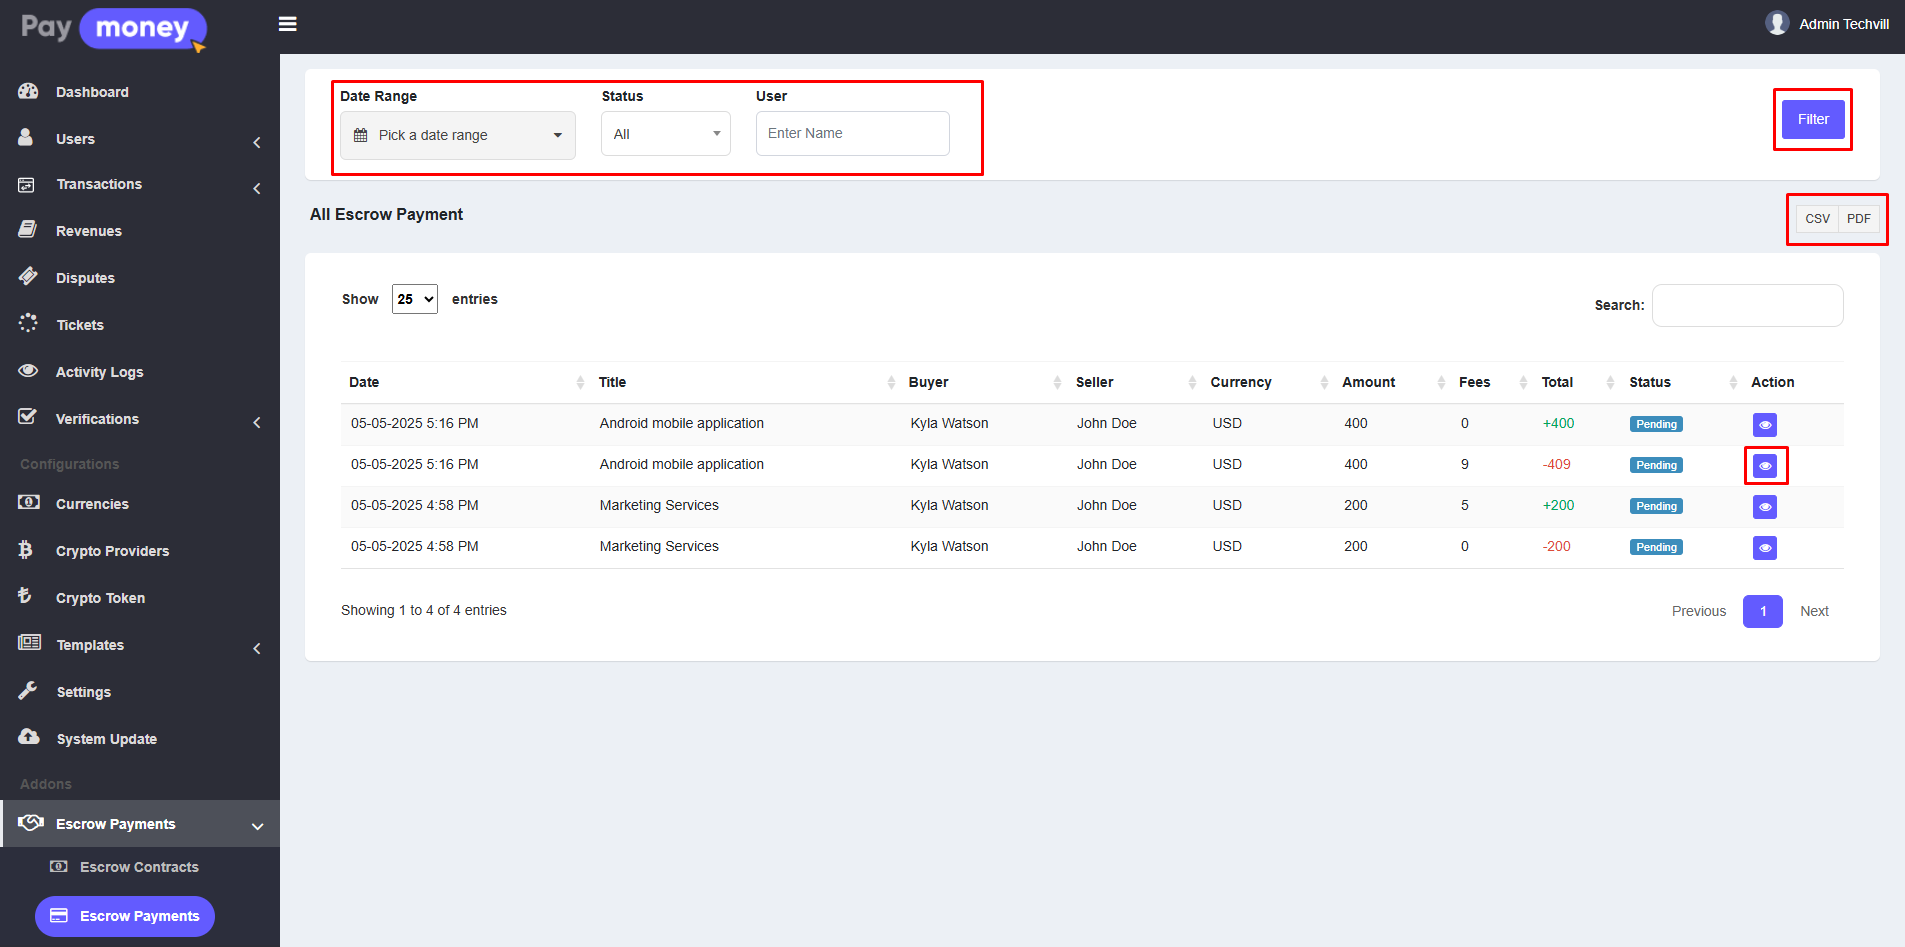
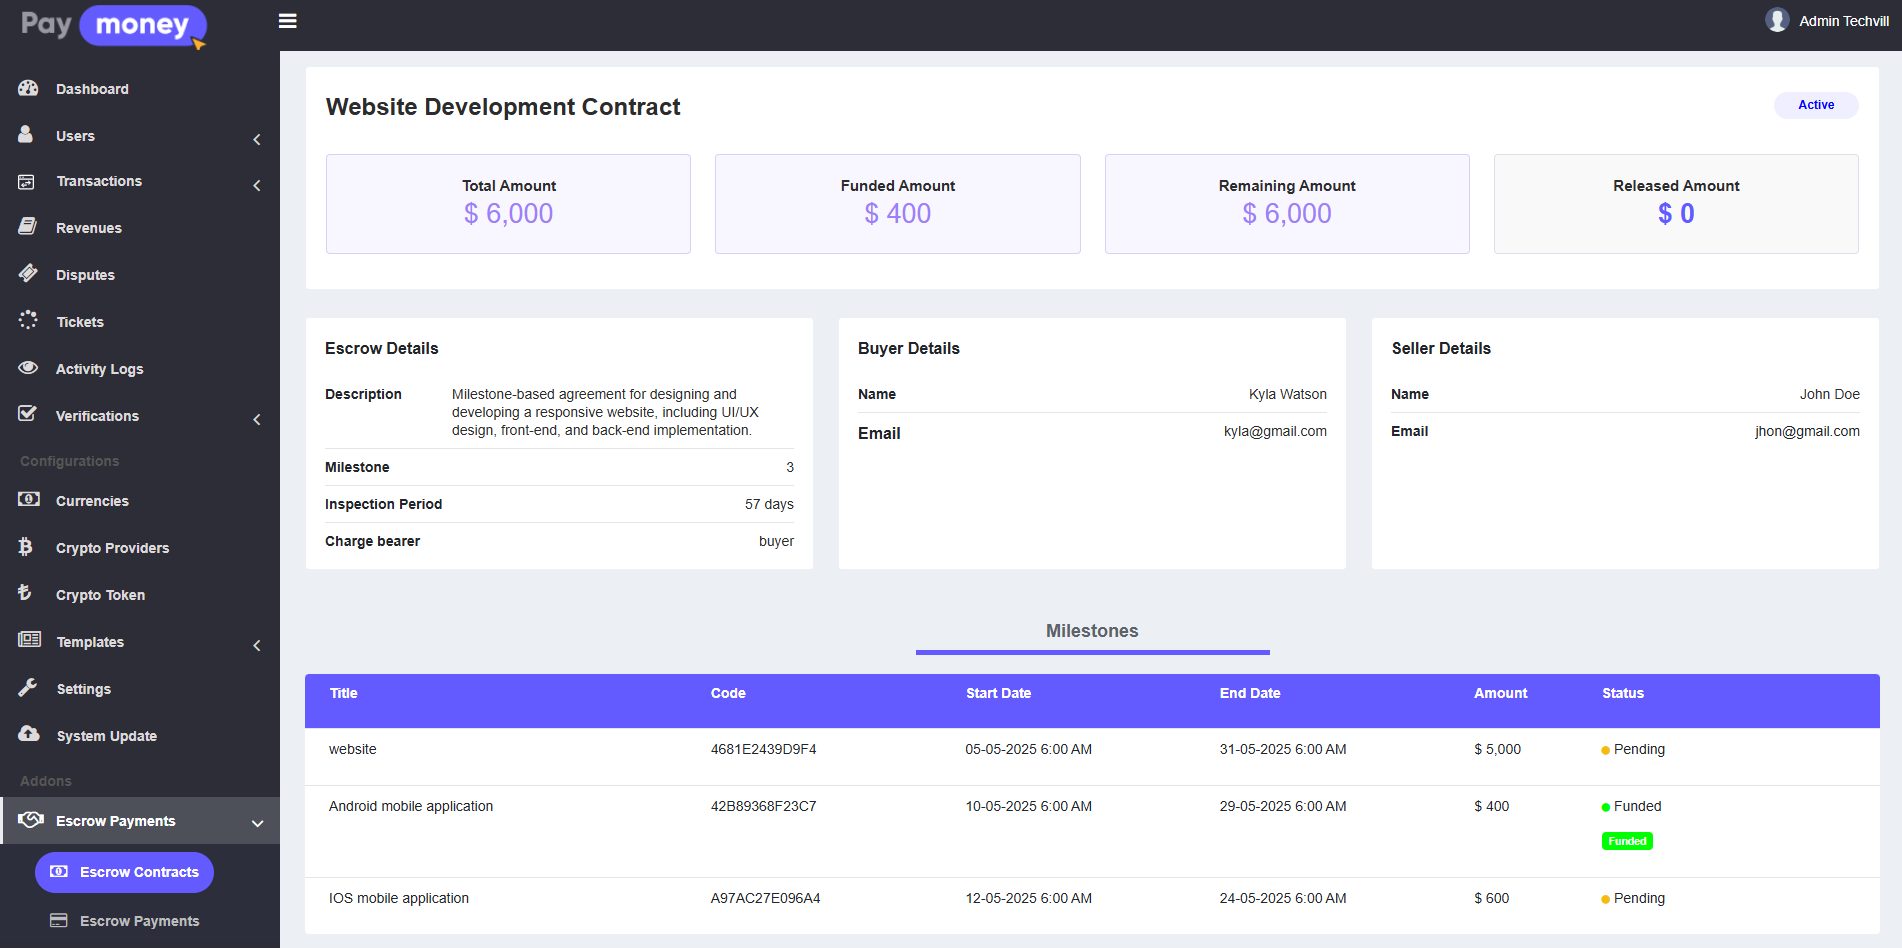
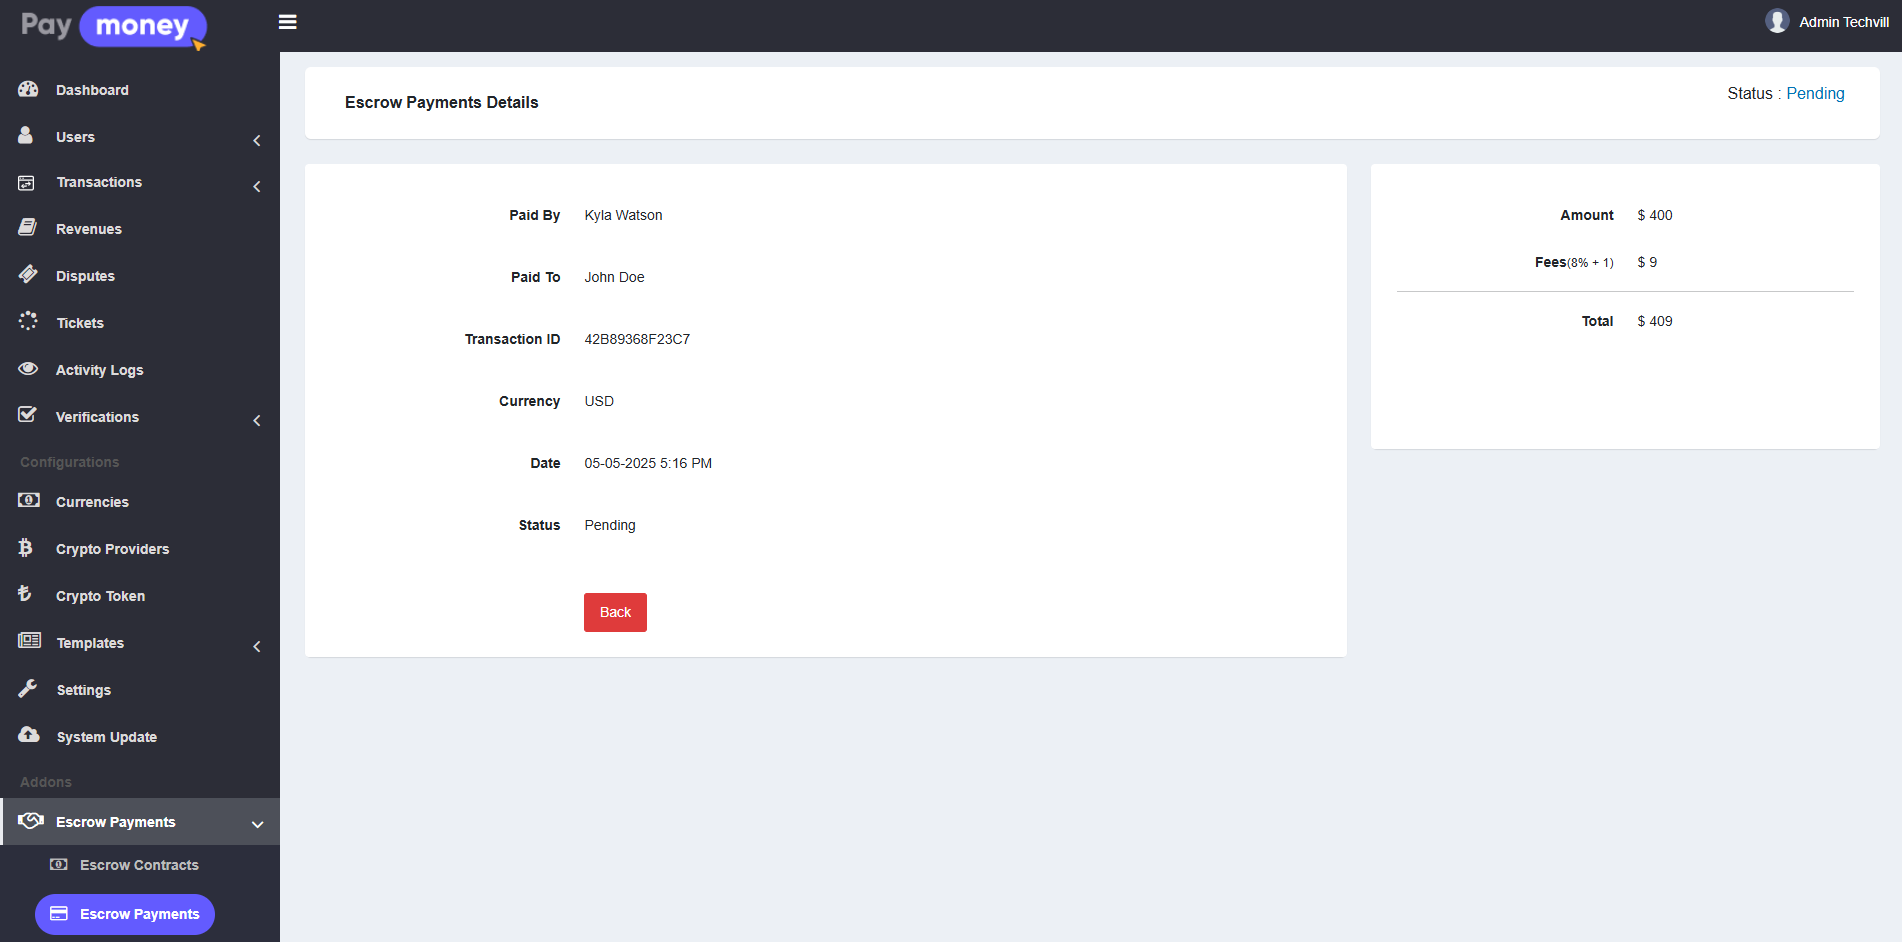
2. After clicking the eye icon, the admin can view the details of the specific contract.
Fees Limits and Payment Method
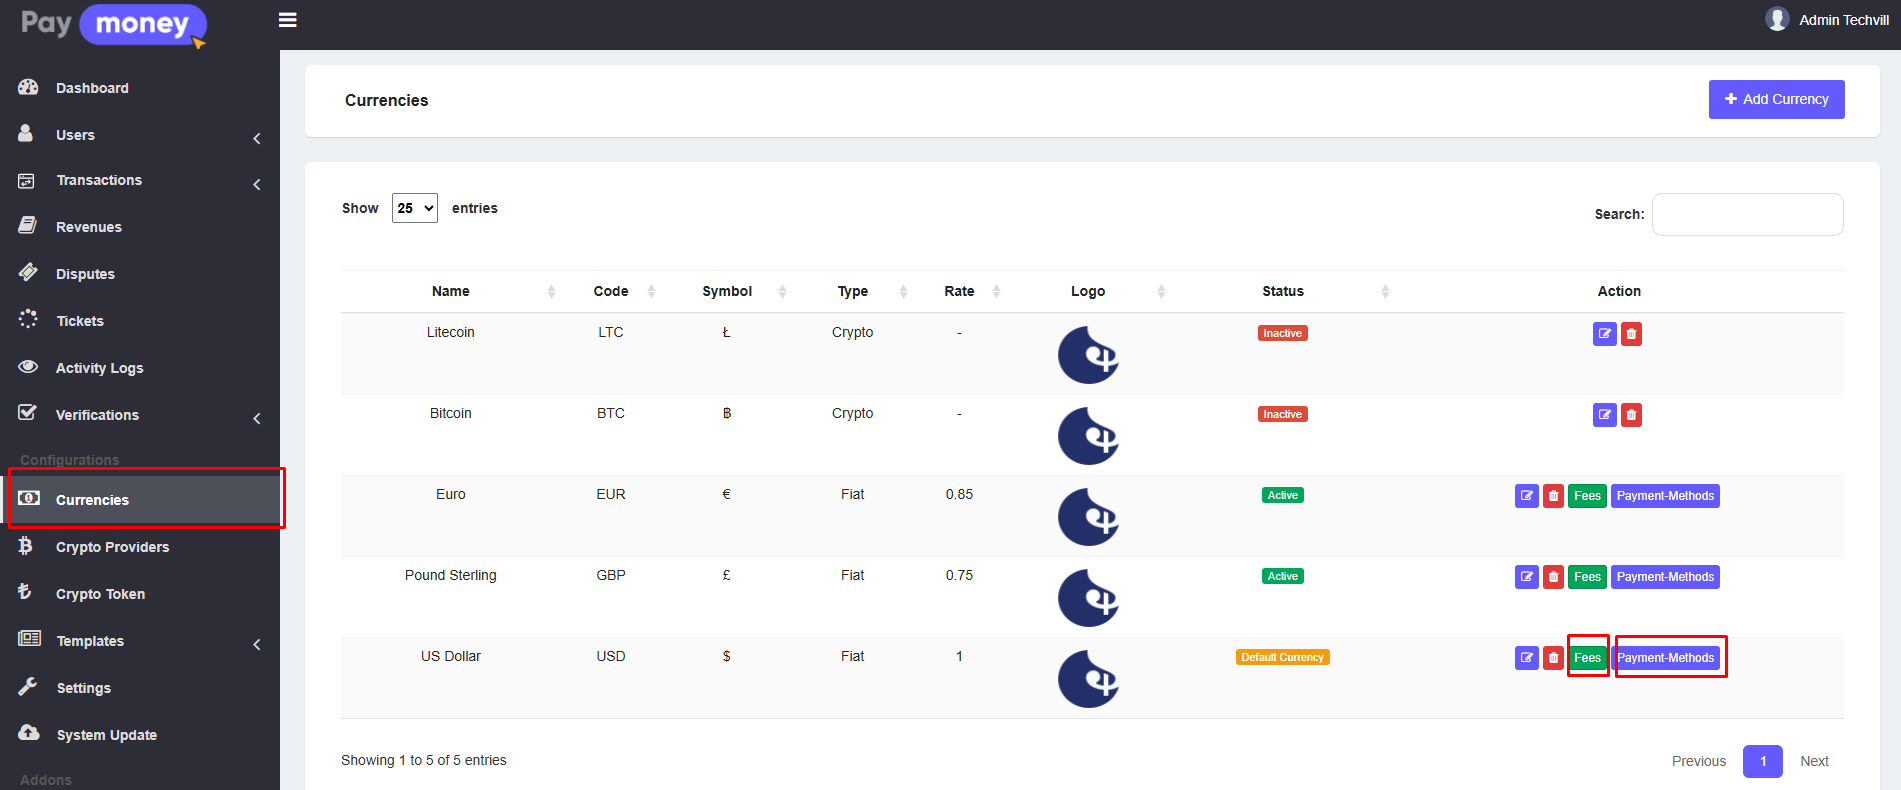
Admins can configure transaction fee limits and payment methods for escrow payments. To do this, go to Settings, then click the Fees and Payment-Methods button for the specific currency.
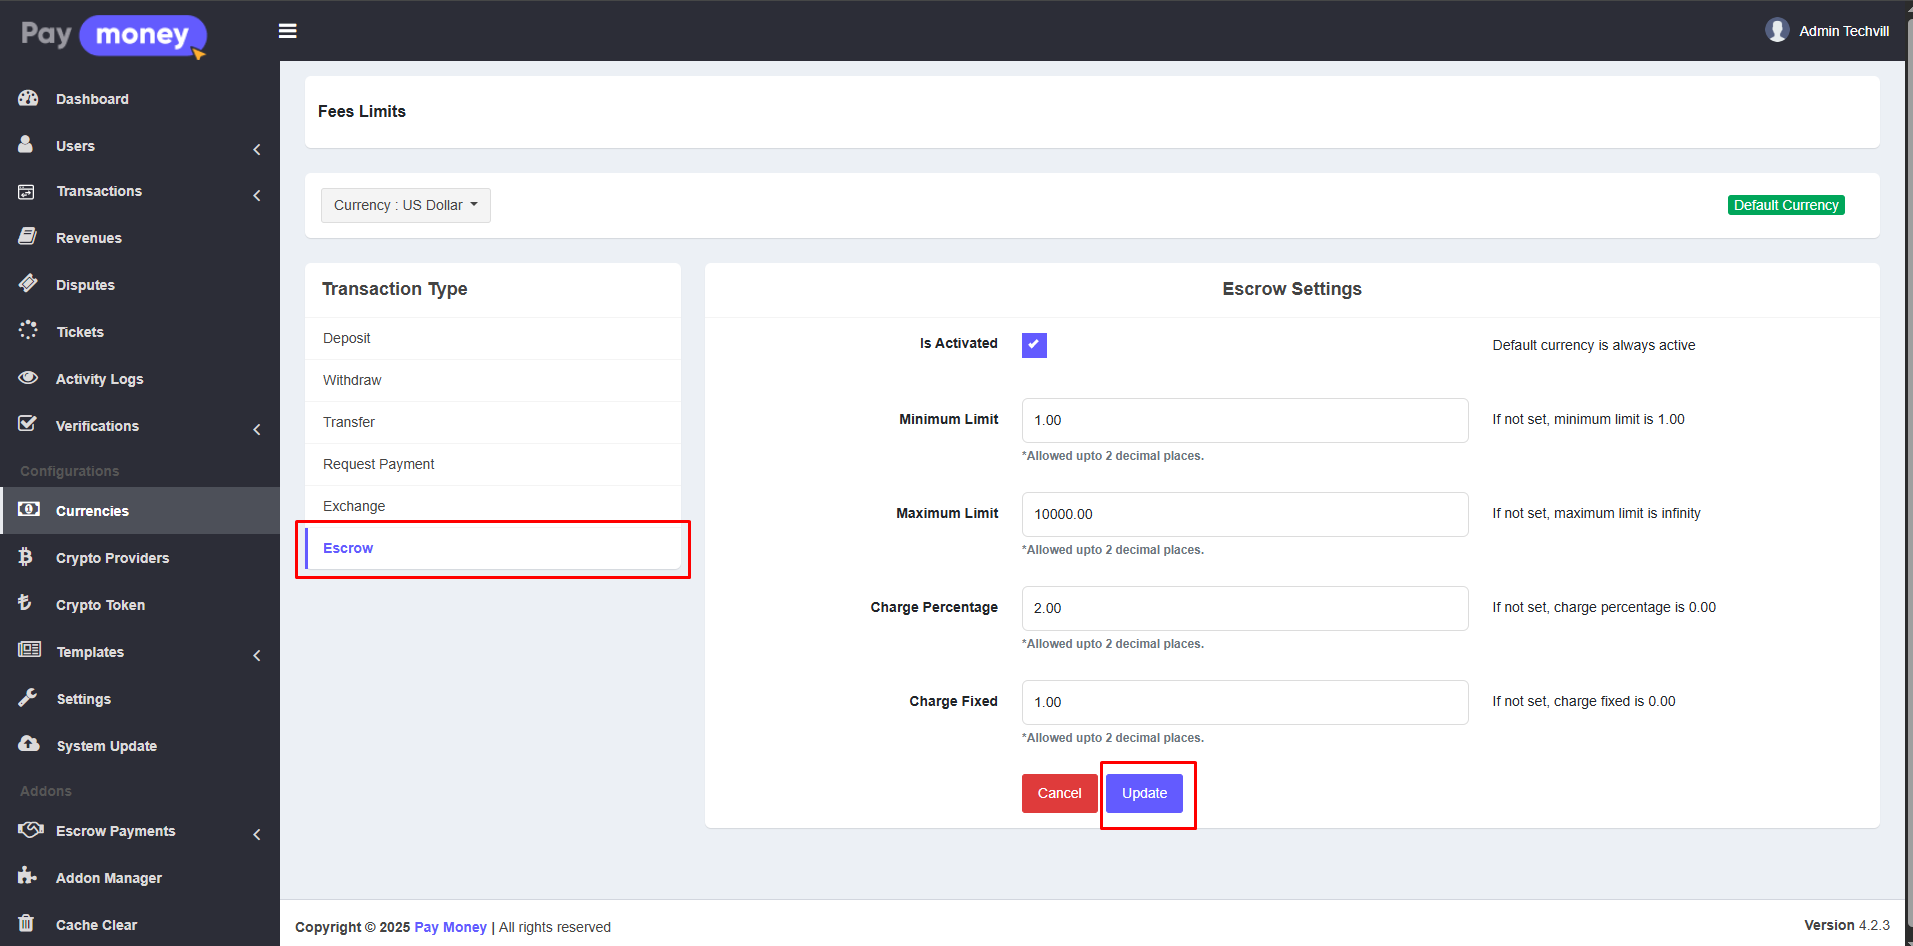
1. After clicking the Fees button, select the Escrow tab. Here, you can set the limits and charges for escrow payments. Once done, click the Update button to save your changes.
2. After clicking the Payment-Methods button, select the Wallet tab. Then, check the Escrow Received option. Finally, click the Update button to save your changes.

Email and SMS Templates
To set up email templates, navigate to Templates >> Email Templates and Templates >> SMS Templates. Scroll down to the Escrow section and edit the content as needed. Email and SMS templates support multiple languages.
User Panel
Escrow Contracts
1. The user's can view their own list of Contracts from user panel. To access the list, navigate to Escrow Payments >> Escrow Contracts. The list can be filtered using Status and Currency. Each contract in the list has an eye icon to view contract details. An edit icon is also available for contracts with the status Invited, but only if the buyer is the same as the contract creator. Additionally, by clicking the Create Contract button, the user can request a new contract.
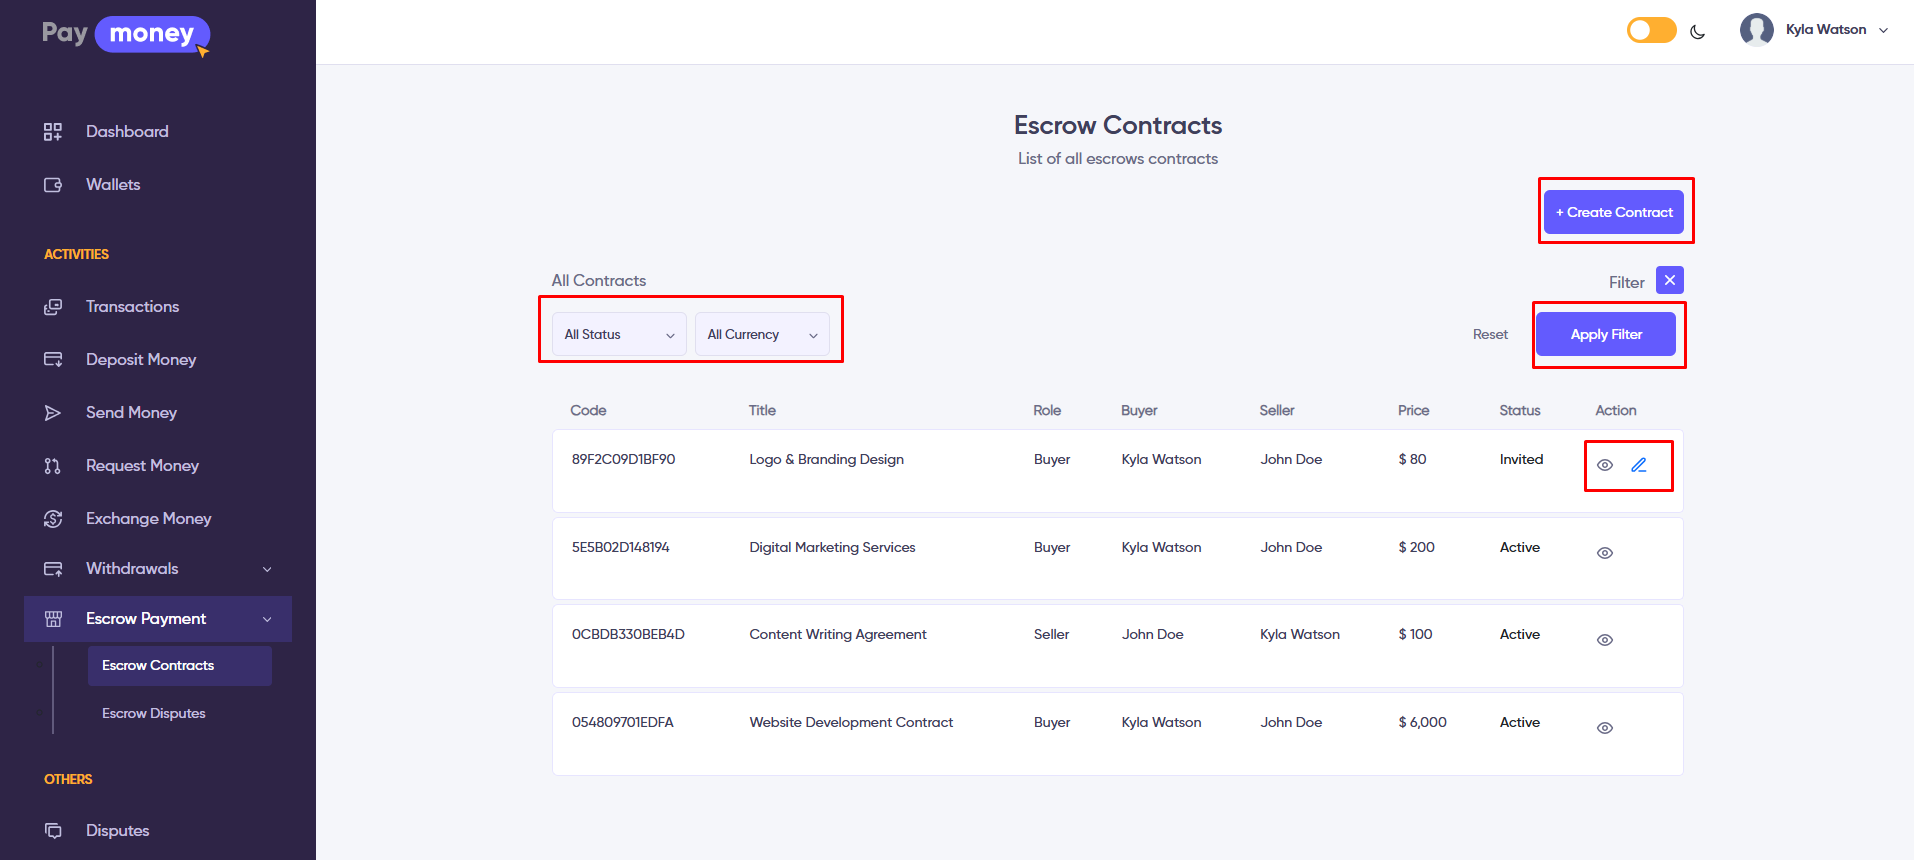
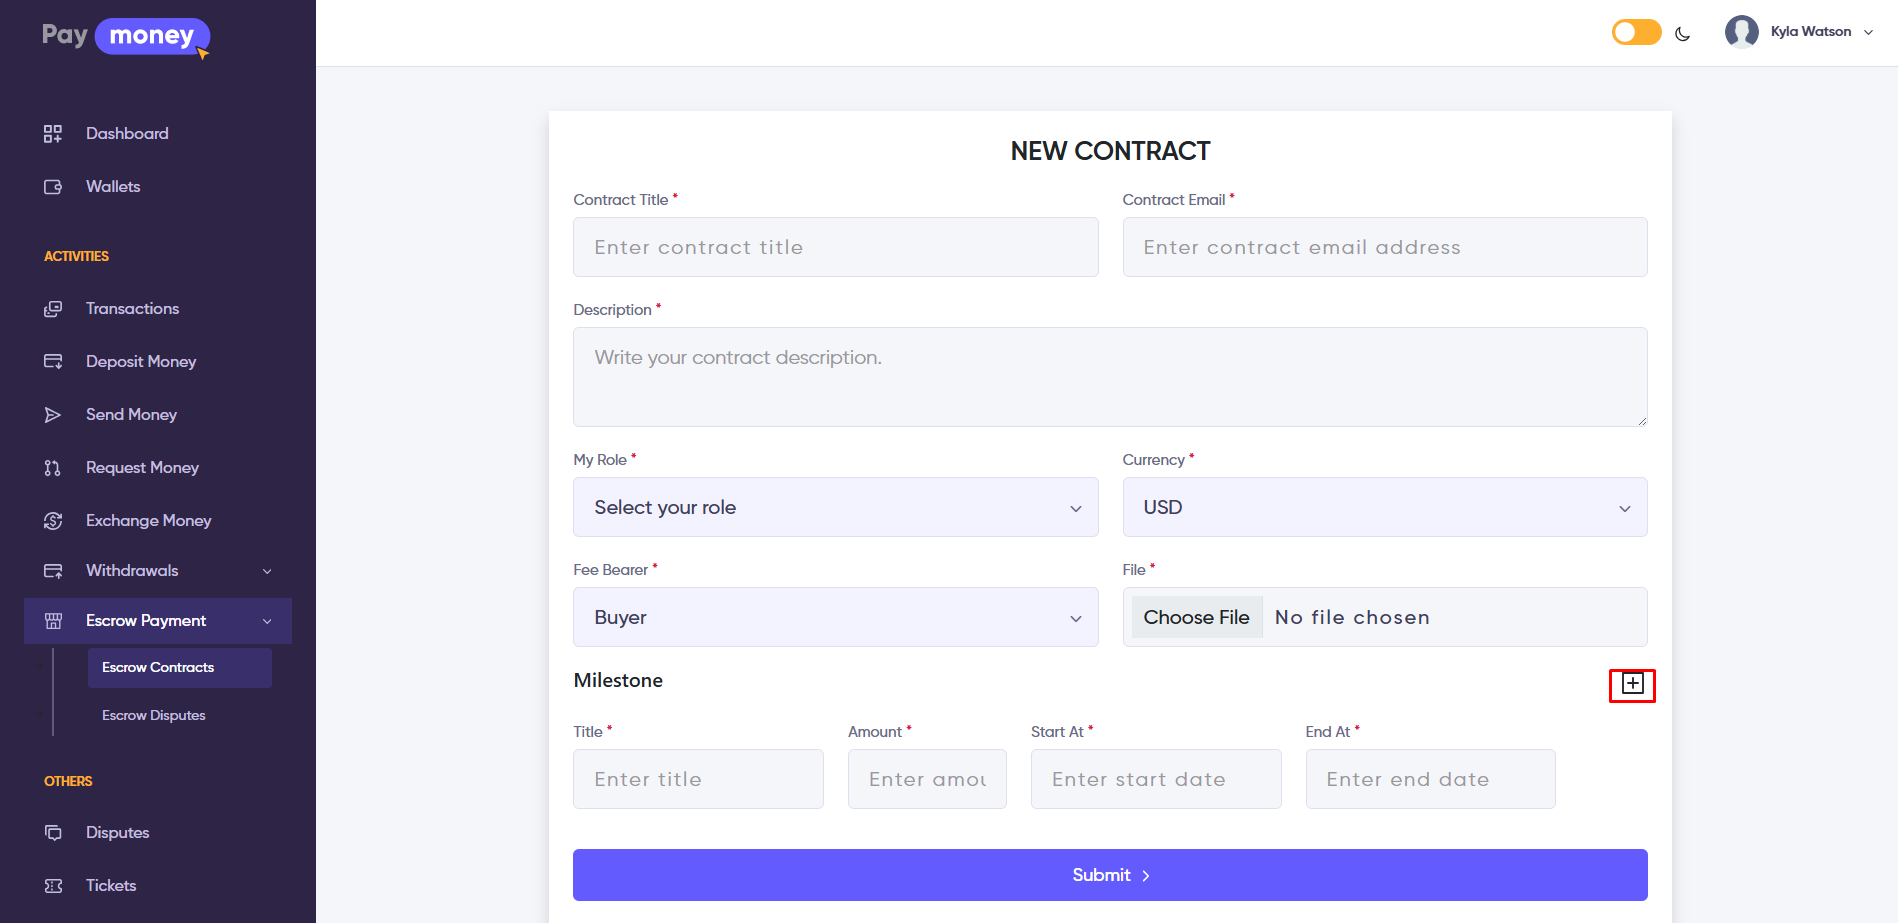
2. After clicking the Create Contract button, the user is redirected to the Create Contract page, where they can set up a new contract.
-
The creator must enter a Contract Title and the Contract Email address of the user to be involved.
-
Unregistered emails can also be used in the Contract Email field if Email Send feature is enabled by the admin. In such cases, an invitation email will be sent to the unregistered user.
-
The user must register using the link provided in the email, and after logging in, they will be able to access and accept the contract.
-
The creator must also select their role in the contract (buyer or seller), provide a description, choose the currency, assign the fee bearer, and upload any necessary files.
-
In the Milestone section, contract milestones can be defined. By clicking the plus (+) icon, the creator can add multiple milestones.
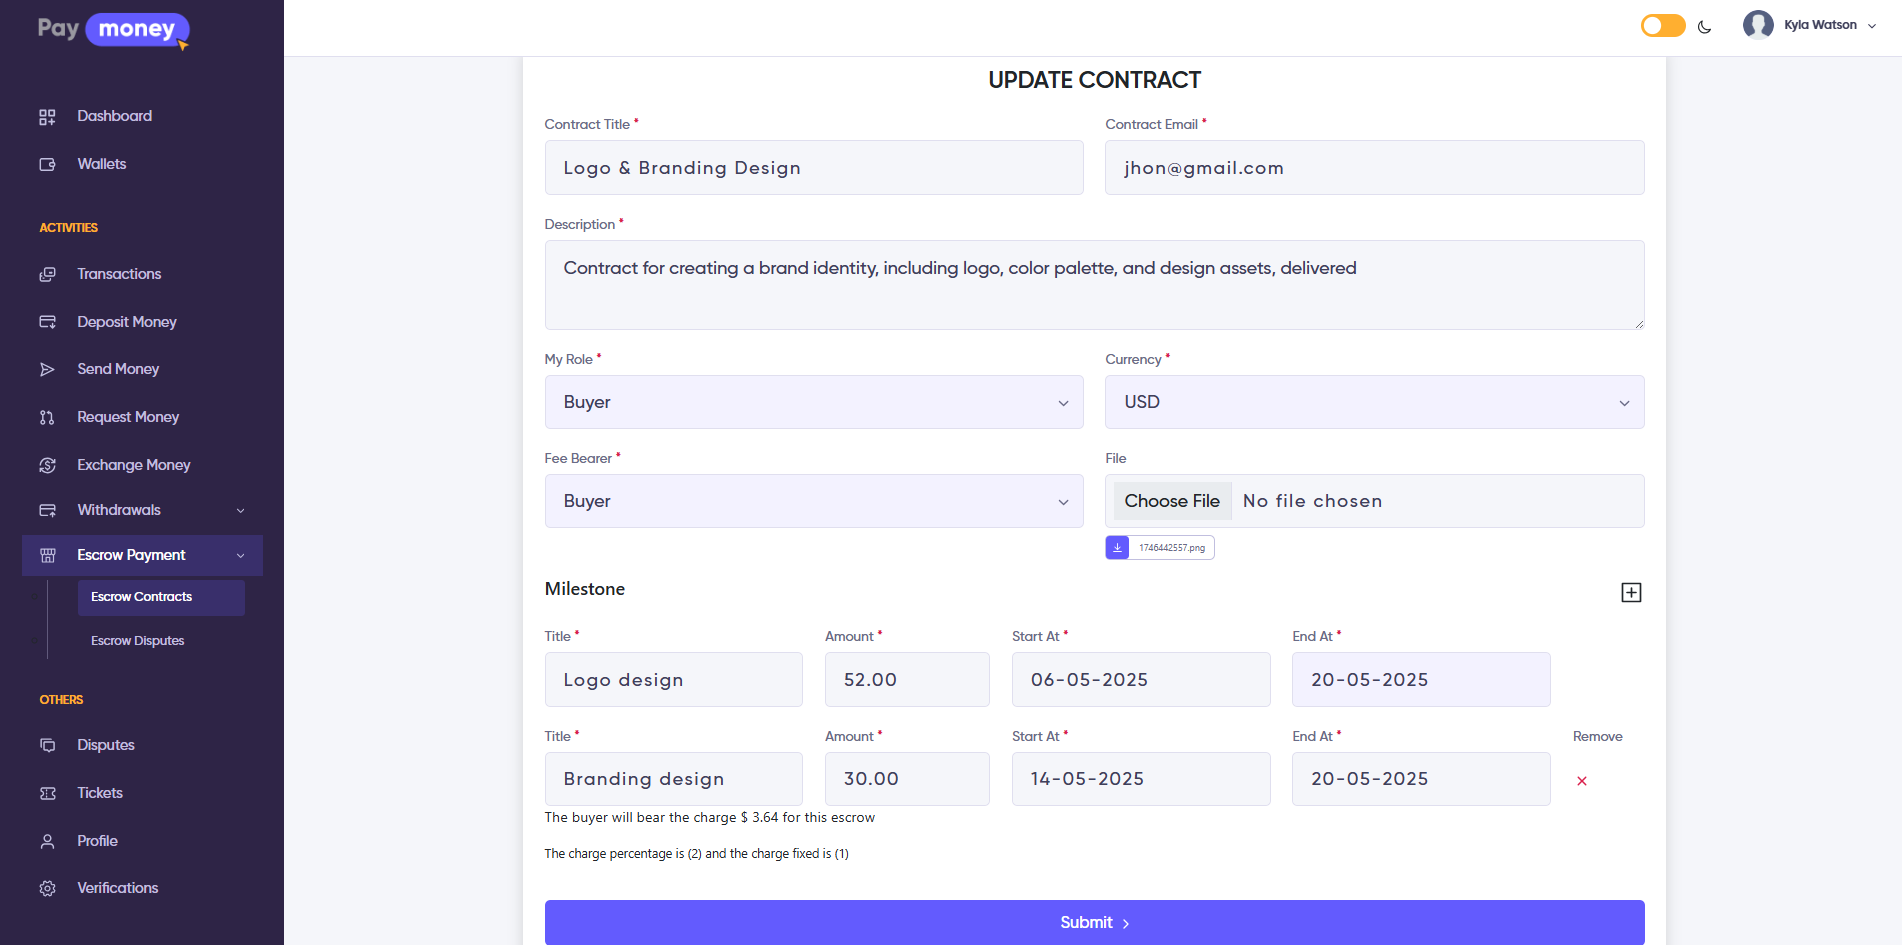
3. After clicking the edit icon from the list for an individual contract, the user is redirected to the Edit page, where they can update the contract details before the invited user accepts it. However, the creator cannot change the invited user's email address.
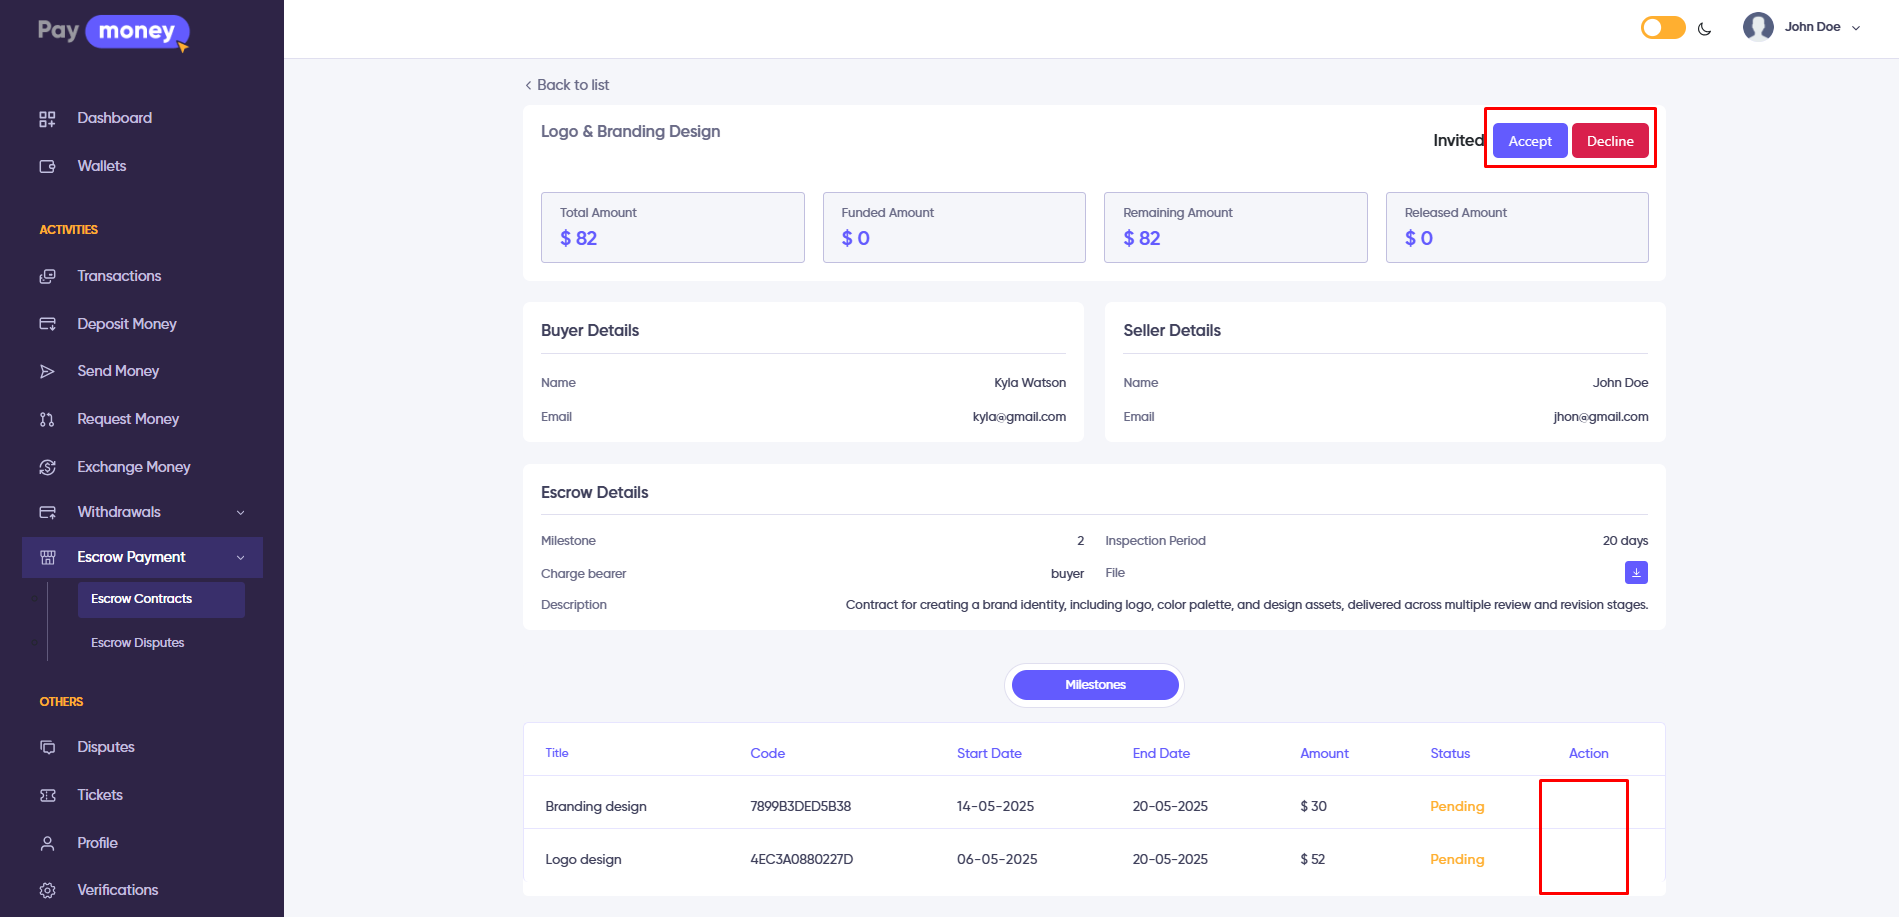
4. After clicking the eye icon from the list on an individual contract, the user is redirected to the contract details page, where they can view the contract and its milestones. If the buyer is the same as the contract creator and the contract status is Invited, the user can update the milestones from their panel.
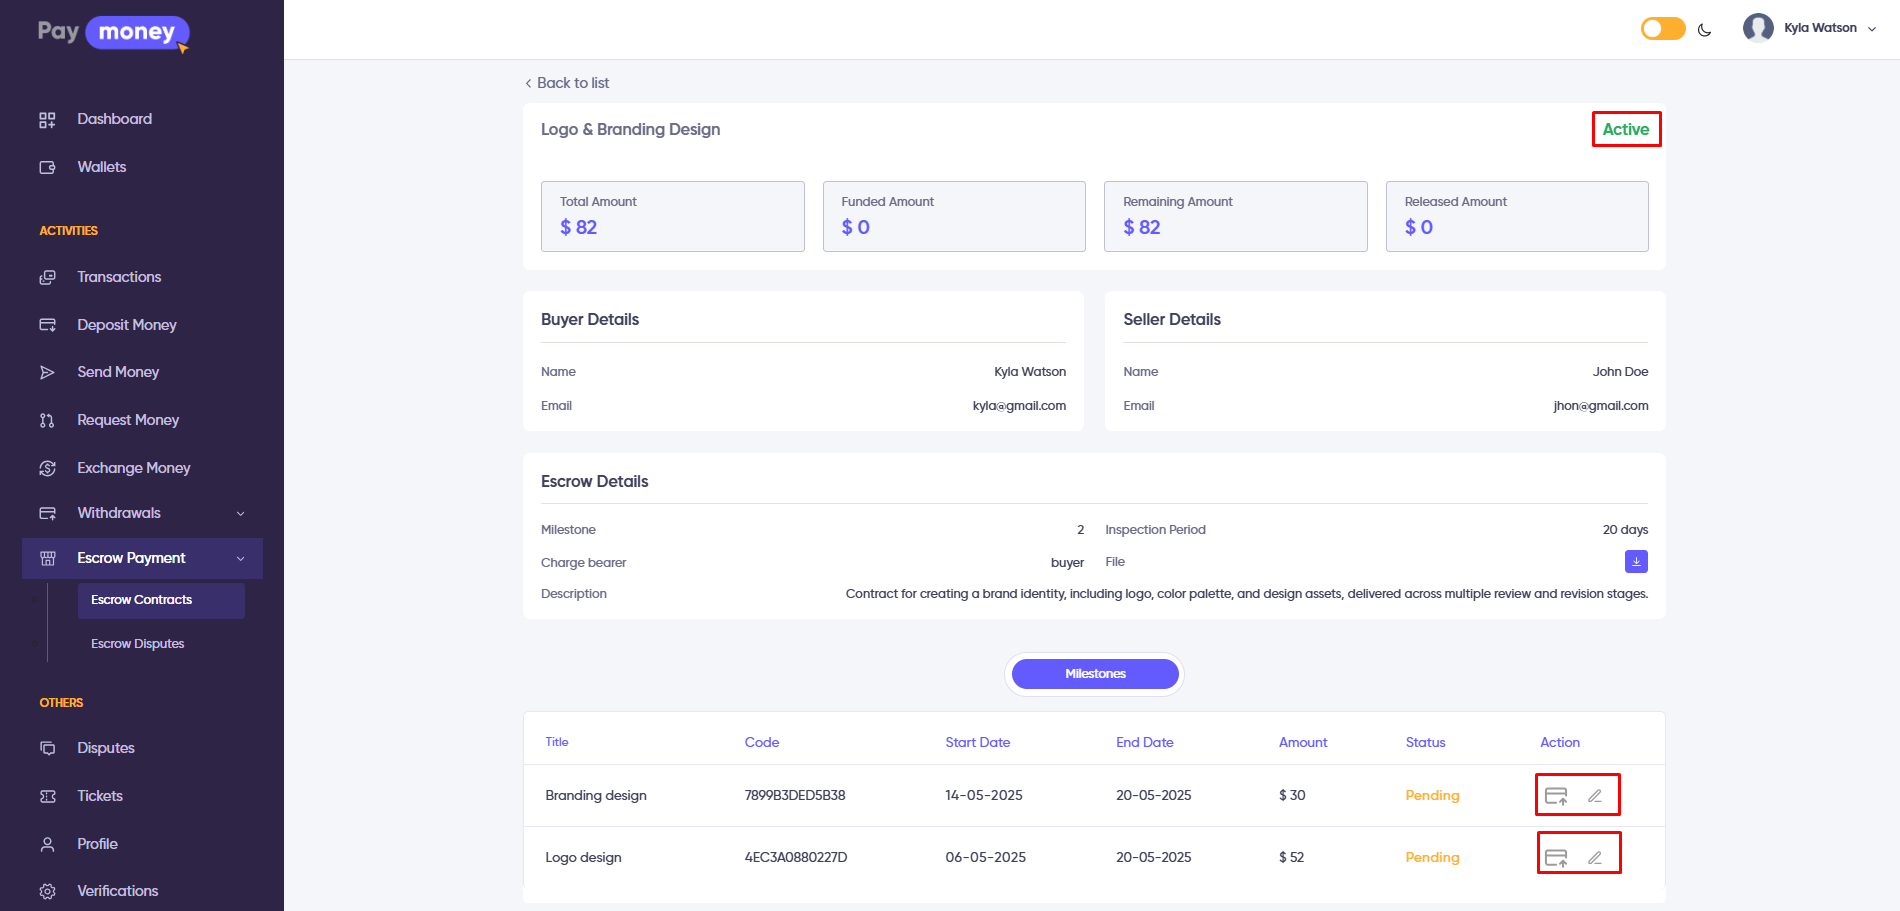
On the contract details page in the seller panel, there are Accept and Decline buttons. The seller must accept the contract to proceed. Sellers cannot edit milestones.
Escrow Milestone
1. After accepting the contract by invited user. Contract buyer role user can edit and make payment of each milestone from the details page of every accepted contract.
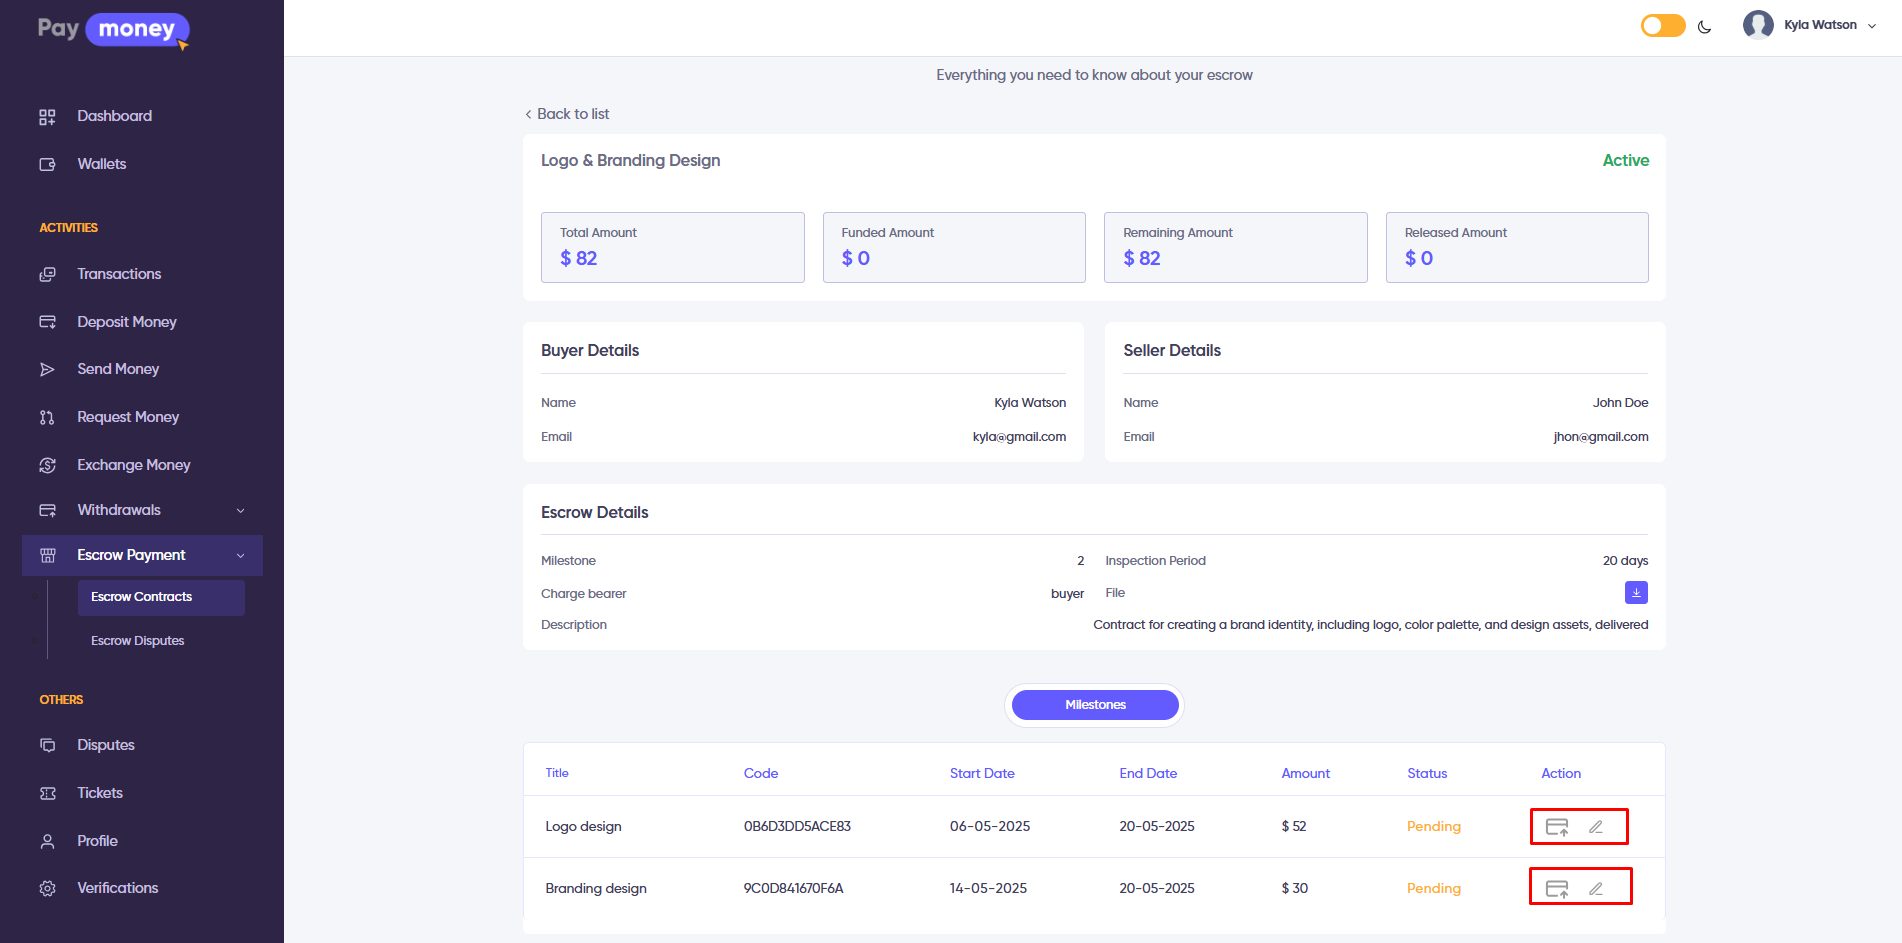
2. After clicking the edit icon on an individual milestone from the contract details page, the user with the buyer role is redirected to the milestone update page. Here, they can update the milestone title, amount, start date, and end date. However, if the milestone is already funded, it cannot be edited.

3. After clicking the Payment icon on an individual milestone from the contract details page, the user with the buyer role is redirected to the milestone payment confirmation page. There, they can review the payment amount and applicable fees before proceeding to complete the payment.
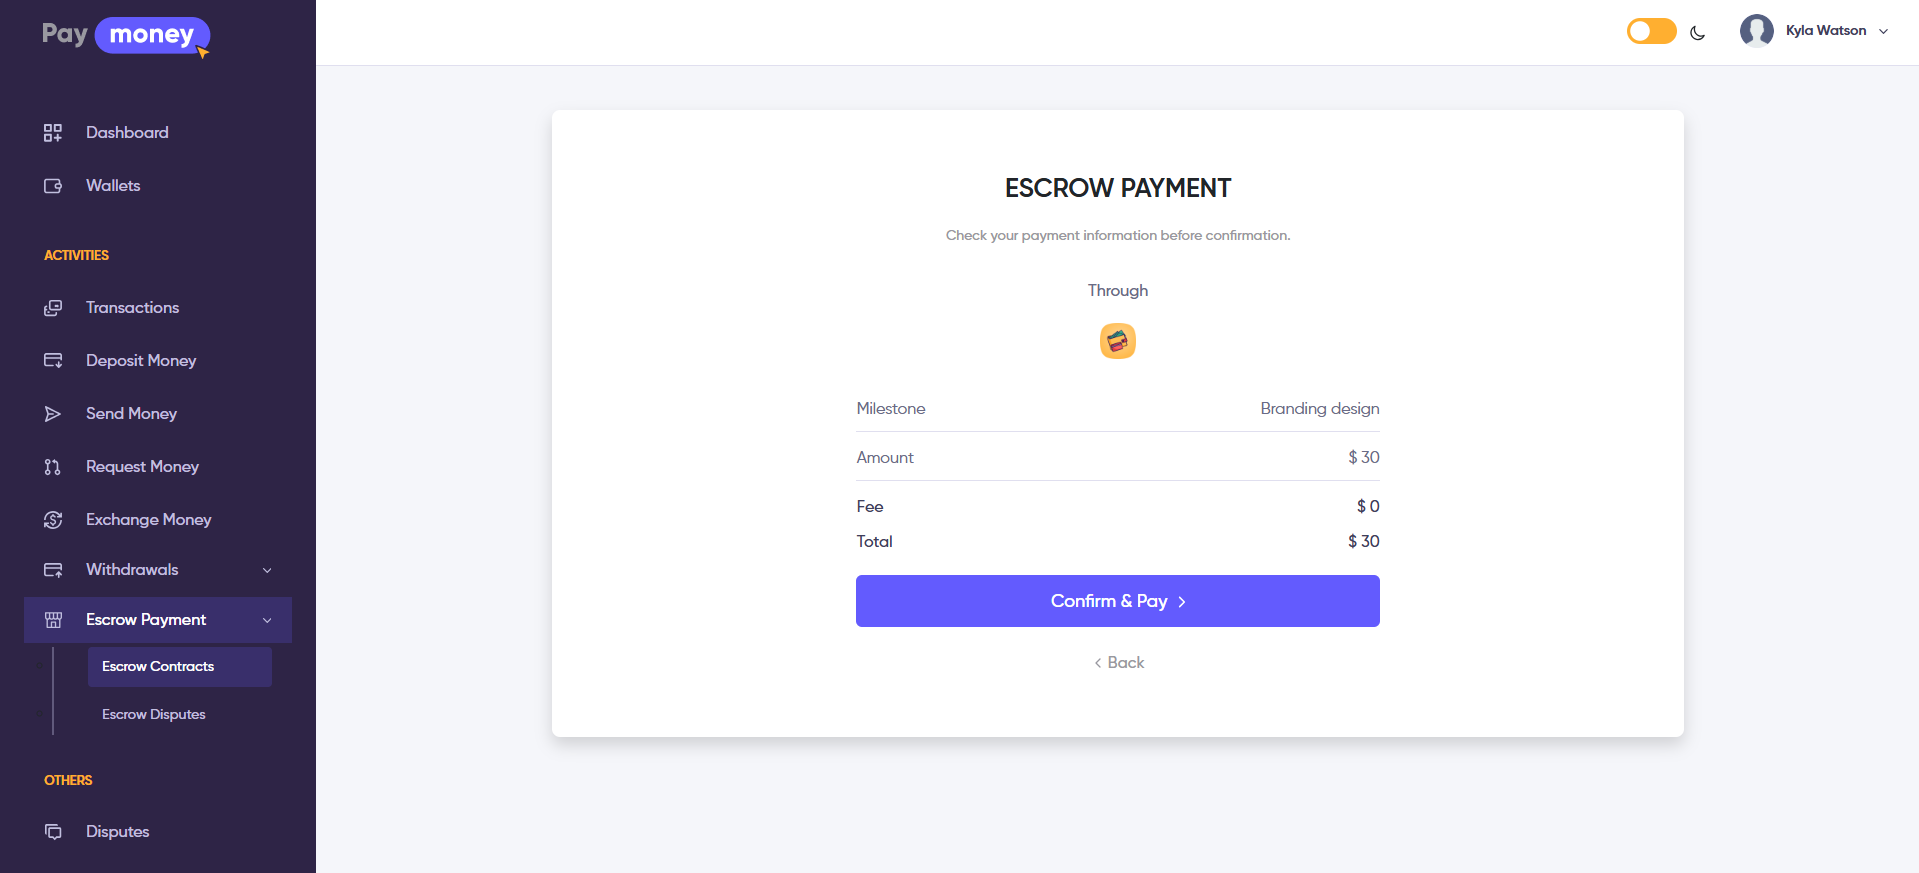
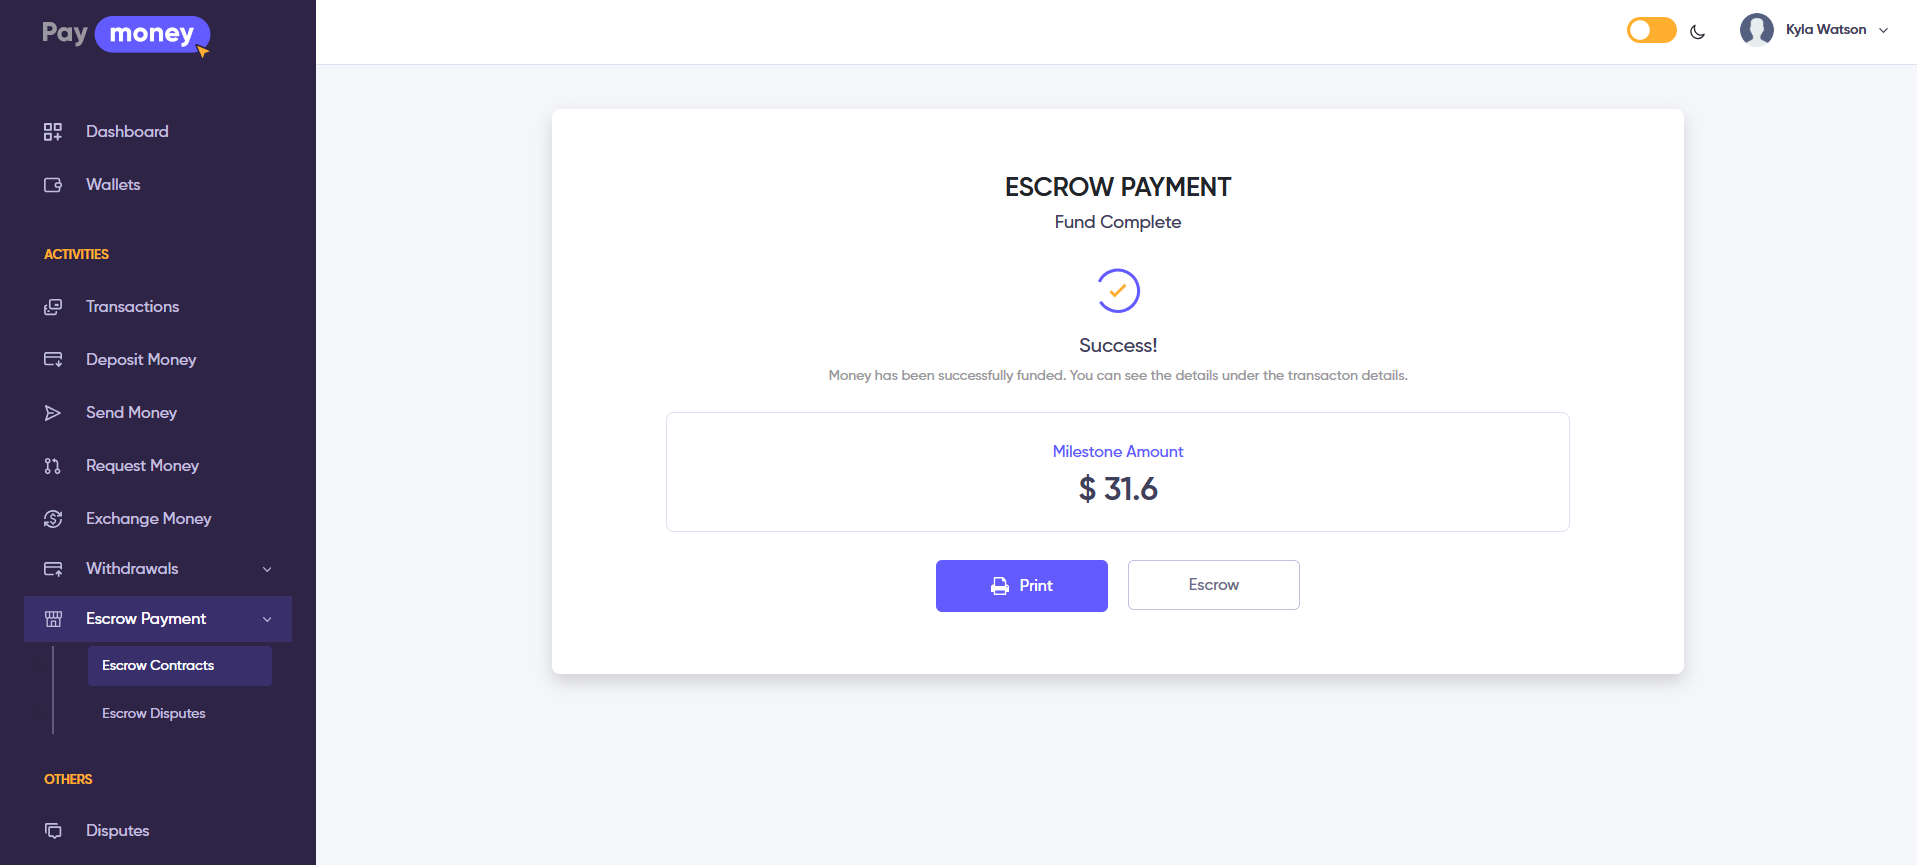
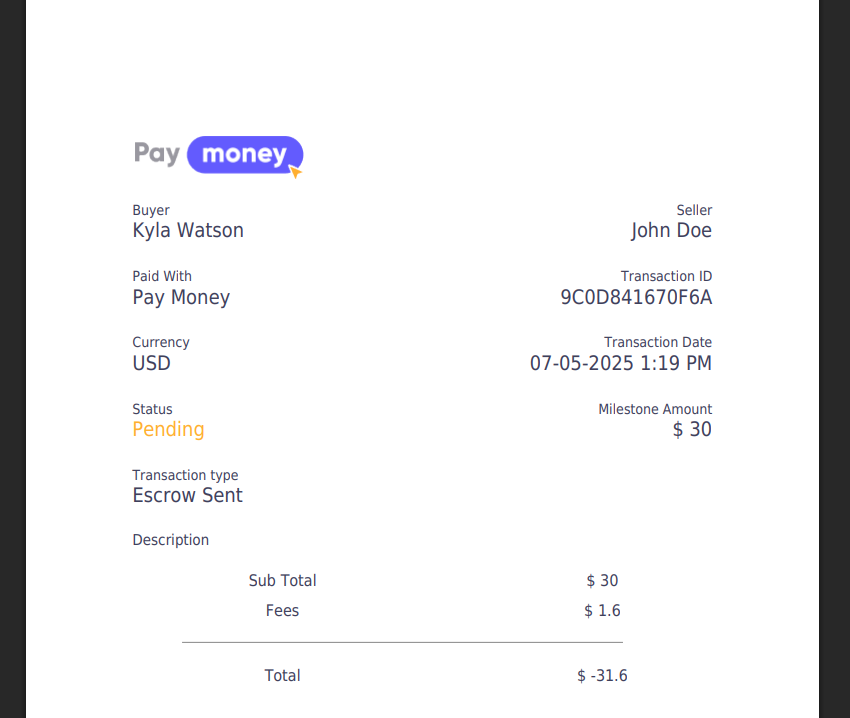
4. After clicking the Confirm & Pay button, the payment is submitted and the payer is redirected to the success page. From there, clicking the Print button will open the printable receipt page. Here, the payment is not yet completed. To proceed, the seller must submit proof for this milestone.
Escrow Milestone Proof Submission
1. After a milestone payment is successfully completed, the buyer can see an eye icon and a print button on the paid milestone row within the contract details page. Clicking the print button redirects to the payment success print page, while clicking the eye icon opens the milestone details page.
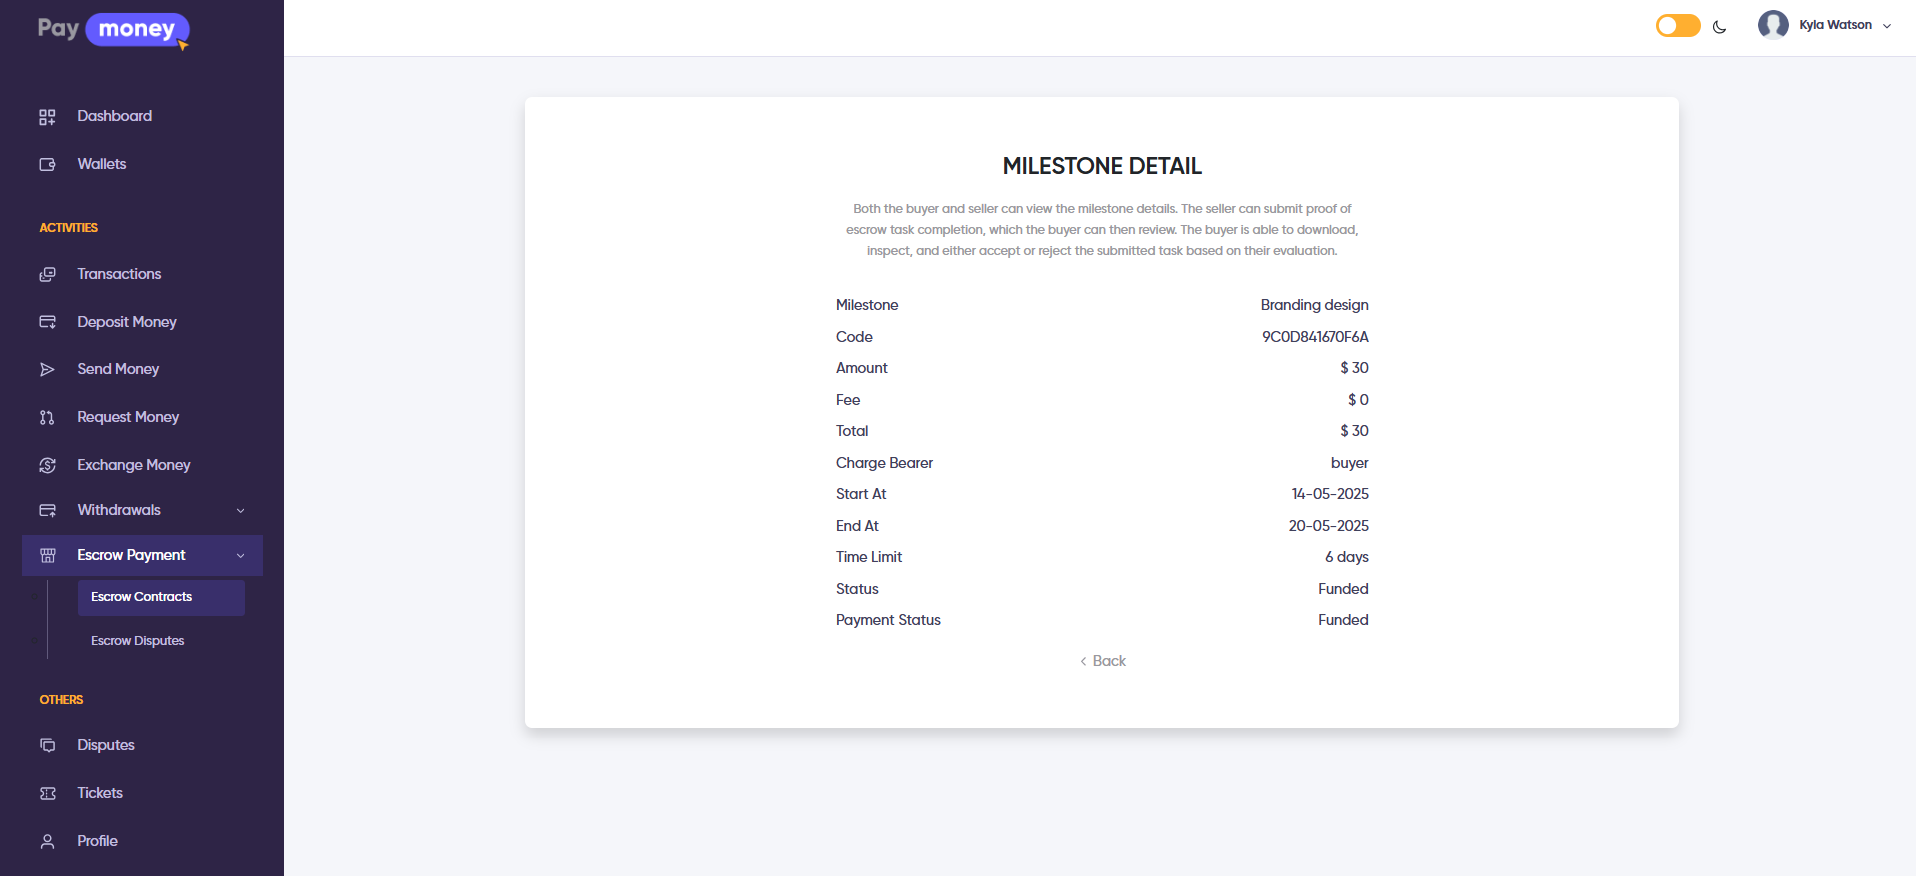
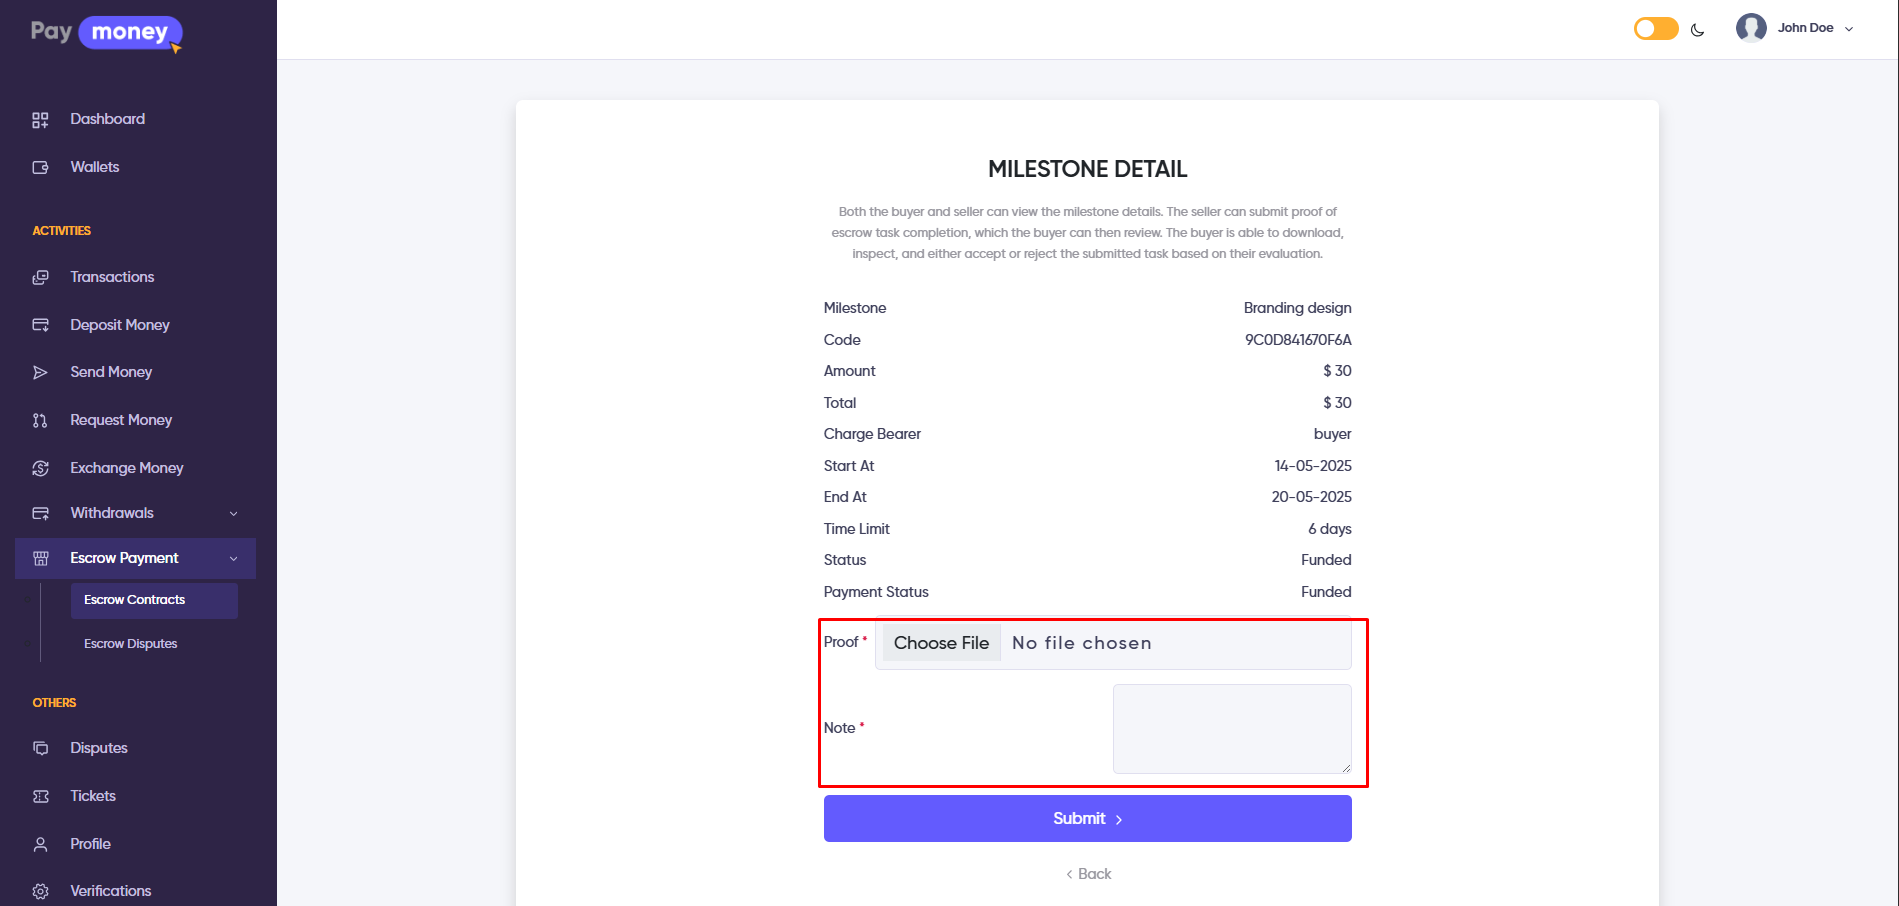
2. In the seller panel, the milestone details page includes a proof submission section. Here, the seller must submit their proof of milestone completion.
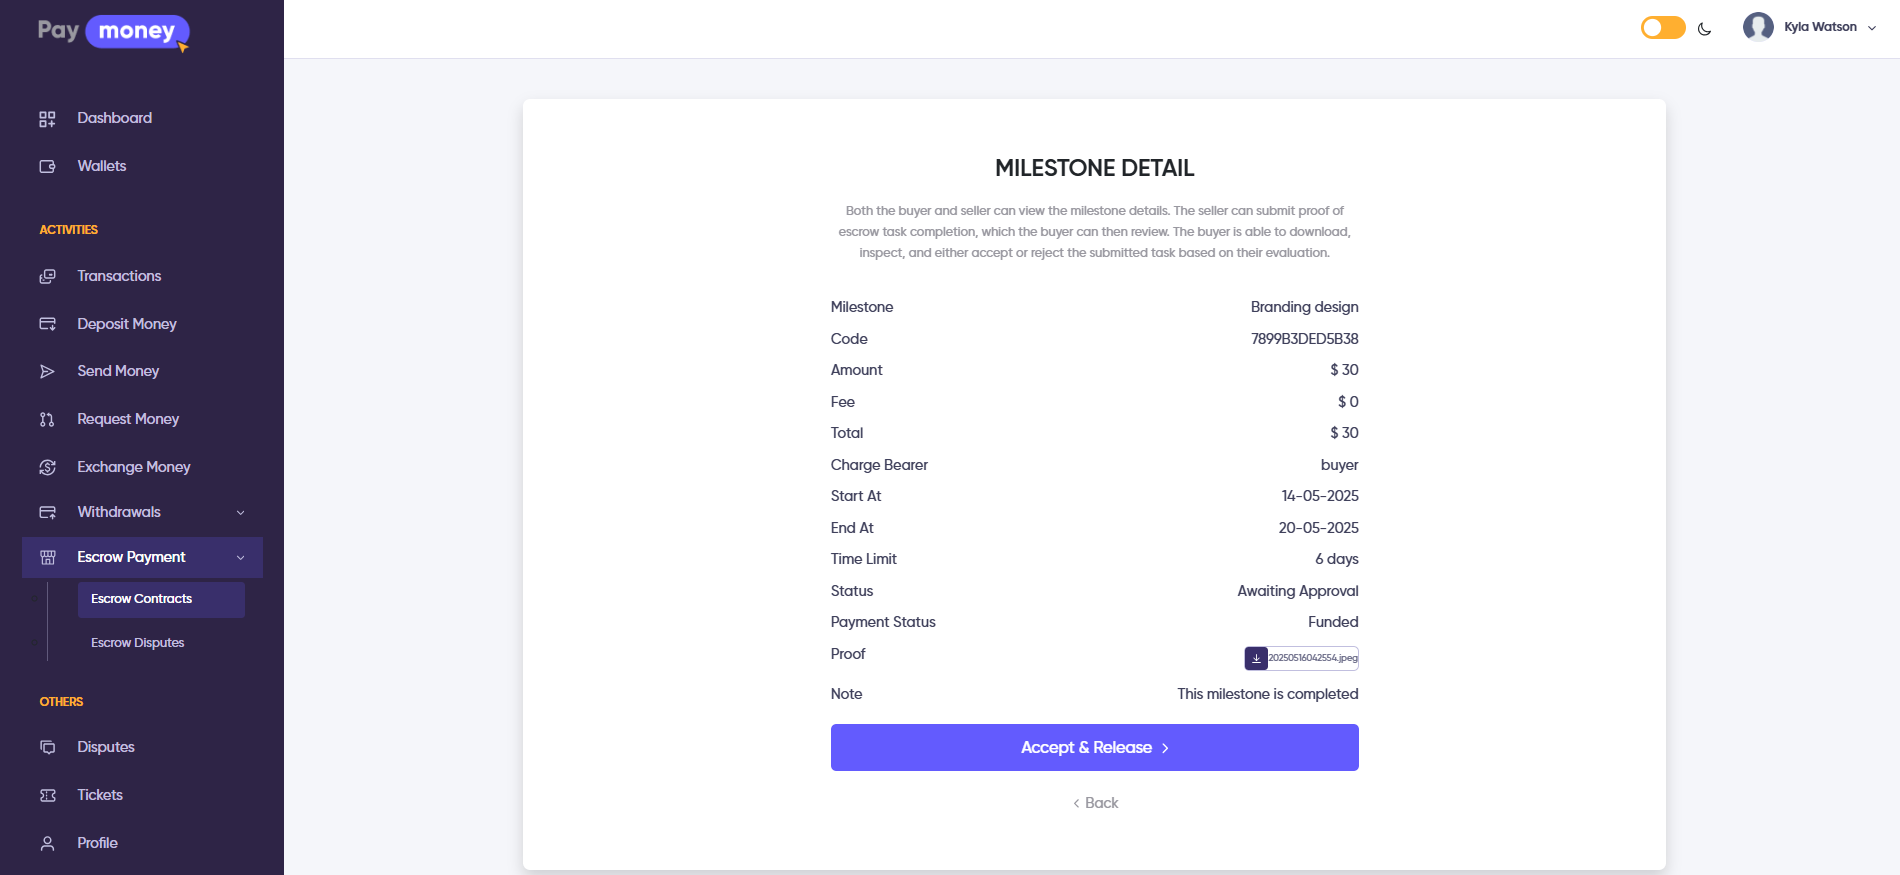
3. After the seller submits proof, the buyer can view it on the same milestone details page in their panel. The buyer must review the proof and release the payment. Once approved, the funded amount will be added to the seller’s wallet.
Escrow Milestone Disputes
1. If the buyer or seller has any concerns about a milestone payment, they can create a dispute for that specific milestone directly from the contract details page.
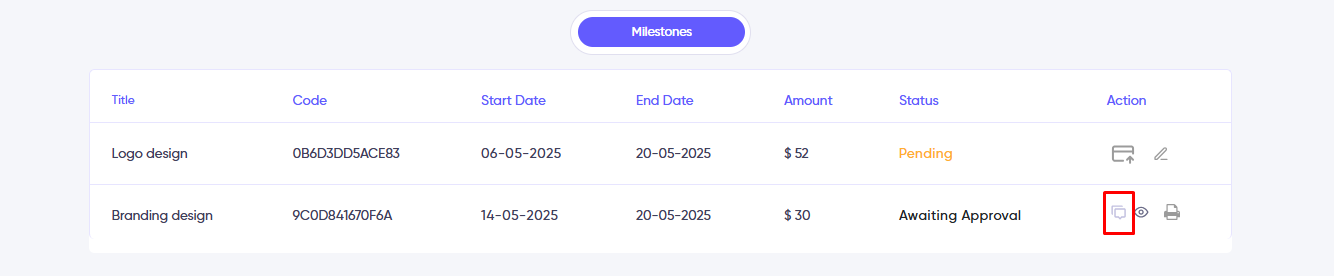
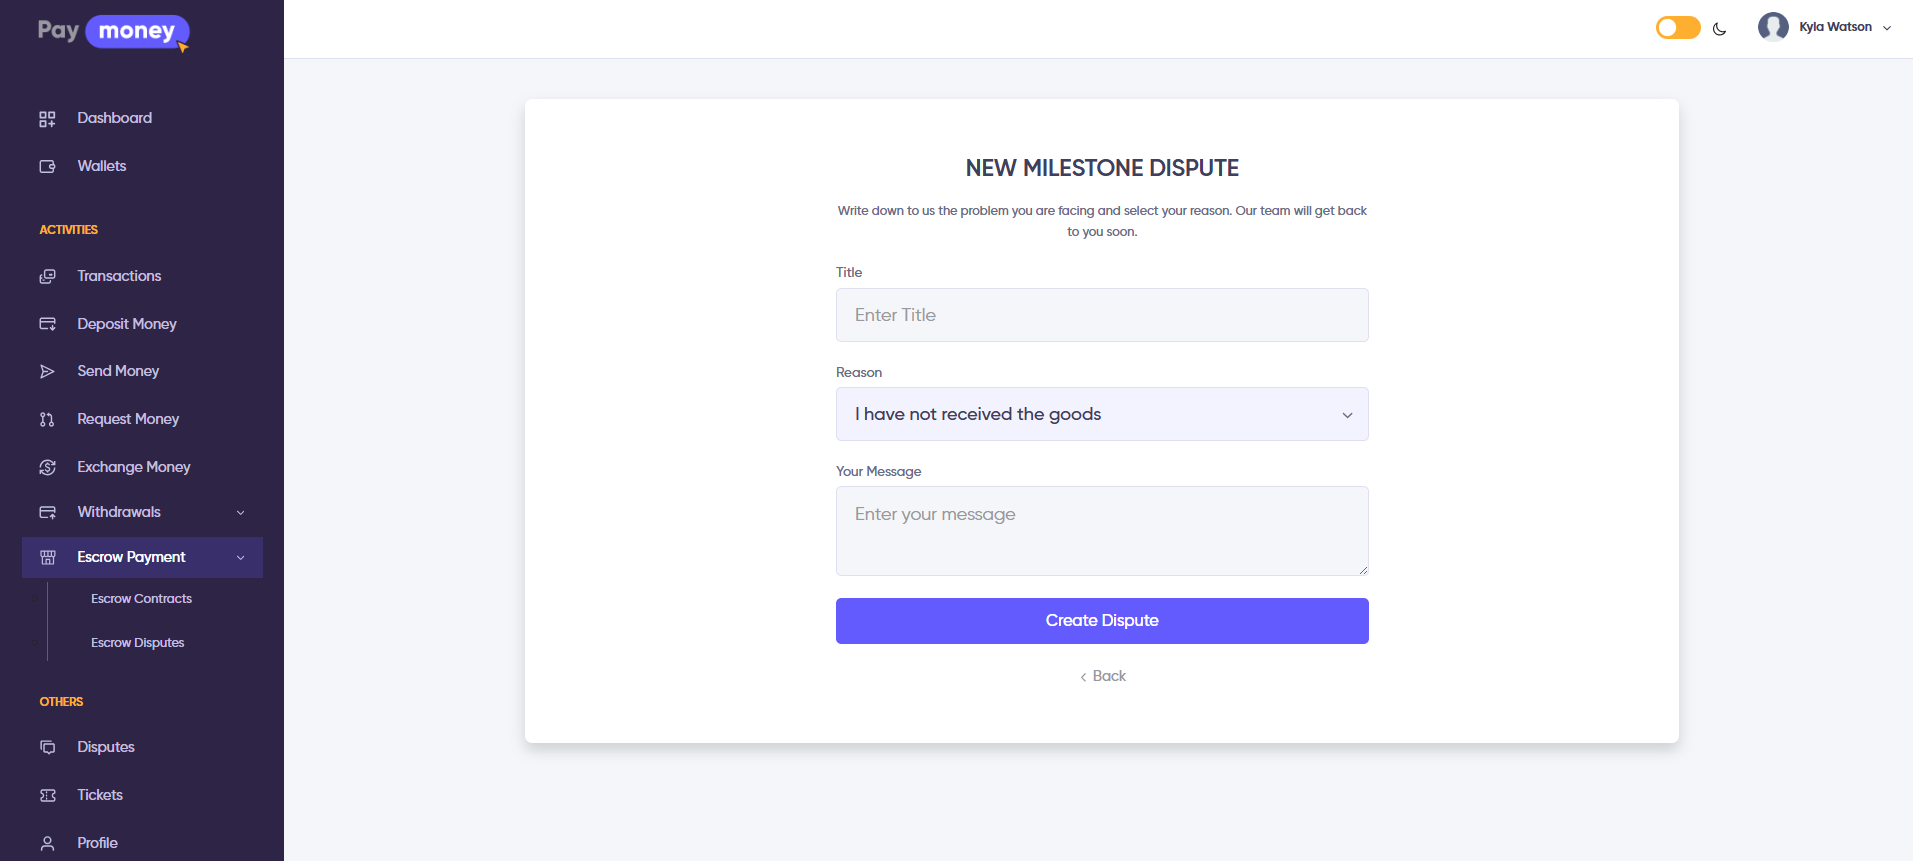
2. After clicking the Dispute button, the user is redirected to the Create Dispute page, where they can submit a dispute based on their concerns or preferences.
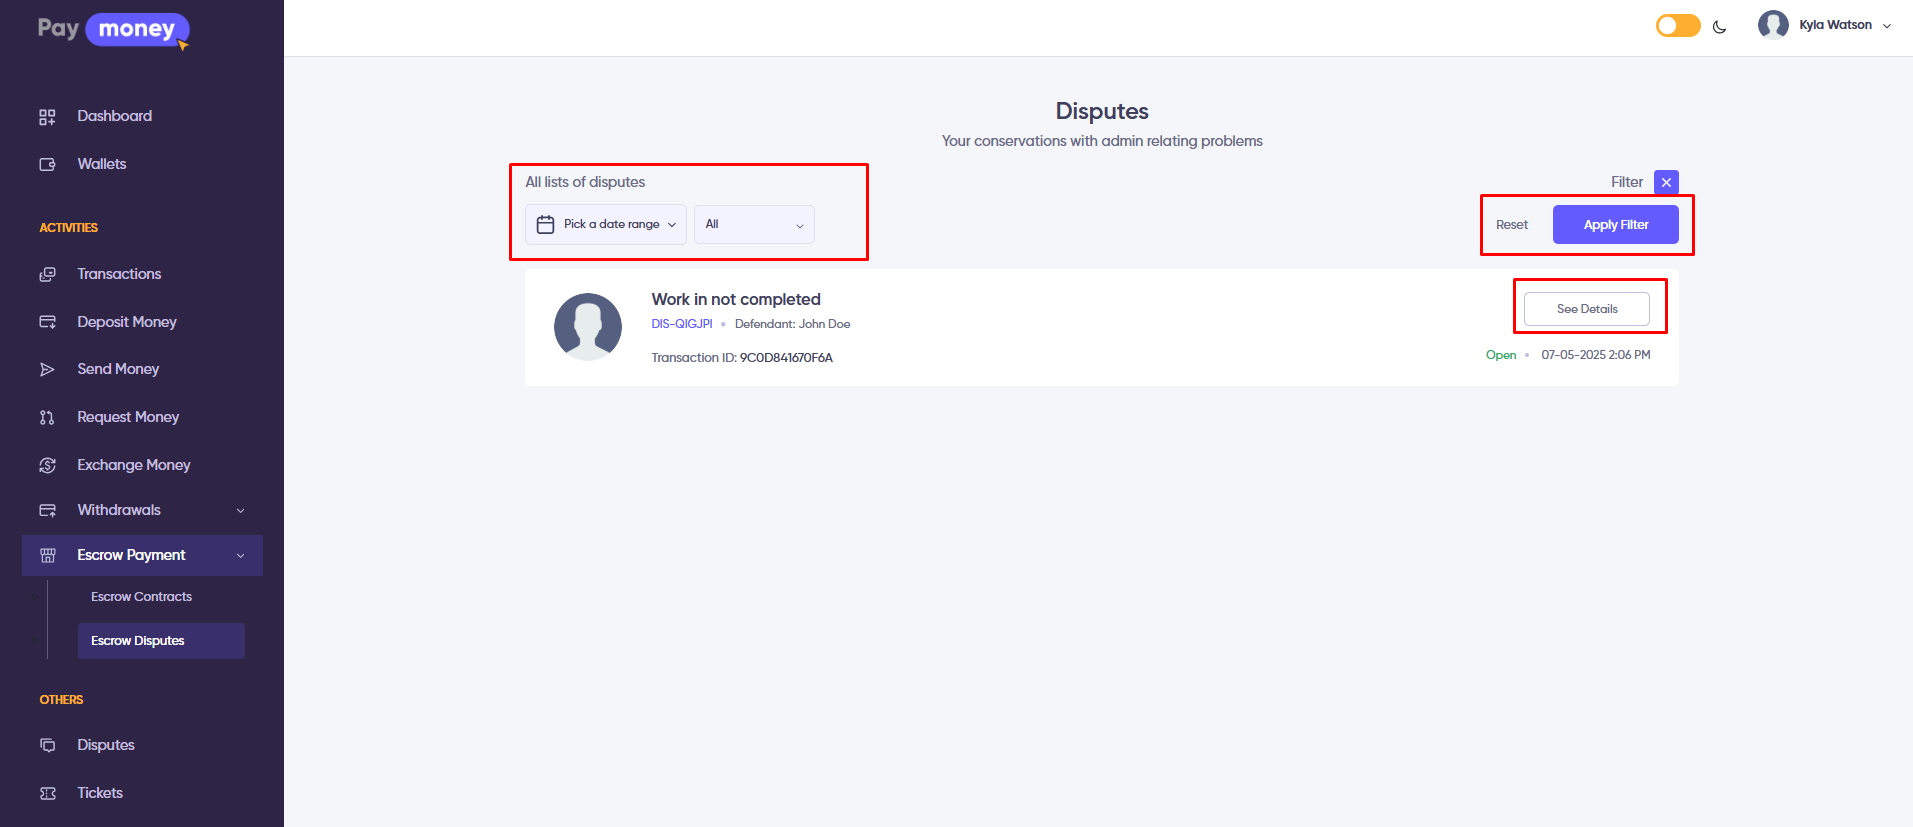
2. After creating a dispute, the user is redirected to the Escrow Dispute List under the Escrow Payment menu. Here, users can filter disputes by date range and status. Clicking the See Details button allows access to the dispute conversation.
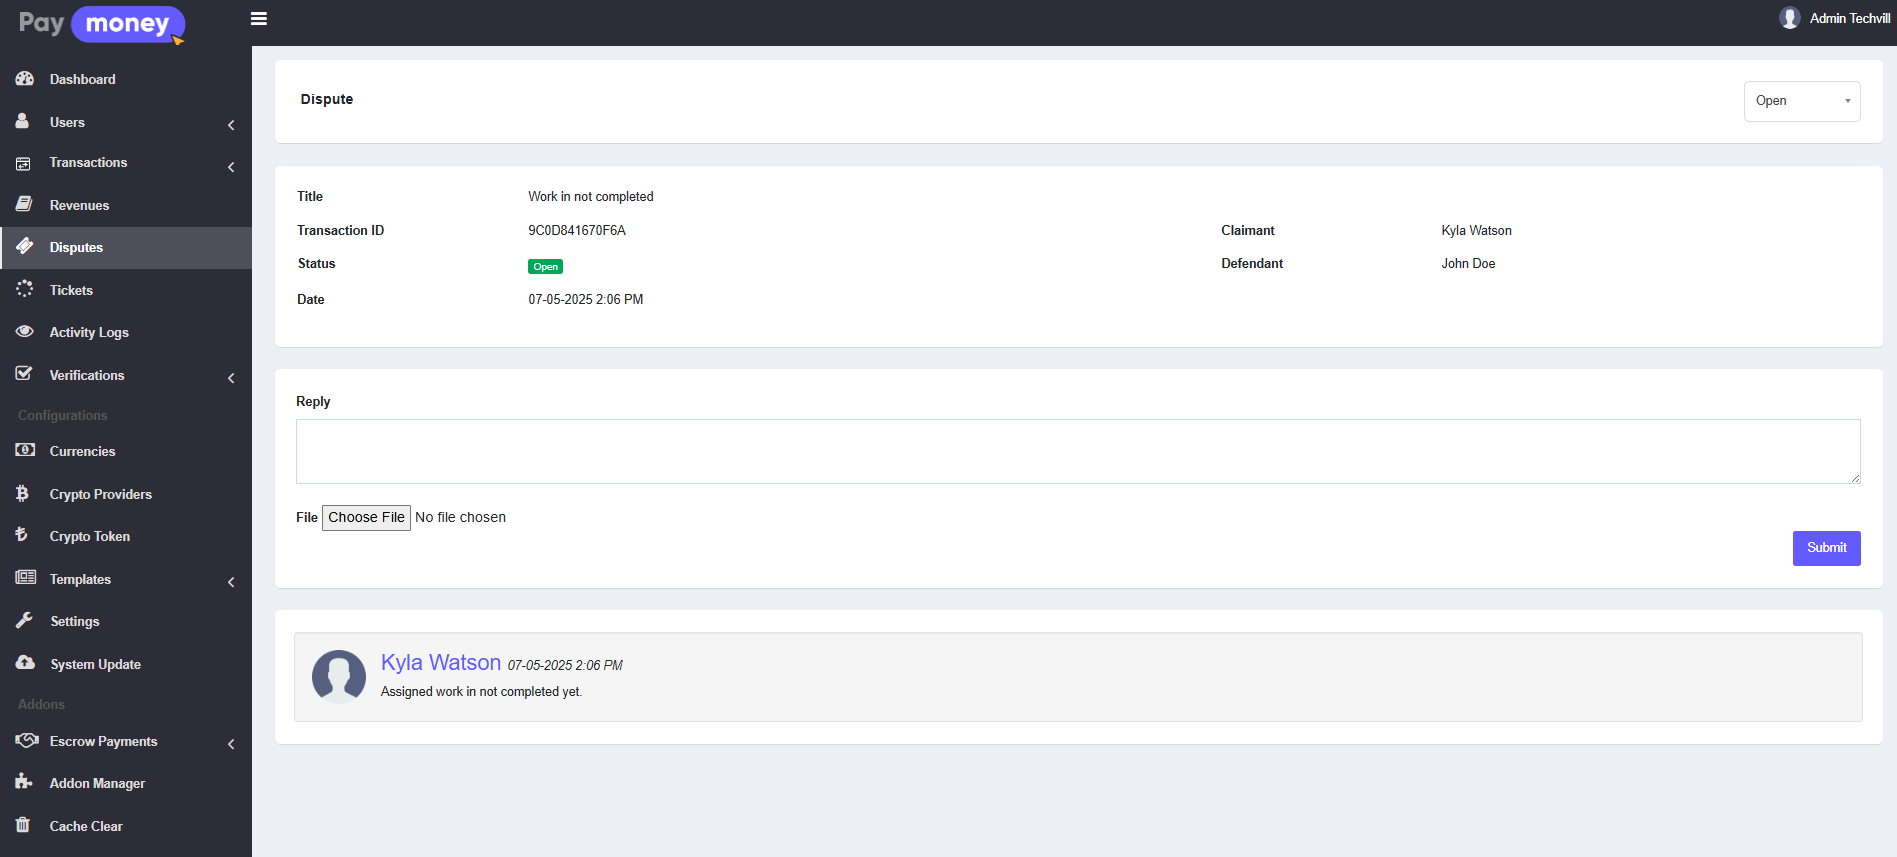
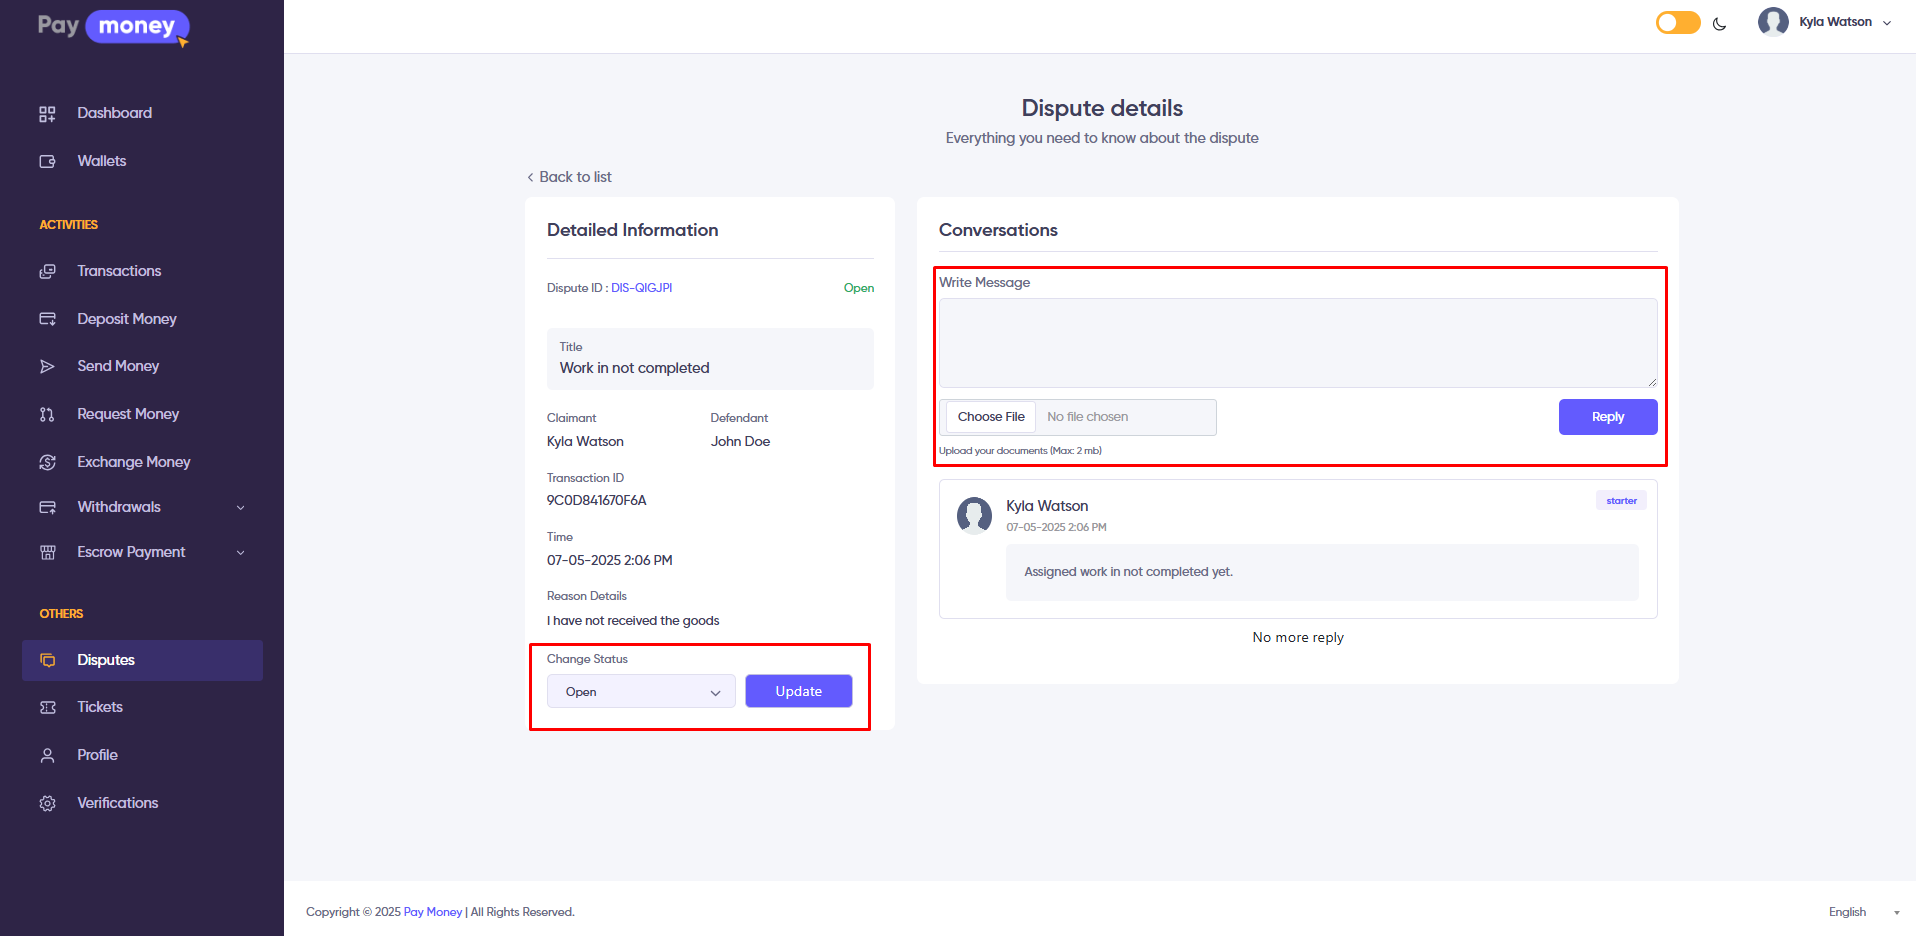
3. On the dispute details page, users can communicate with each other through the conversation thread. Admins can also view and reply to the conversation. Both the buyer and seller have the ability to change the status of the dispute.
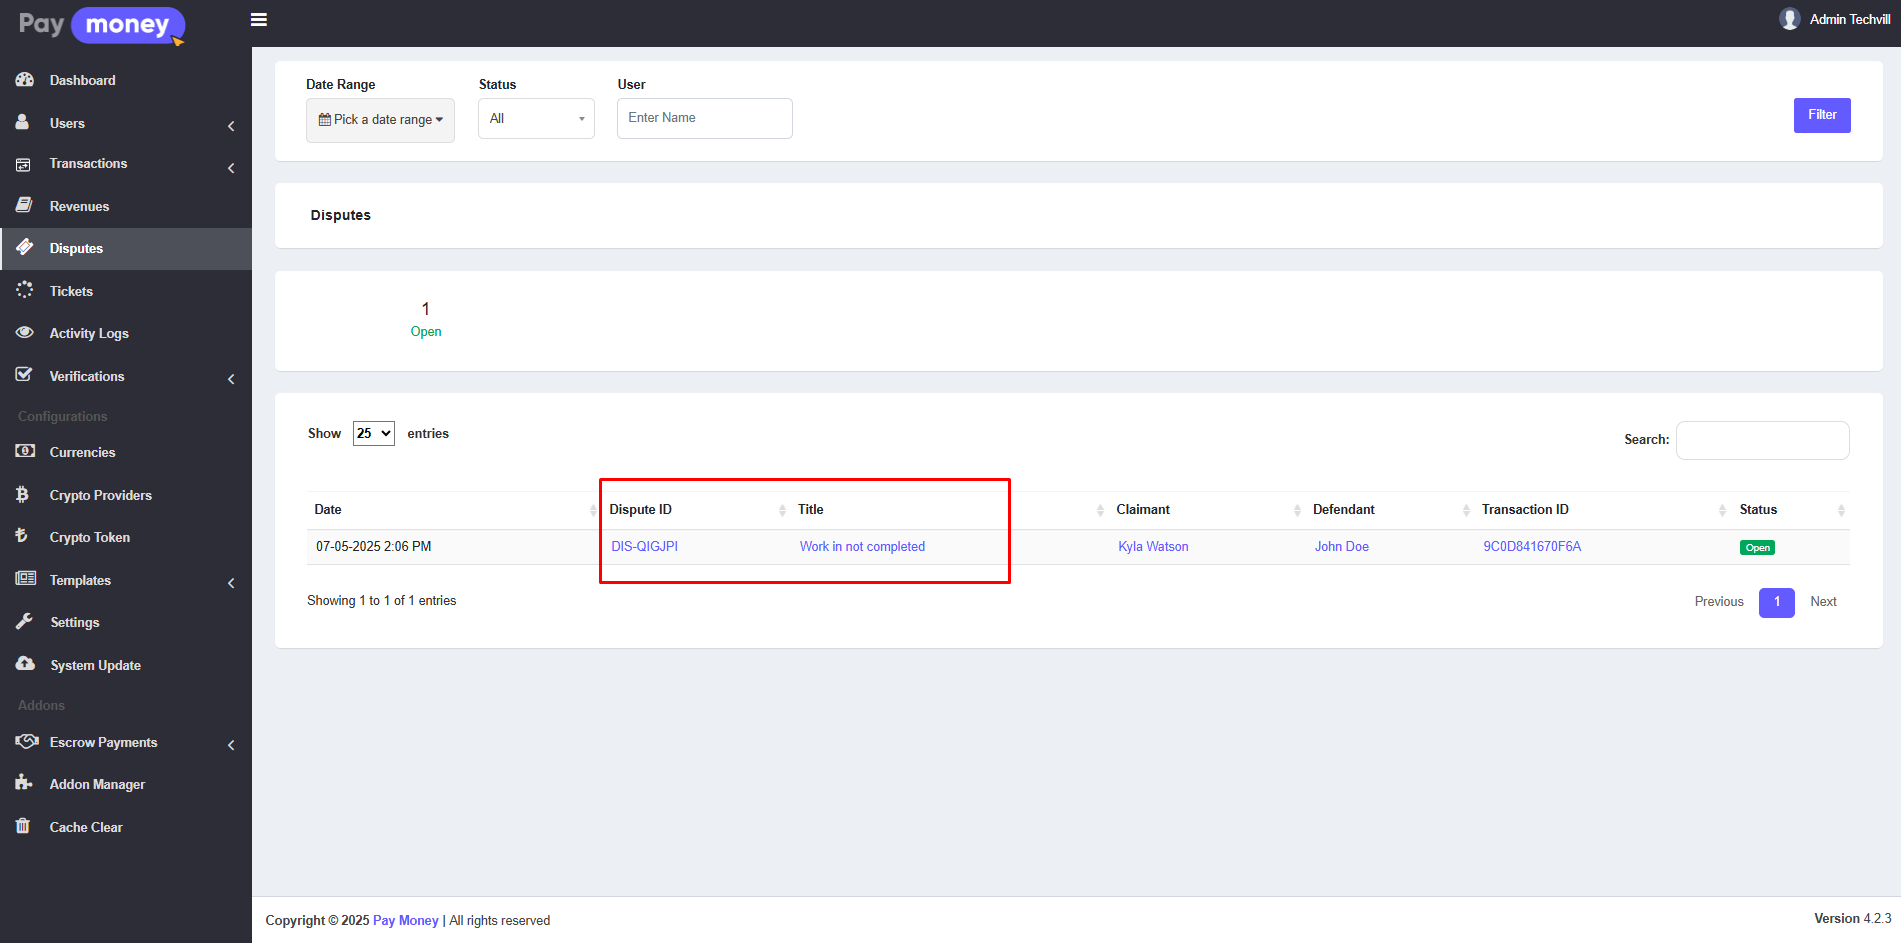
4. Admins can view dispute conversations from the admin panel. To access them, navigate to Admin Panel >> Disputes. Here, the admin can see all milestone payment disputes. Click on the Dispute ID or Title to open the dispute details page.