Standard merchant
Merchant
There are two types of merchants available in our script.
- Standard Merchant
- Express Merchant
Here we will talk about the Standard Merchants.
Merchant Create
The mechants can be created by only the Merchant user. Regular user are unable use this feature.
To create a merchant, only Merchant users have the authority. Regular users cannot access this feature.
Follow these steps to create a Merchant:
- Go to
User Panel > Merchants > Merchants. - Click on
New Merchant. - Fill in all the necessary information.
- Select the Merchant Type as a
Standard. - Click
Create merchant. - Upon successful creation, you'll be redirected to the
Merchants listpage. - Initially, the new merchant will be in the
Moderationstate. - The admin must change the status to activate the merchant.
Change Status
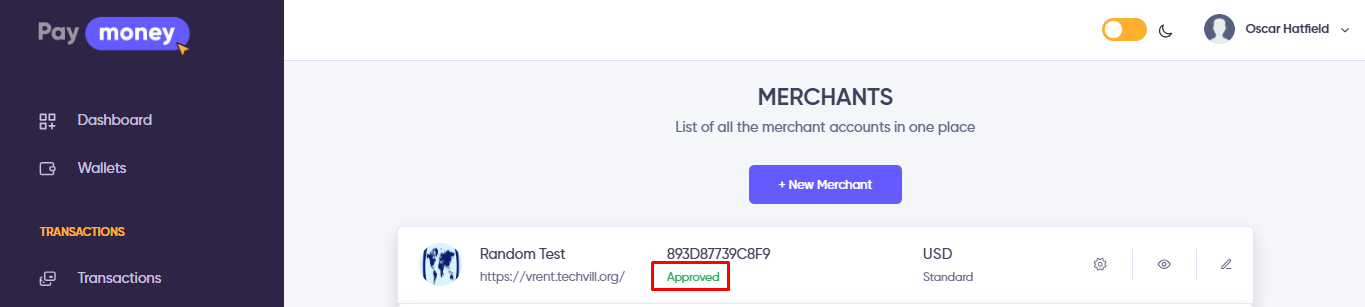
After a new merchant is created, the admin receives a notification via email. To approve the merchant, the admin should follow these steps:
- Go to
Admin Panel > Users > Merchants. - Here, the admin will find a list of merchants.
- Click on the
Editoption of the newly created merchant. - Change the status from
ModerationtoApproved.
After changing the status from Moderation to Approved in the admin panel, the updated status will be reflected in the user panel for the merchant.
Take Payment from customer
Generating Form
Once a Standard Merchant generates a form for an individual product, the form will be provided in HTML format. This HTML code can be embedded into their website, enabling customers to make payments for the product.
Additionally, upon form generation, a QR code will also be generated. This QR code can be utilized for payments using the WalletPay App.
To generate a payment form, follow these steps:
- Navigate to
Merchants > Merchants. - Click on
Generate HTML Payment Formfor the specific merchant. - Provide the required information for
Item Name, Order Name, Price. - Click
Generate Form. - The form will be generated along with a QR code.
- You can copy the HTML code of the payment form and implement it on your website.

Customer making payment
When a customer opts to buy a product and selects the Paymoney payment method, they need to follow these steps:
- A new page will appear for the customer.
- Click on
Pay Now. - The customer will see the order details on this page.
- The user will have three payment options:
Paymoney, PayPal, Stripe. - For
PayPal and Stripe, customers can use a Credit Card for payments. ForPaymoney Wallet, the customer must have a Paymoney account and make the purchase using their Paymoney Wallet. - After selecting the payment method, click
Confirm. - Provide the necessary credentials and click
Confirm Payment. - If the payment is successful, the page will display "Payment Successful".

After a successful payment, the transaction details will be accessible in the Transaction Section.
![]()