Virtual Card Module
The virtual card feature enables online payments without the need for a physical card. Similar to traditional debit or credit cards, virtual cards generate unique card numbers for each transaction or account, enhancing security and minimizing fraud risks. Our PayMoney online platform offers both manual and automated virtual card issuance, designed for personal and business needs.
Admin Panel
Card Holders
1. The admin can view the list of virtual card holders from the admin panel. To access the list, navigate to Virtual Card >> Card Holders. Here, the admin can see card holders submitted by different users. The list can be filtered using various options, including Date Range, Type, Country, Status and User. Additionally, the holder list data can be downloaded in CSV or PDF format. Each card holder has an eye icon; clicking on it displays the details of the specific virtual card holder.
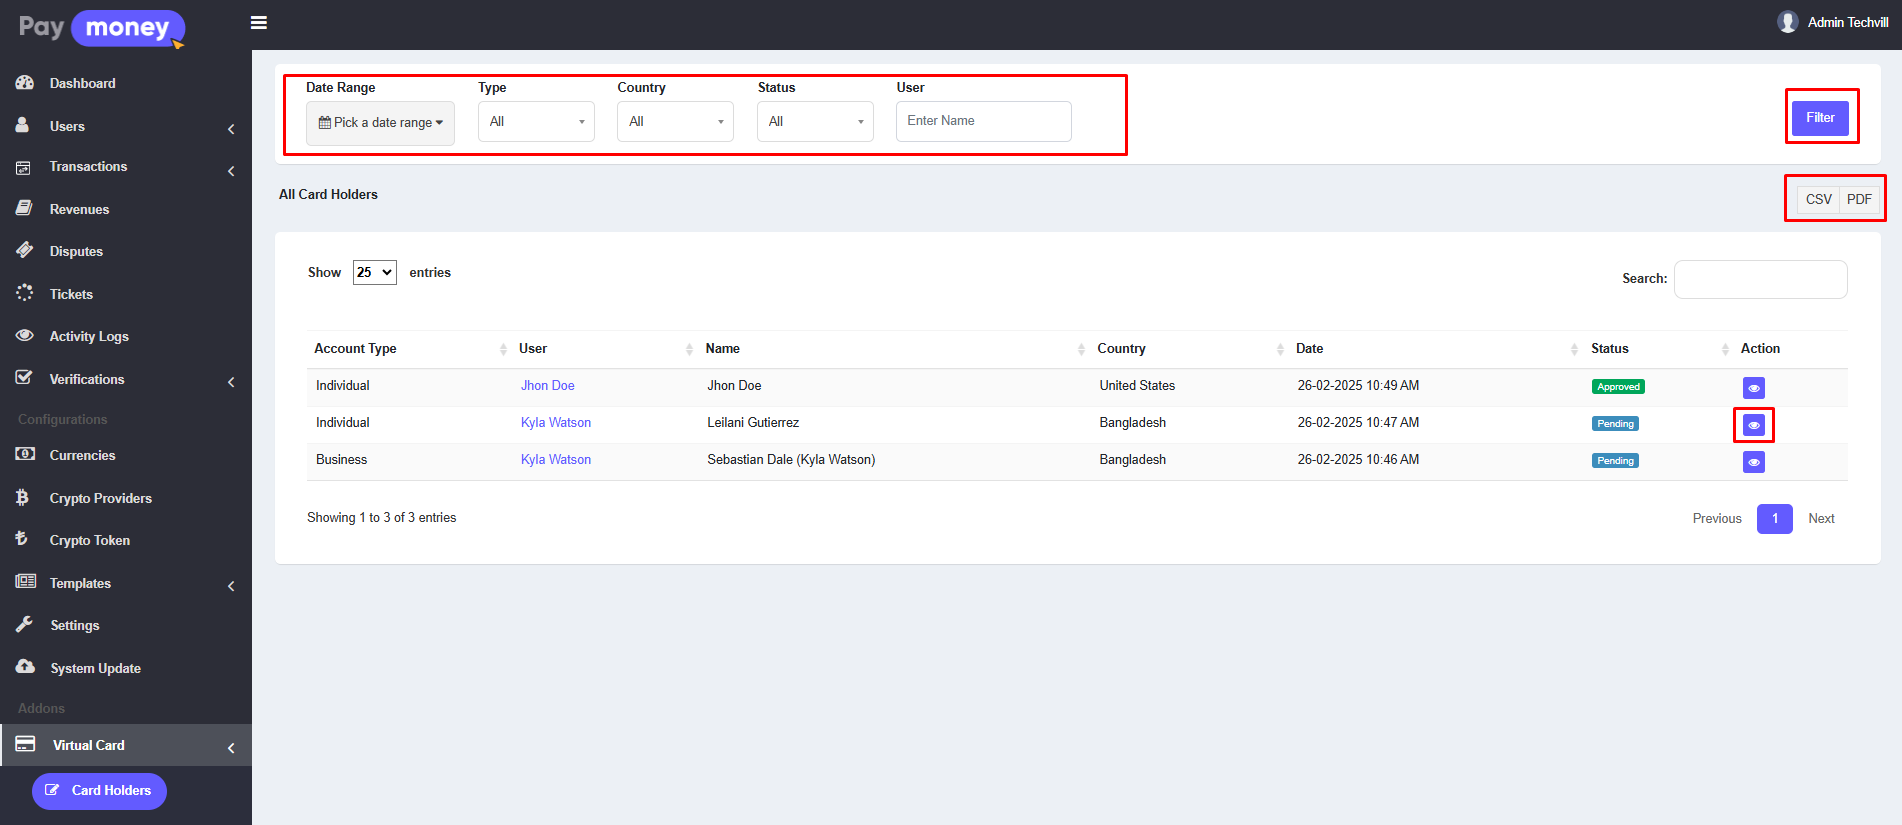
2. After clicking the eye icon, the admin can view the details of the specific virtual card holder. If the holder's status is Pending, the admin can either Approve or Reject the holder application. After clicking the Approve button, the admin can approve the card holder using either the Manual Provider or the Automated Provider via API. The providers are displayed from the available providers list on Virtual Card >> Providers.

Cards
1. The admin can view the list of virtual cards from the admin panel. To access the list, navigate to Virtual Card >> Cards. Here, the admin can see the virtual cards of different users. The list can be filtered using options such as Date Range, Brand, Currency, and Status. Additionally, the card list can be downloaded in CSV or PDF format. Each row includes an eye icon and an edit icon. Click the eye icon to view the details of a specific virtual card, or click the edit icon to modify it.
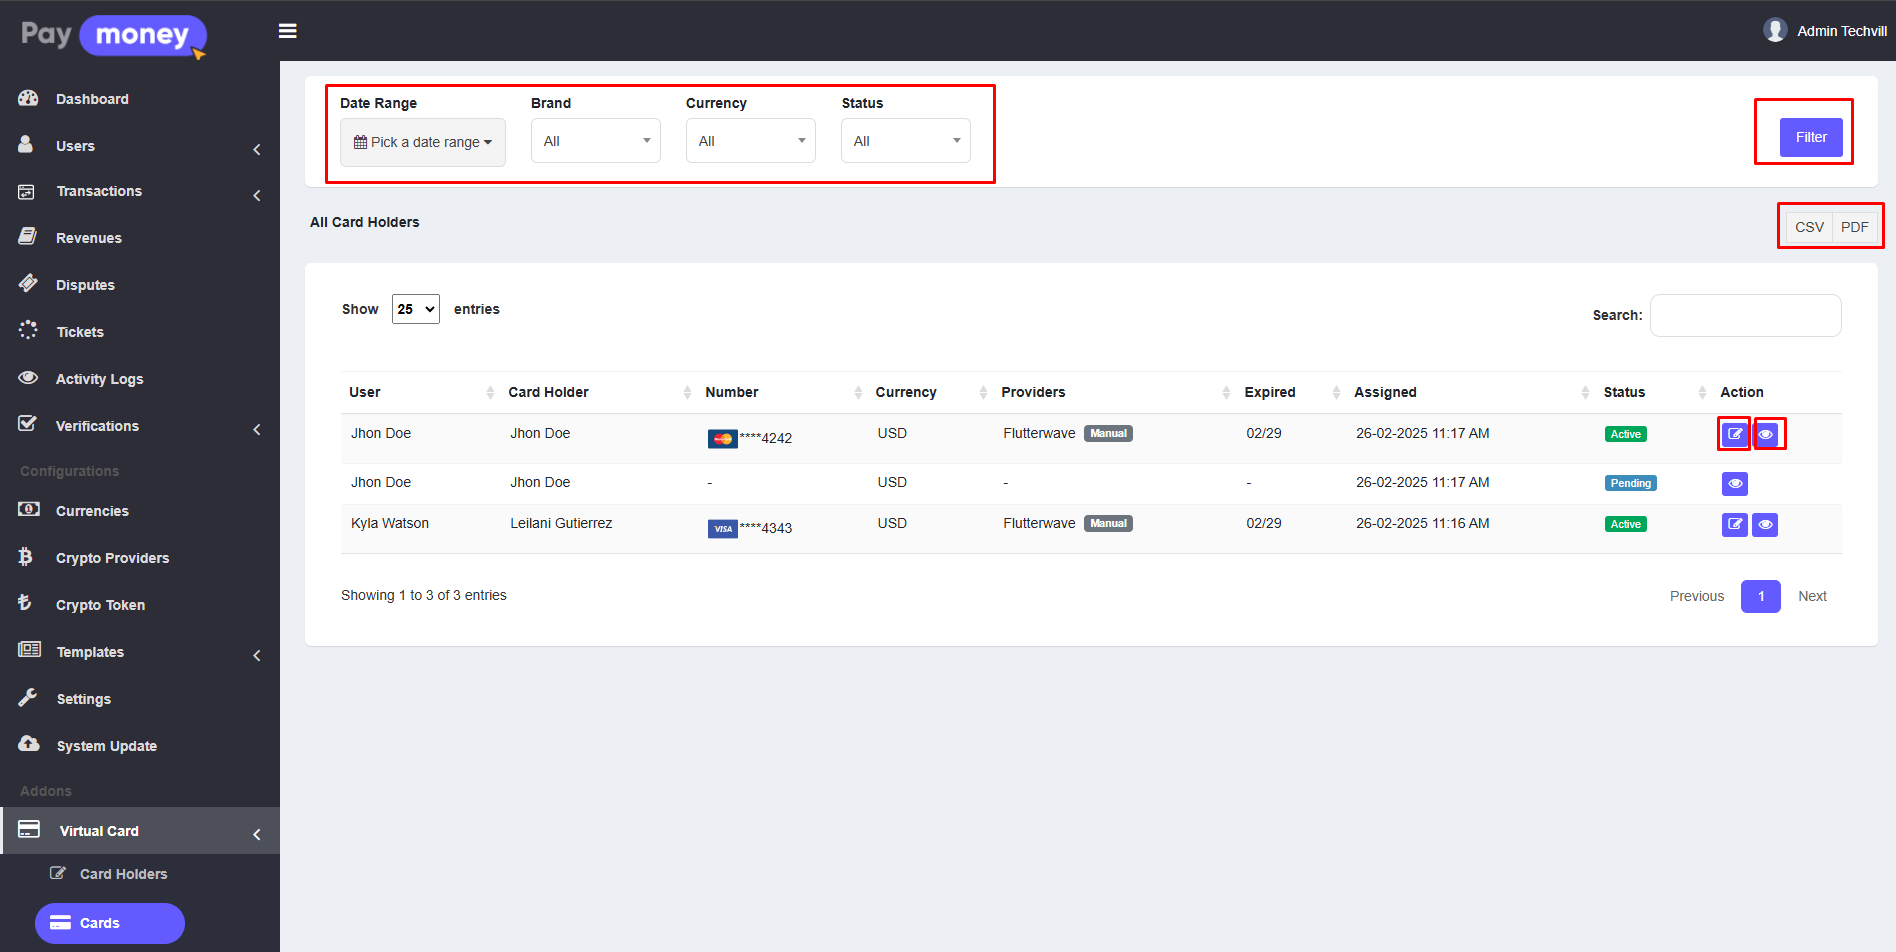
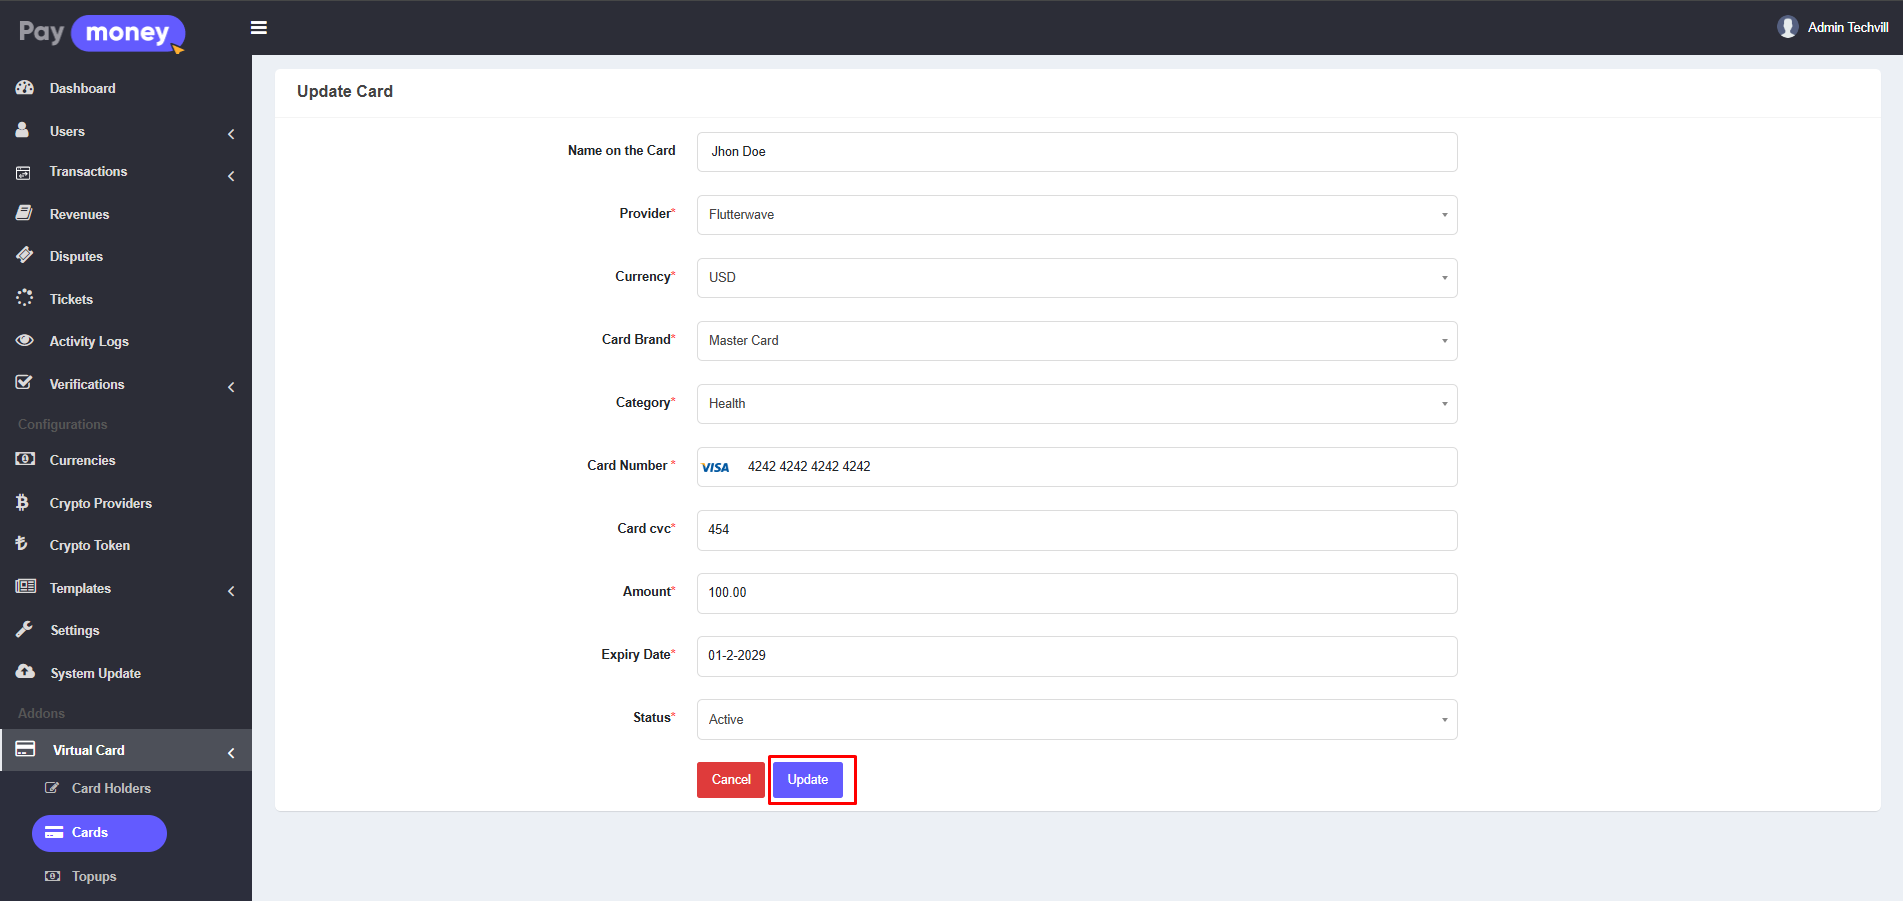
2. After clicking the edit icon, the admin can edit the virtual card.
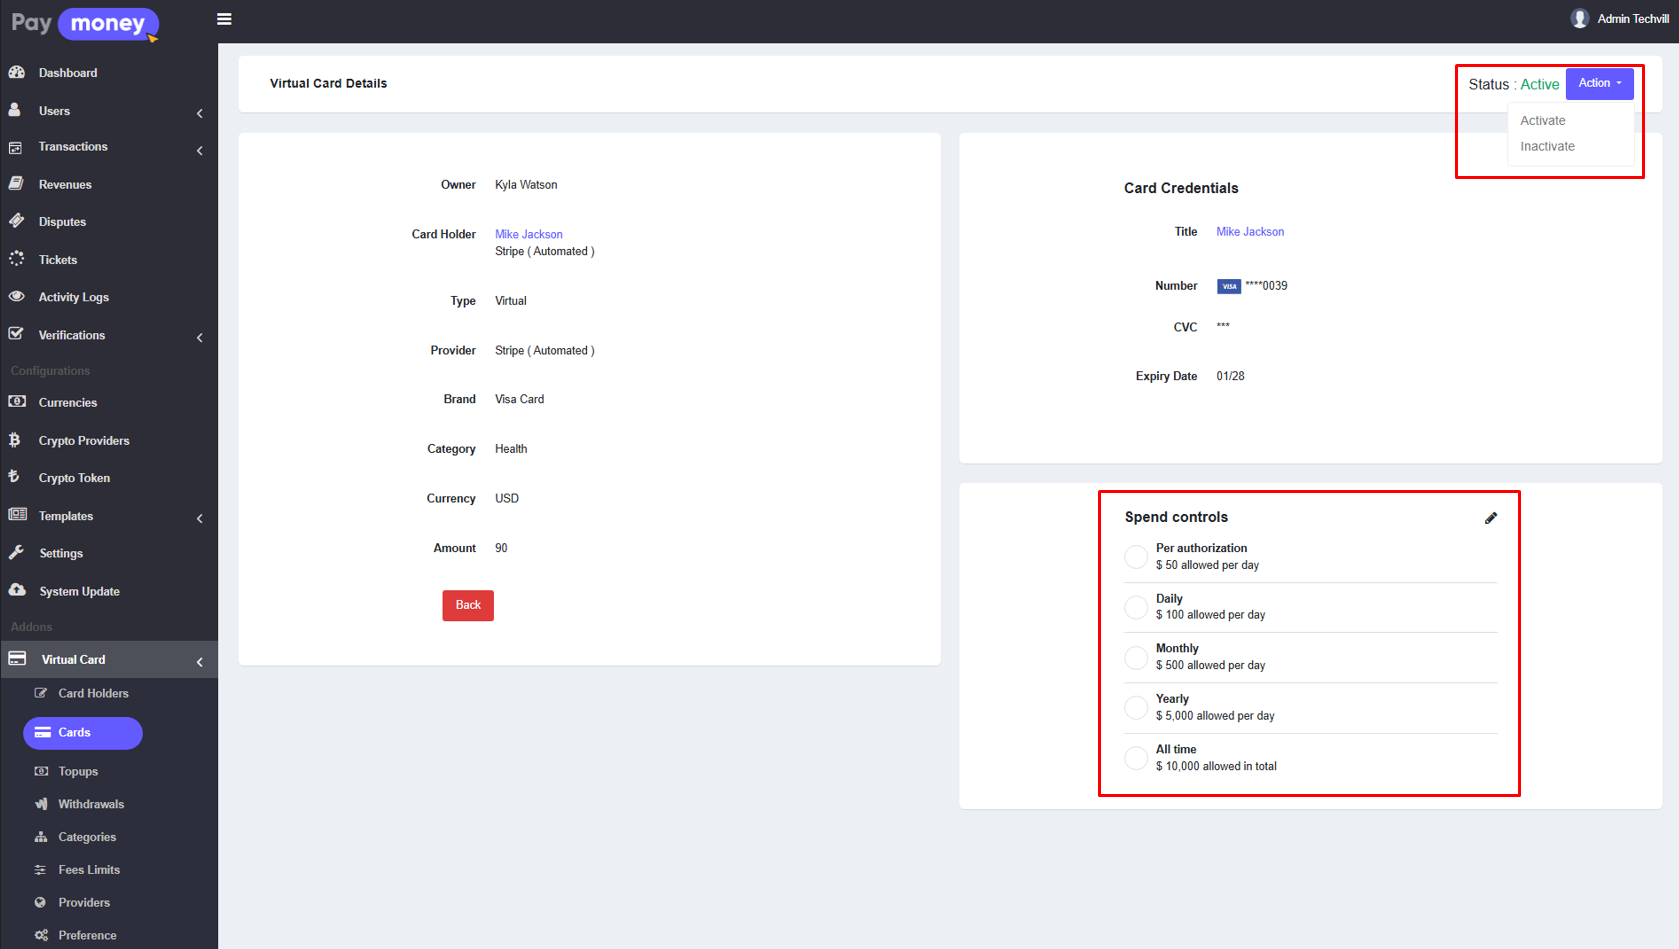
3. After clicking the eye icon, the admin can view the details of the specific virtual card. If the card's status is Pending, the admin can either Approve or Reject the card. After clicking the Approve button, the admin can approve the card using either the Manual Provider or the Automated Provider via API.
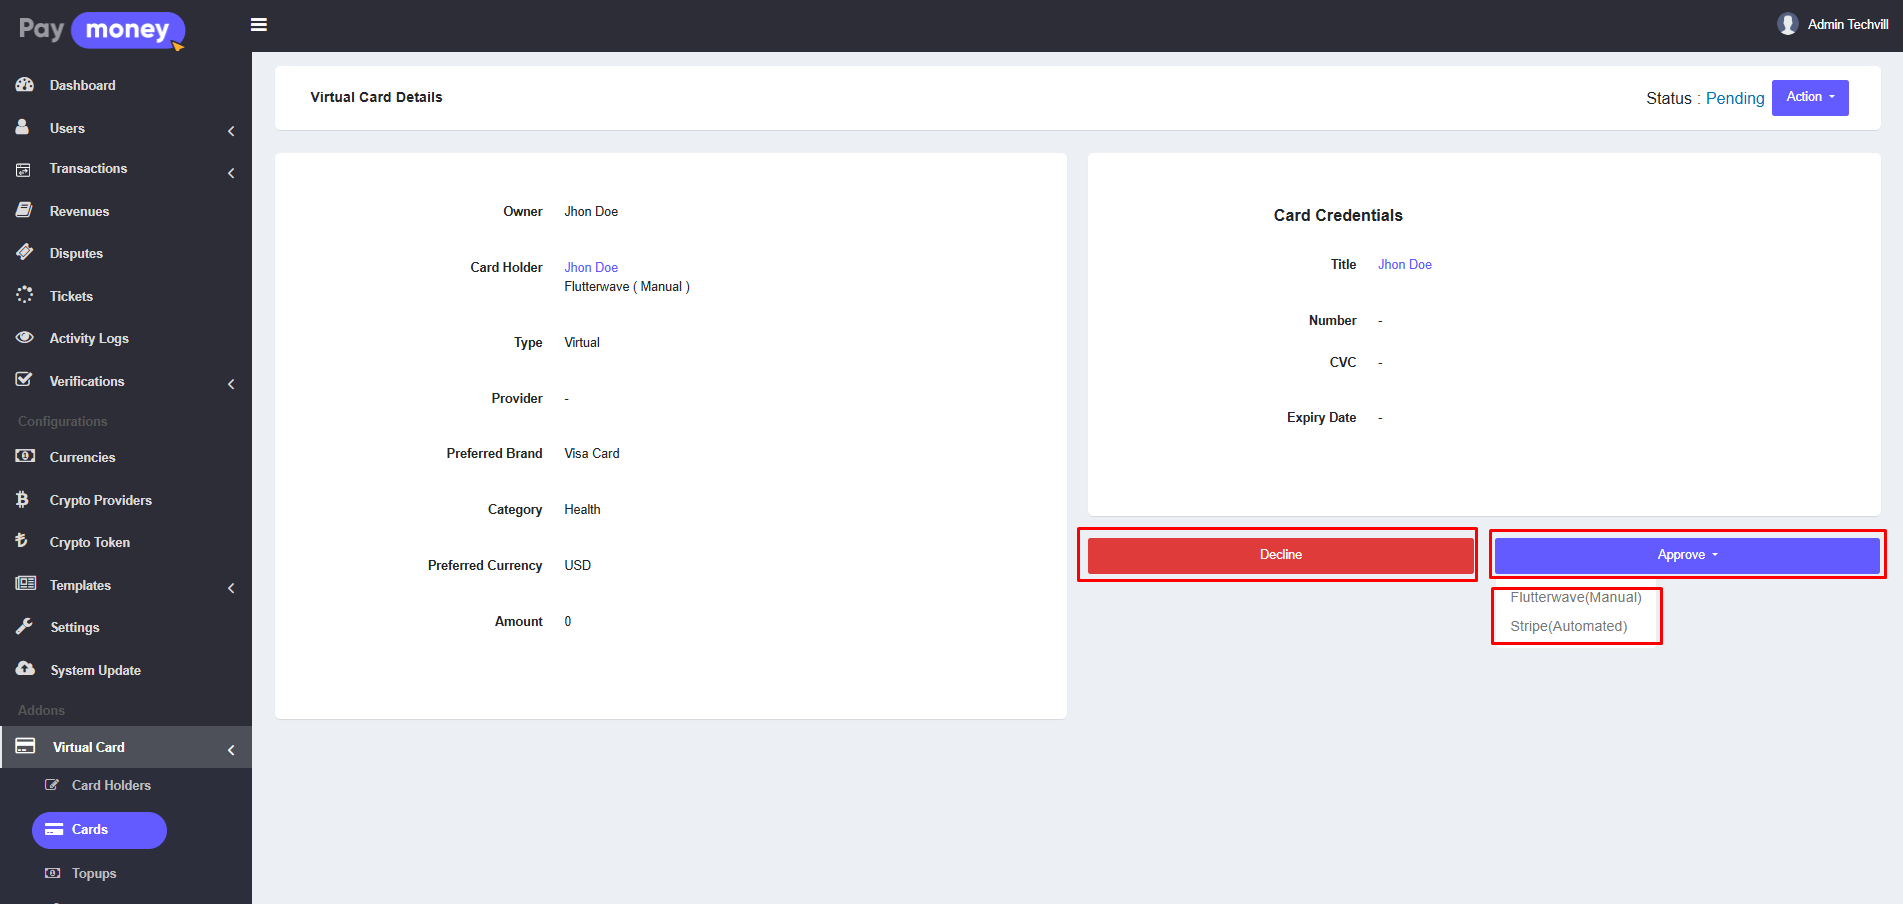
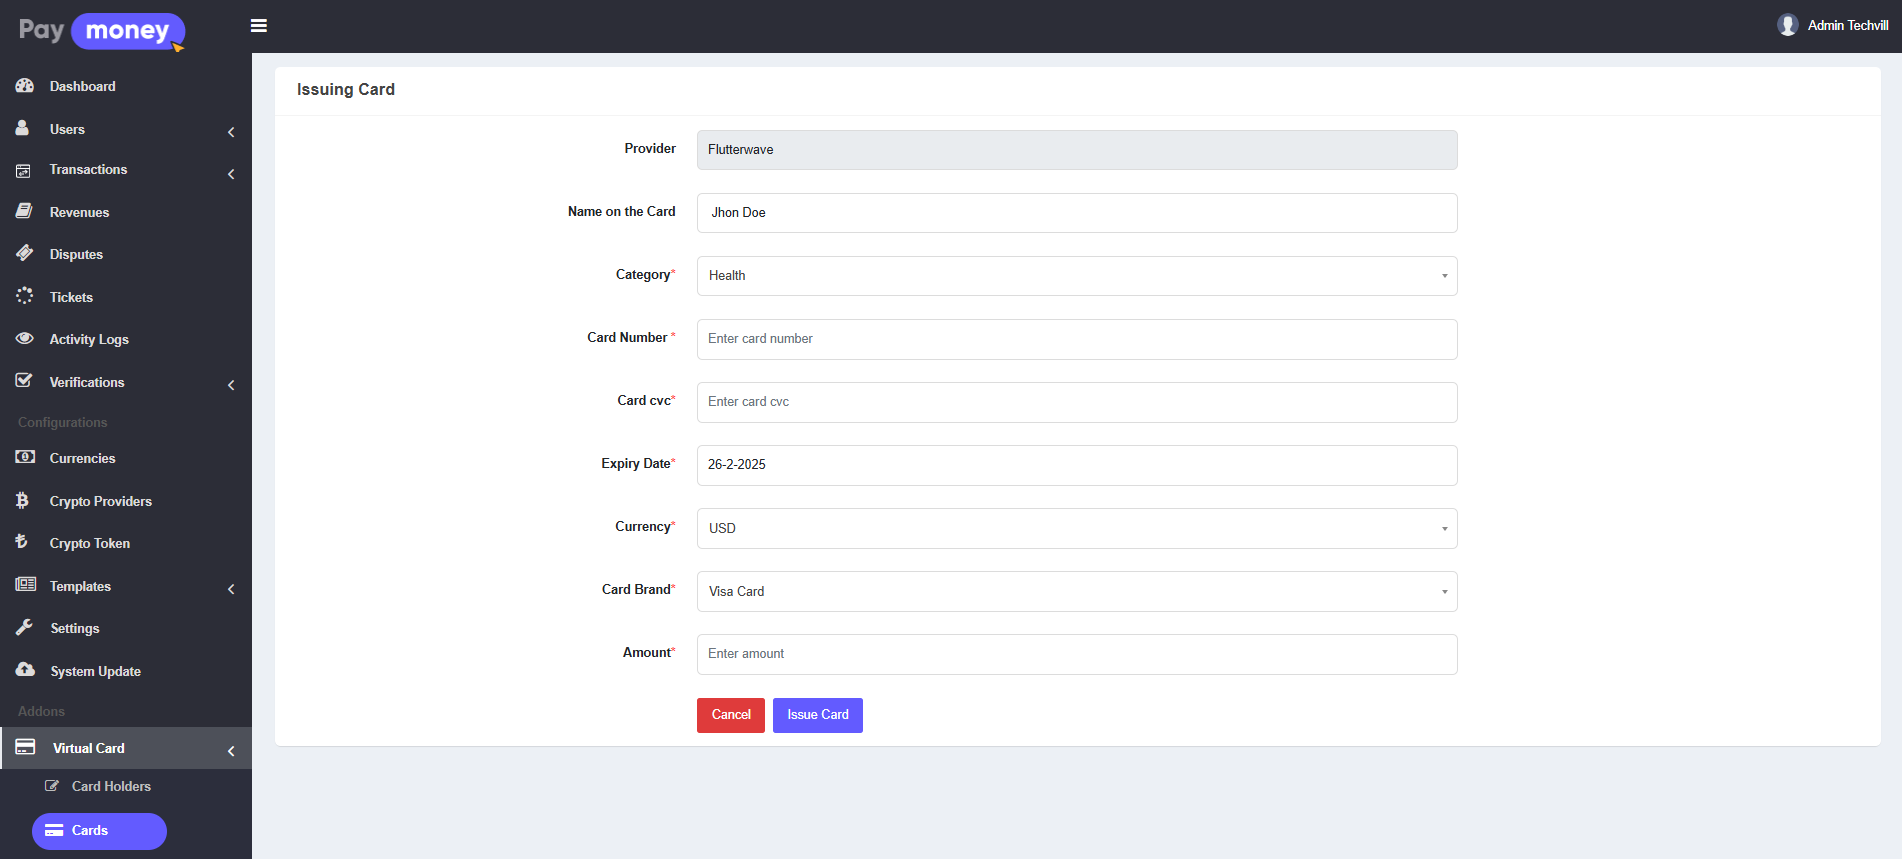
4. After clicking on Manual Provider, the admin will be redirected to another page where they need to manually issue a card.
5. On the details page, after approval, the admin can set the spending control of a card. Additionally, the admin can active, inactive, or freeze the card from this page.
Topups
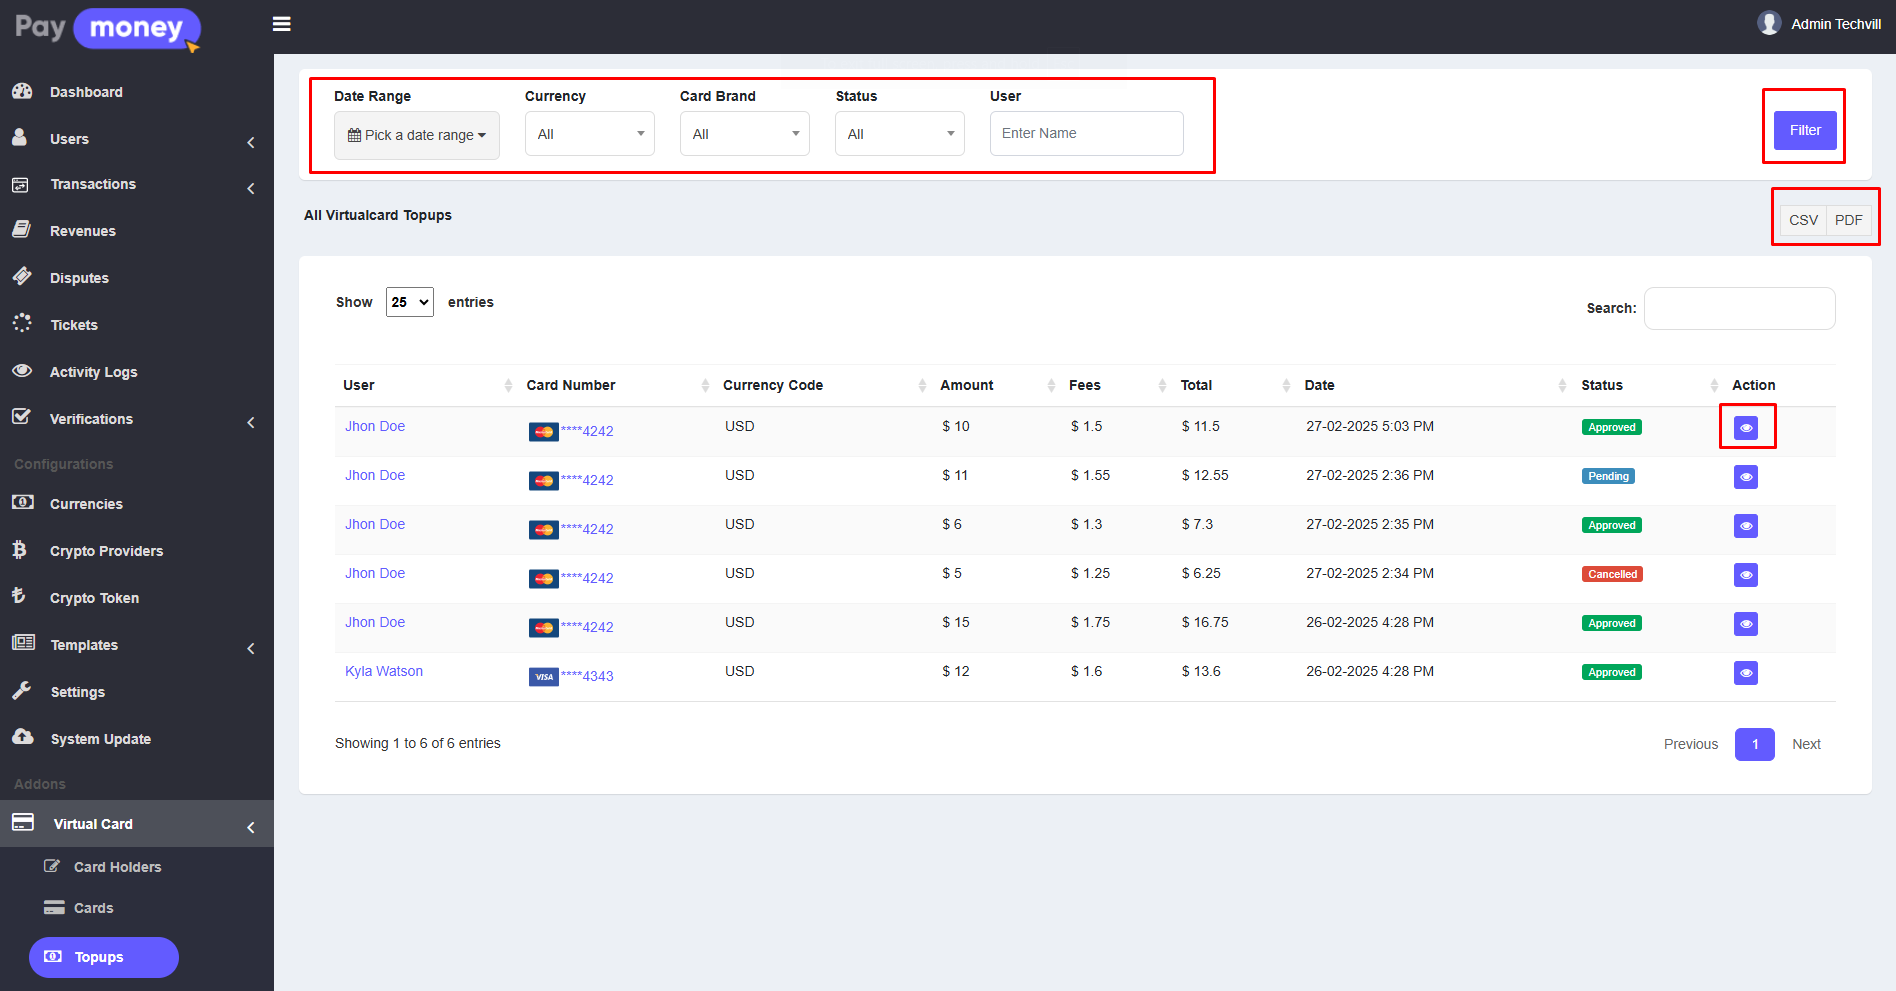
1. The admin can view the list of topups from the admin panel. To access the list, navigate to Virtual Card >> Topups. Here, the admin can see the topups made by different users. The list can be filtered using options such as Date Range, Card Brand, Currency, Status, and User. Additionally, the topup list can be downloaded in CSV or PDF format. Each row includes an eye icon; click the eye icon to view the details of a specific topup.
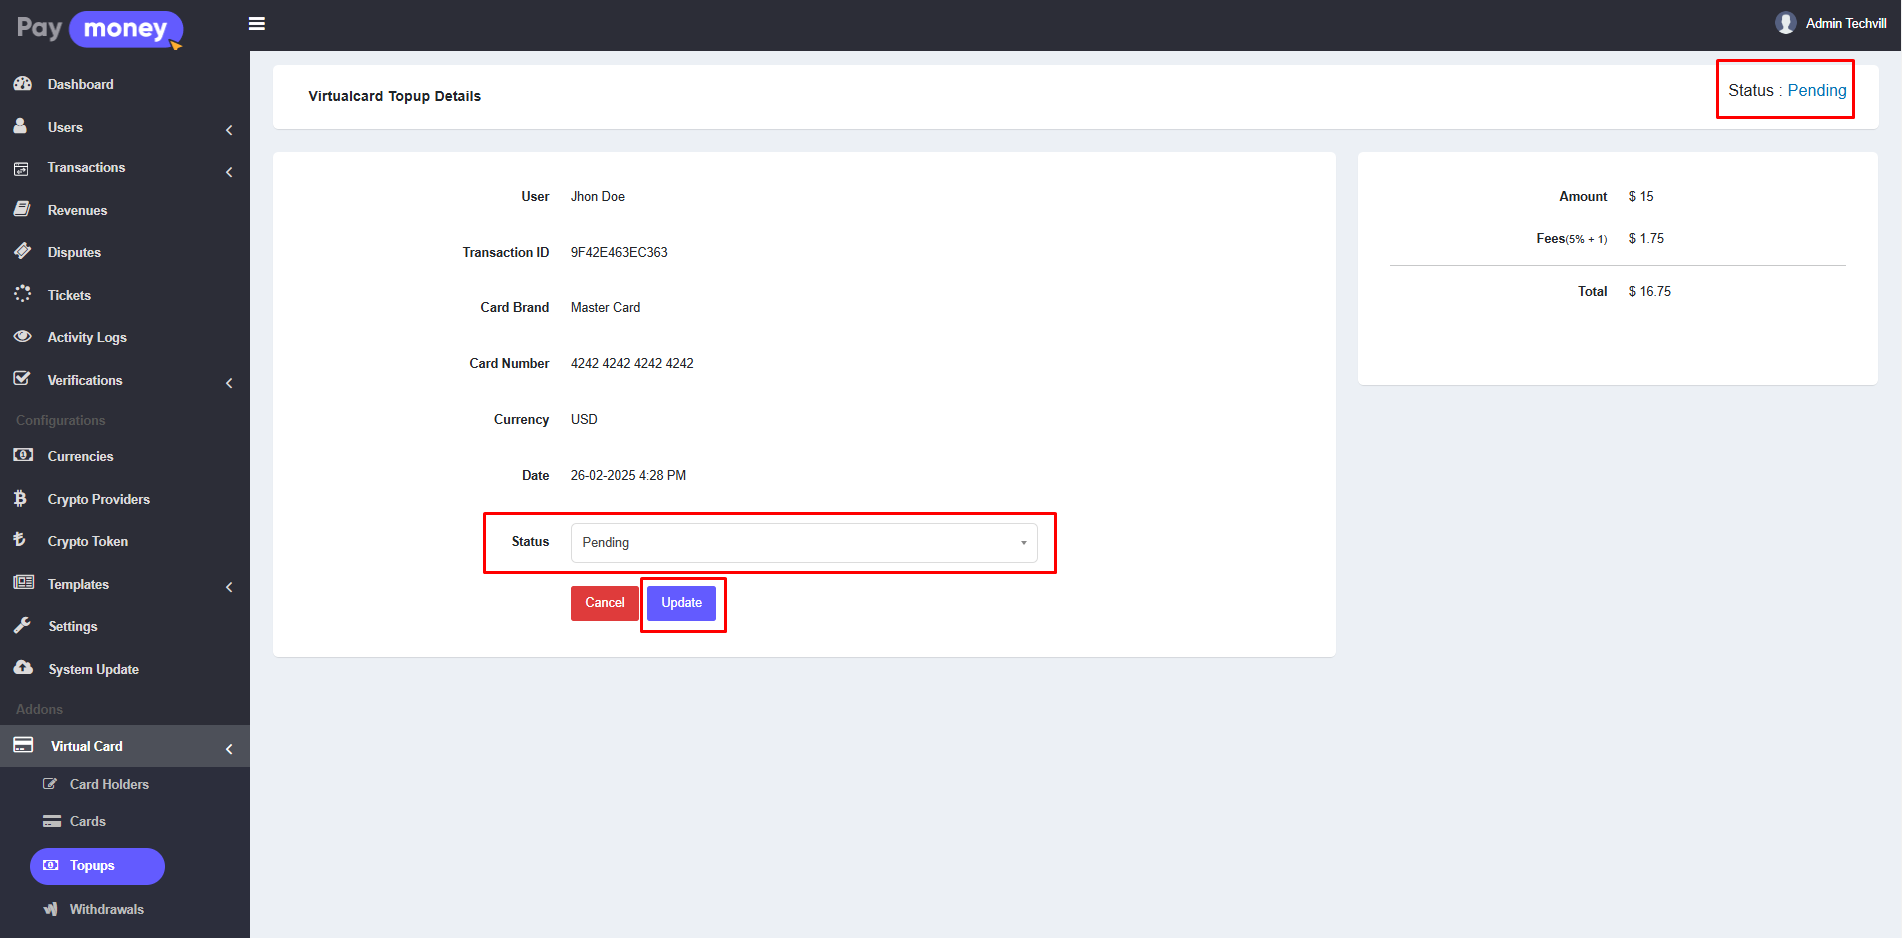
2. After clicking the eye icon, the admin can view the details of the specific topup. If the topup's status is not Approved, the admin has the option to change its status.
Withdrawals
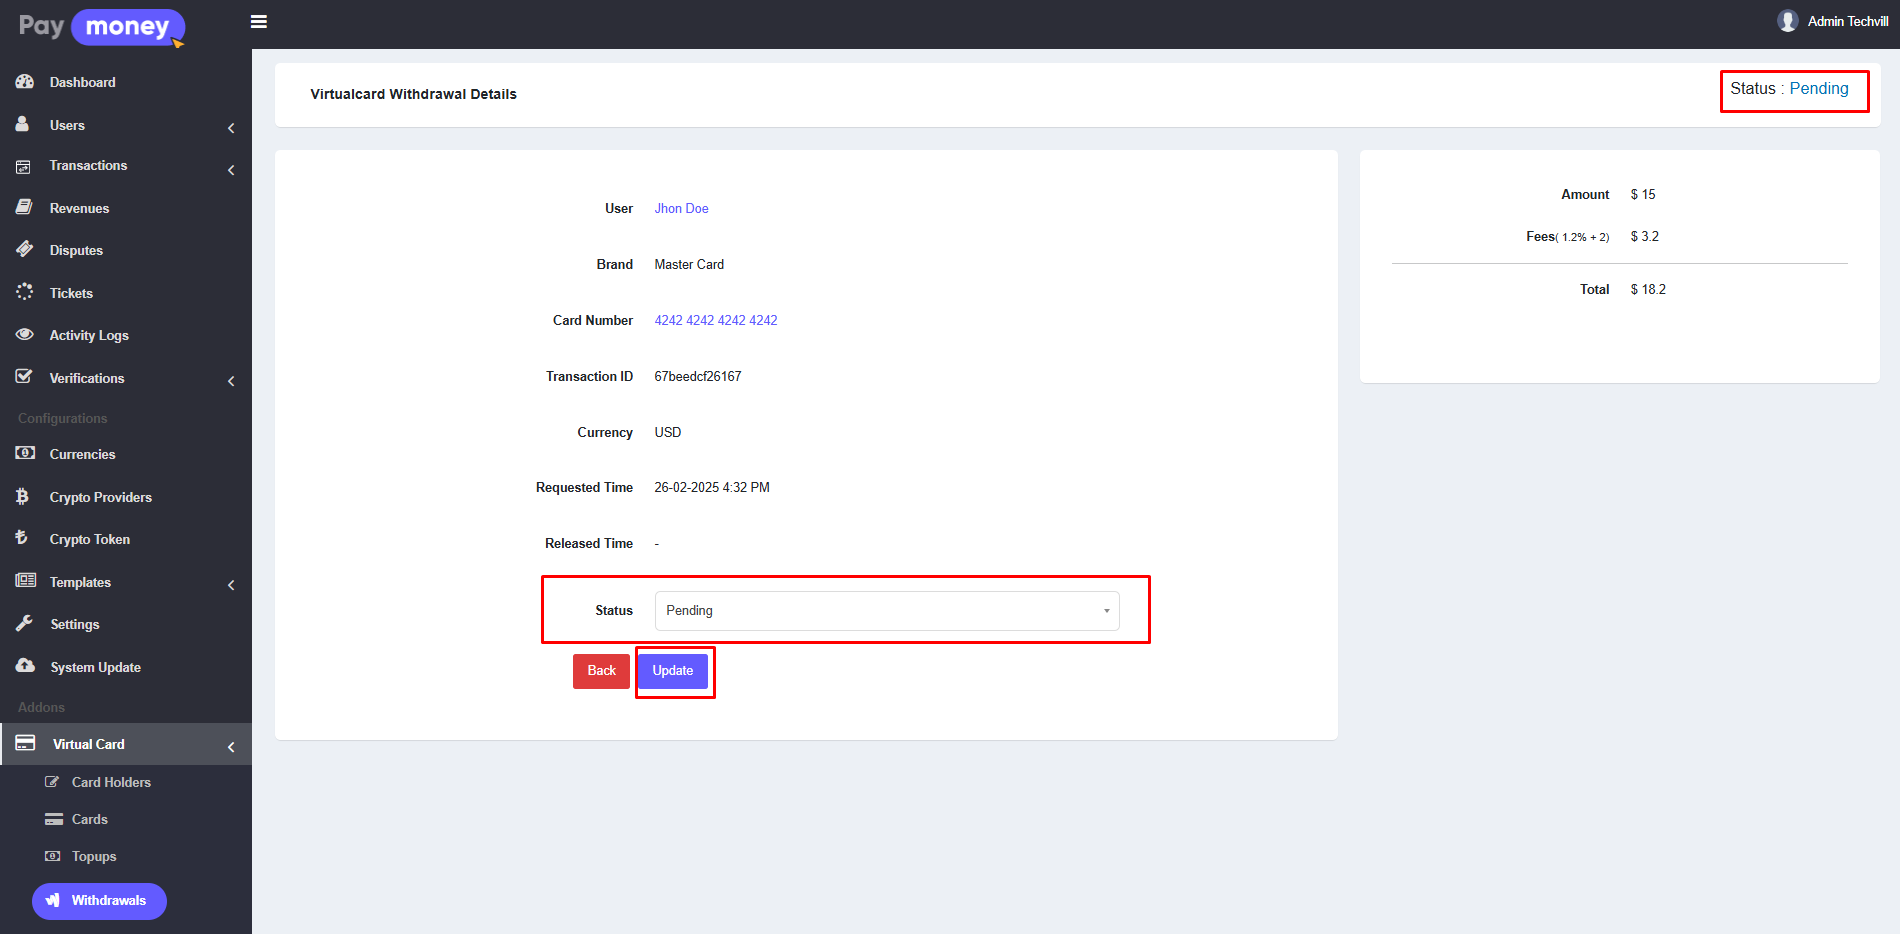
1. The admin can view the list of withdrawals from the admin panel. To access the list, navigate to Virtual Card >> Withdrawals. Here, the admin can see the withdrawals made by different users. The list can be filtered using options such as Date Range, Currency, Status, and User. Additionally, the withdrawal list can be downloaded in CSV or PDF format. Each row includes an edit icon; click the edit icon to edit the details of a specific withdrawal.

2. After clicking the edit icon, the admin can view the edit page of the specific withdrawal. If the withdrawal's status is not Approved, the admin has the option to change its status.
Categories
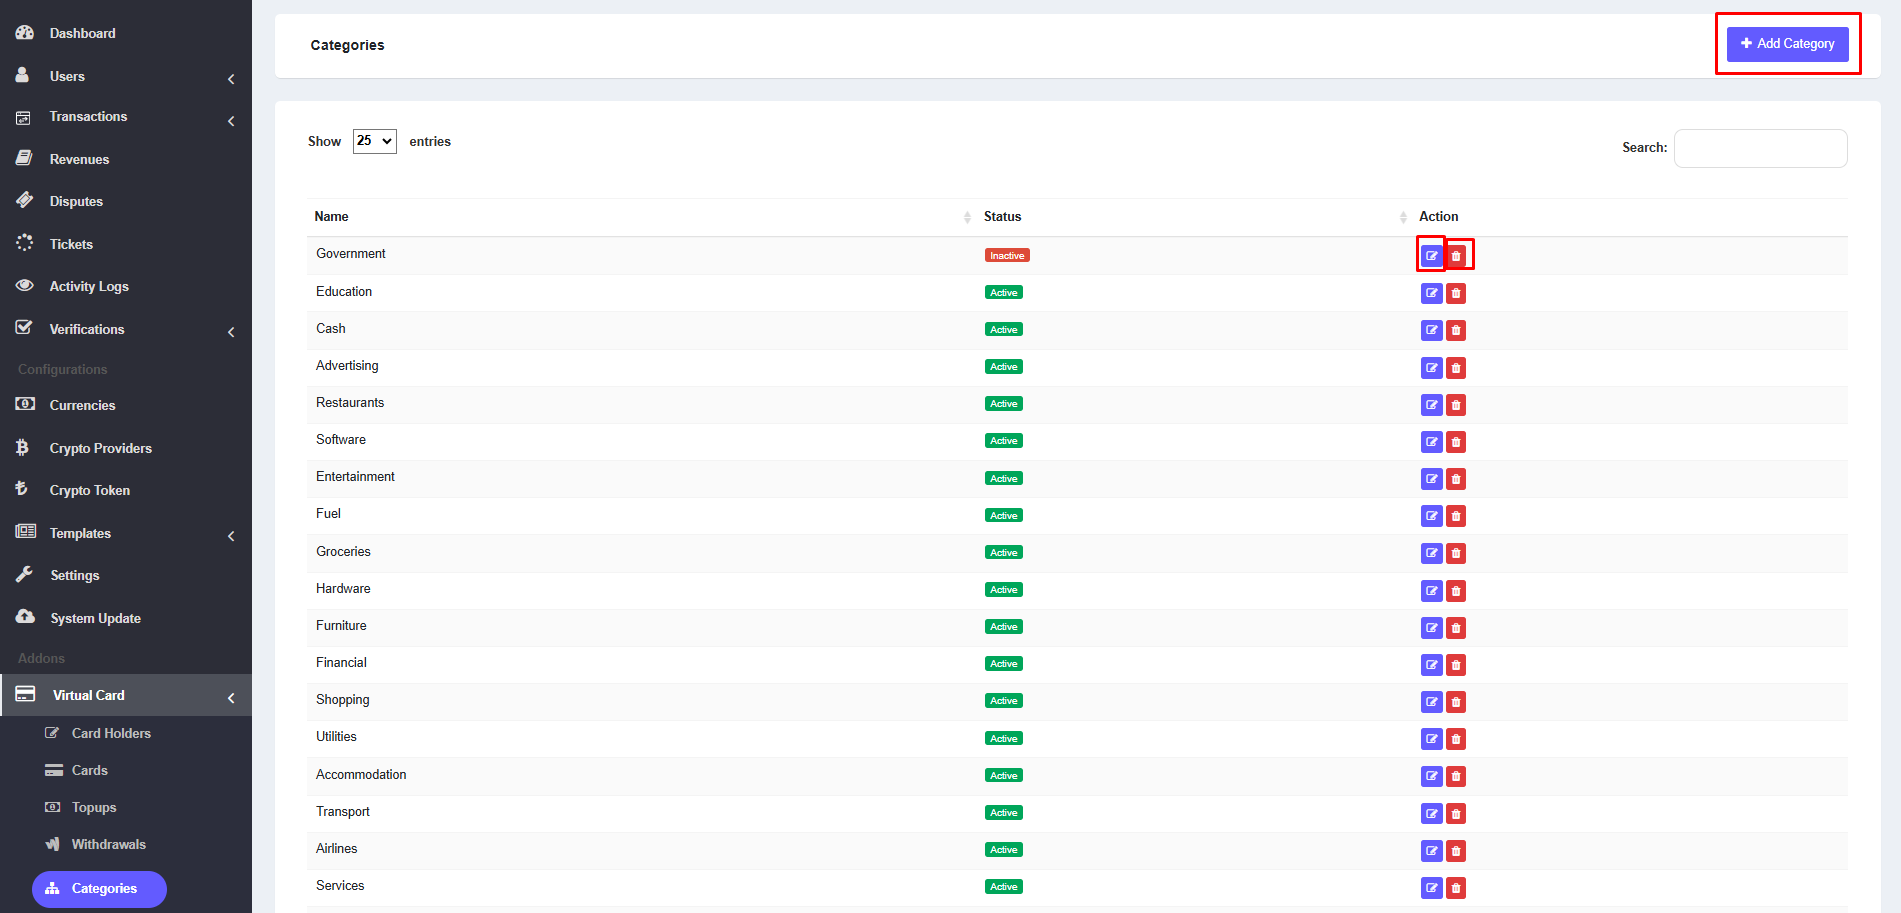
1. The admin can view the list of categories from the admin panel. To access the list, navigate to Virtual Card >> Categories. Here, the admin can see the list of all virtual card categories. Each row includes an edit icon and an delete icon. Click the edit icon to edit the specific category, or click the delete icon to delete a category.
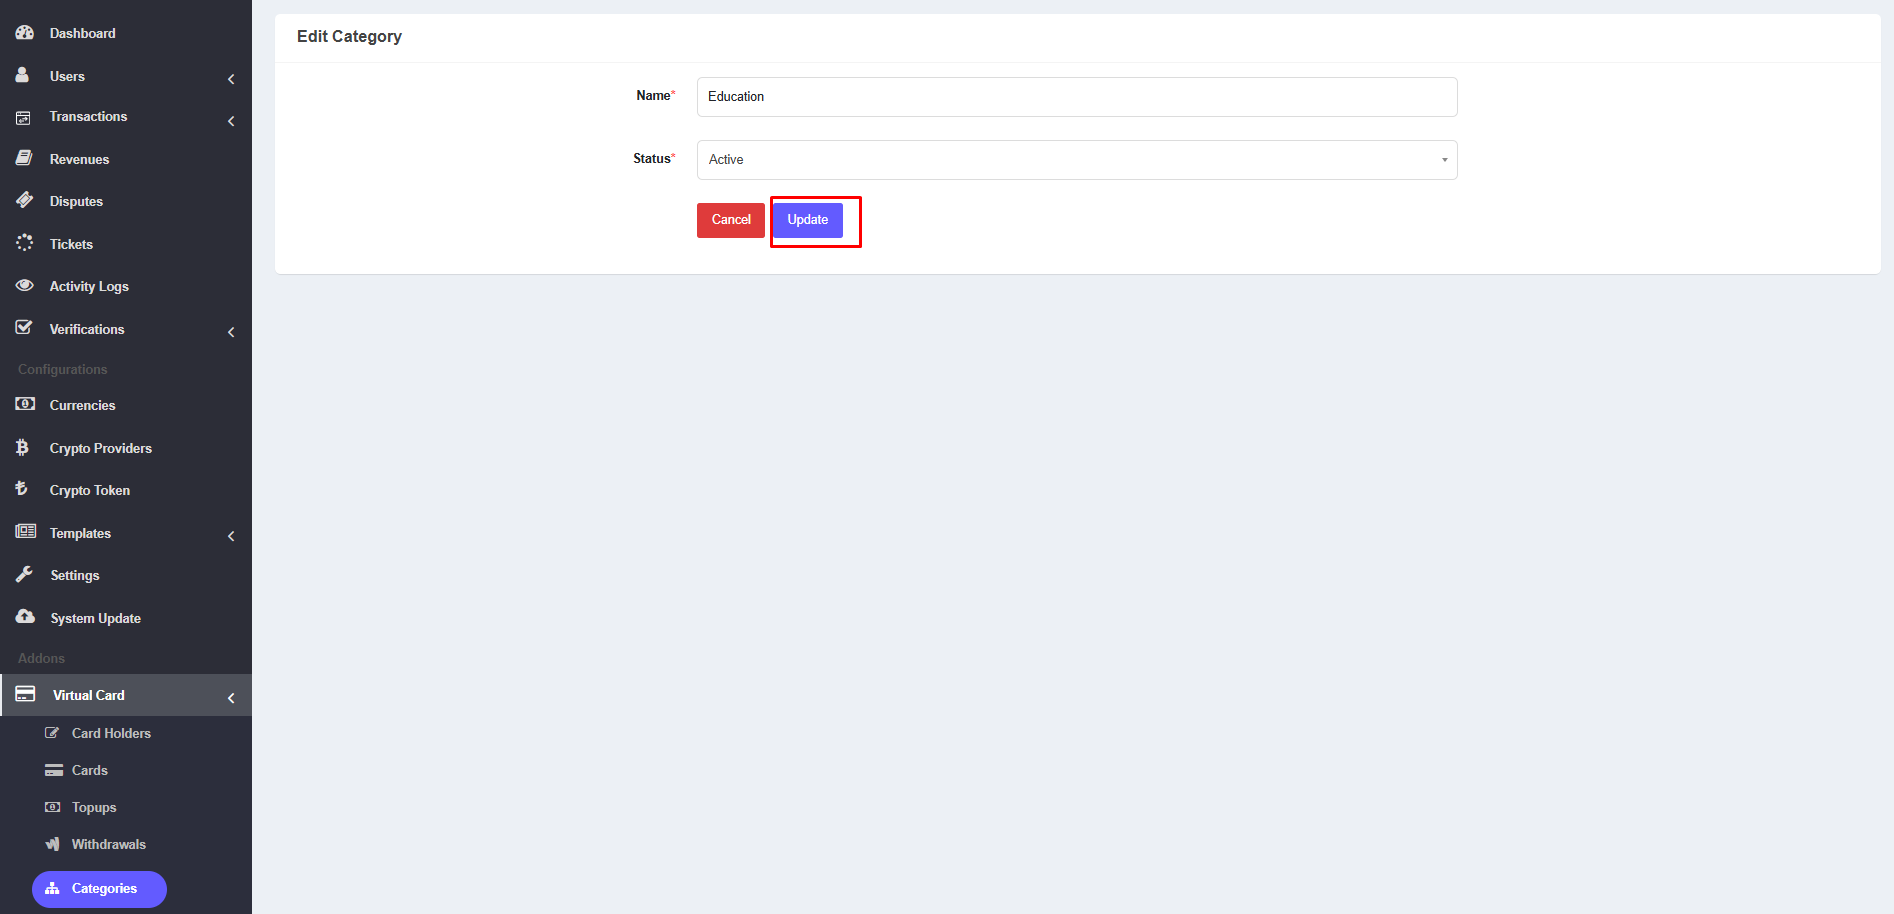
2. After clicking the edit icon, the admin can view the edit page of category. Here, admin can update the specific category.
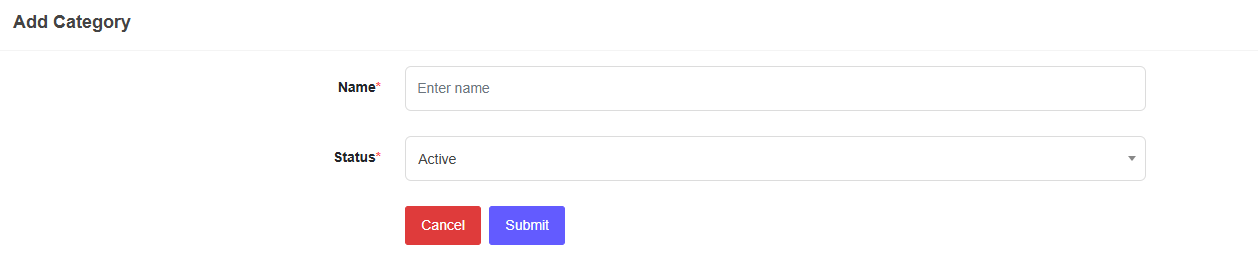
3. After clicking the Add Category button, the admin will go to the new category creation page.
Fees Limits
1. The admin can view the list of fees limits from the admin panel. To access the list, navigate to Virtual Card >> Fees Limits. Here, the admin can see the list of all virtual card fees limits. By click on Add Fees Limit button admin can add new fees limit. In the list, each row includes an edit icon and an delete icon. Click the edit icon to edit the specific fees limit, or click the delete icon to delete a fees limit.
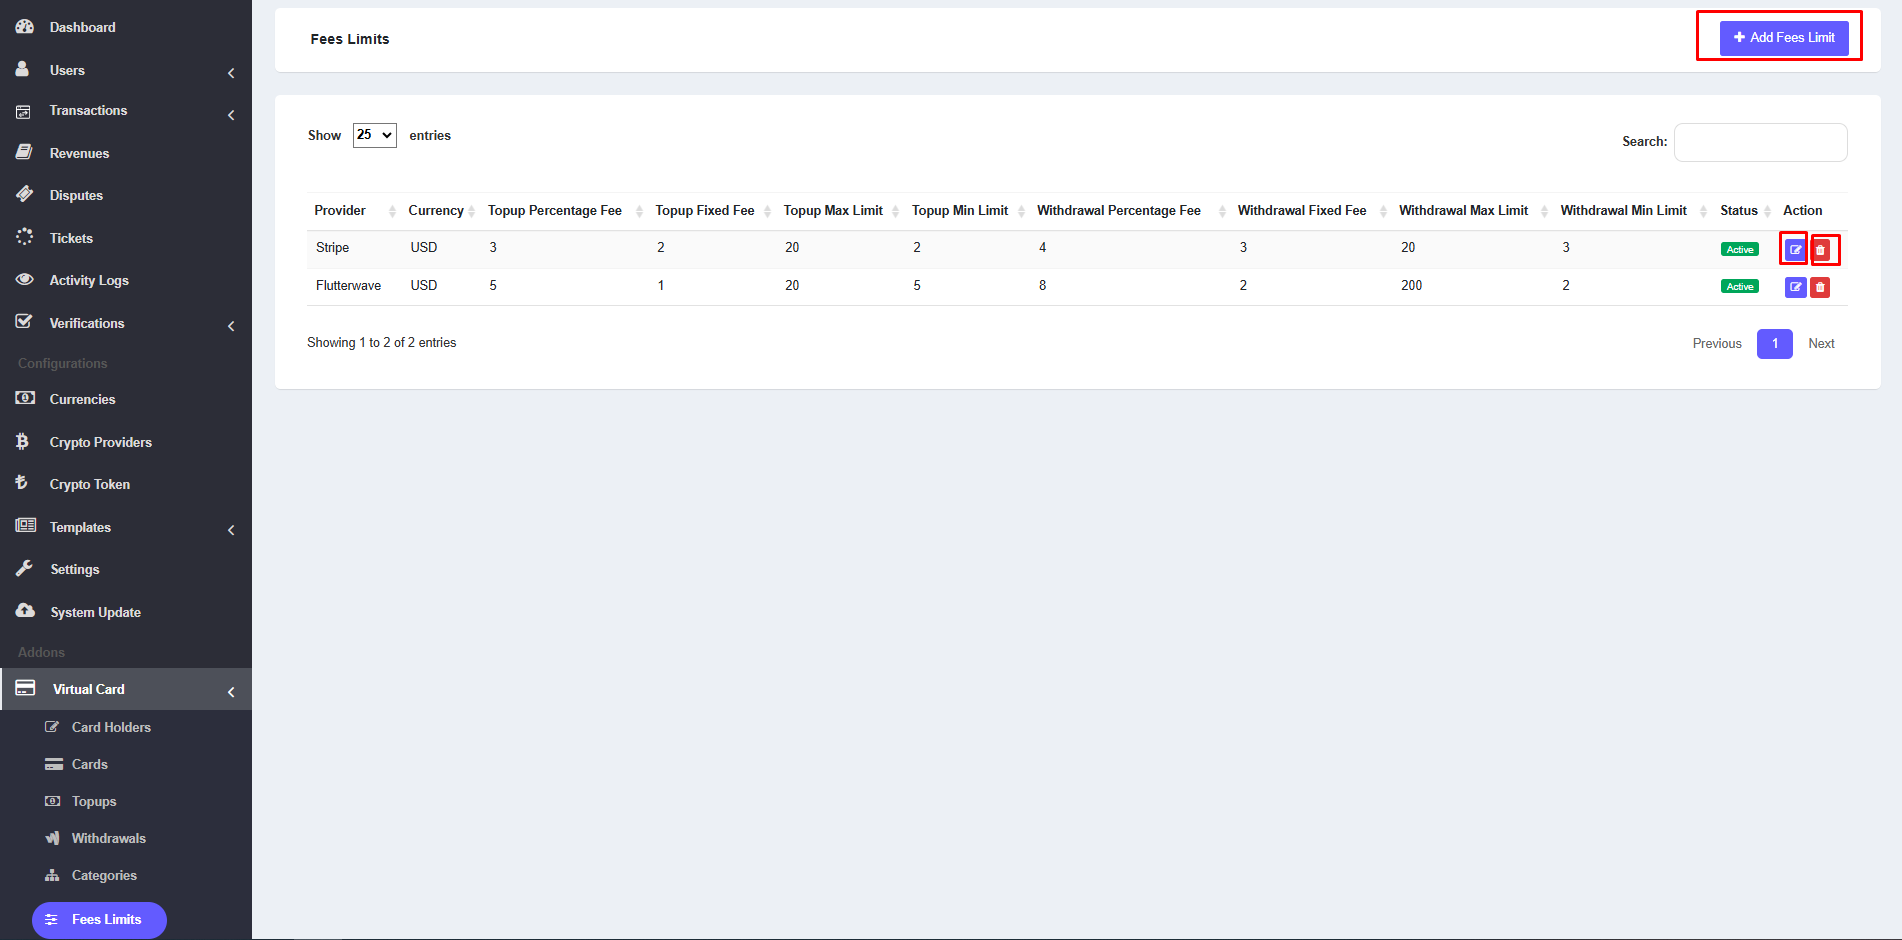
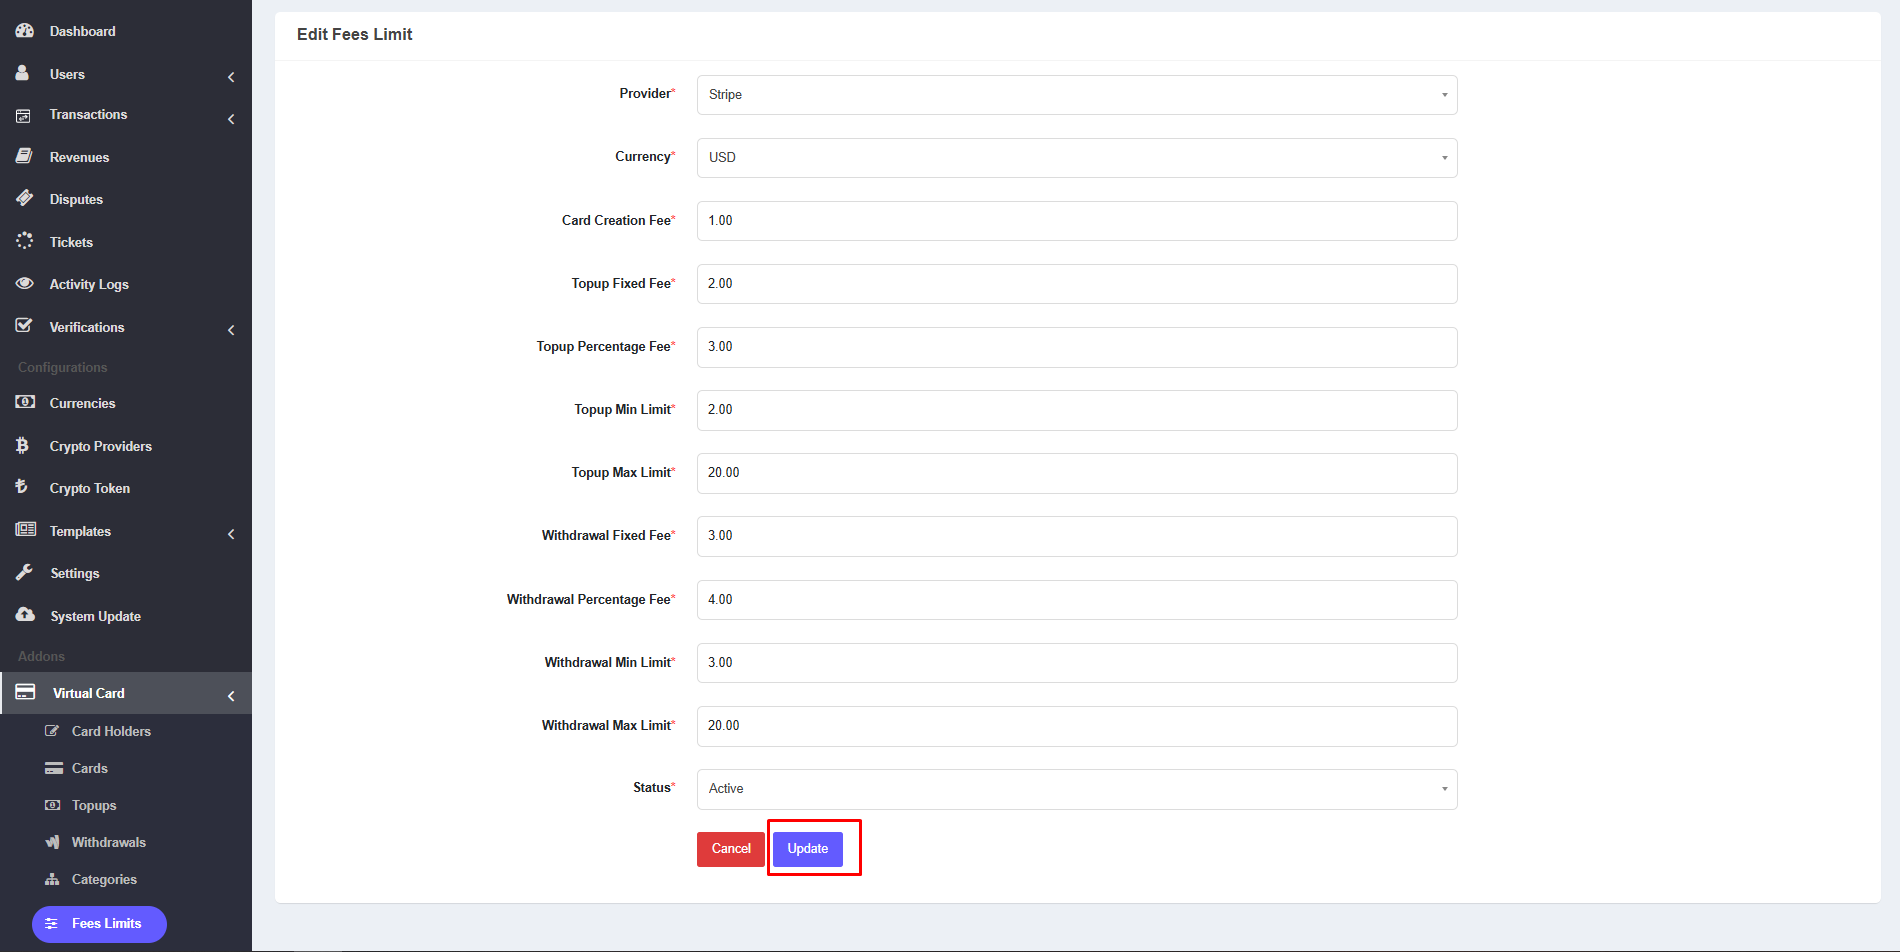
2. After clicking the edit icon, the admin can view the edit page of fees limit. Here, admin can update the specific fees limit.
Providers
1. The admin can view the list of providers from the admin panel. To access the list, navigate to Virtual Card >> Providers. Here, the admin can see the list of all virtual card providers. By click on Create Provider button admin can add new provider. In the list, each row includes an edit icon and an delete icon. Click the edit icon to edit the specific provider, or click the delete icon to delete a provider. Here, Automated provider will be displayed when admin uploads a new automatic provider addon for virtual card.
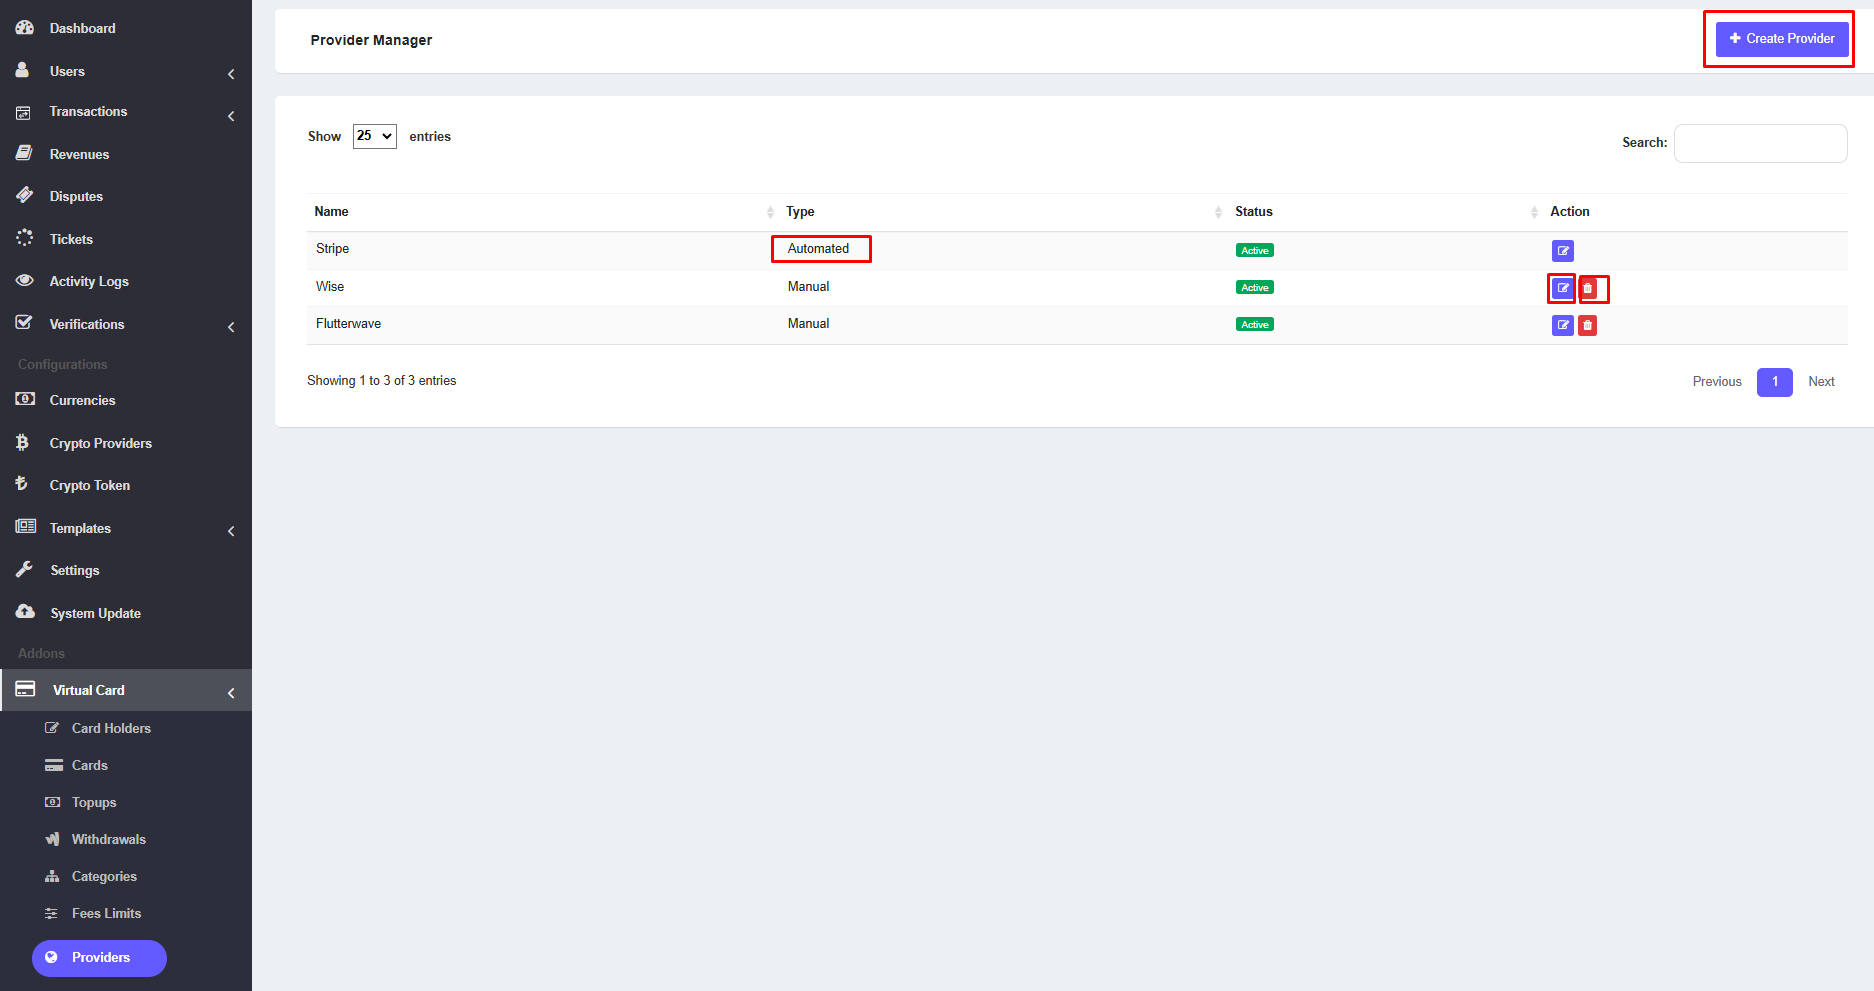
2. After clicking the edit icon, the admin can view the edit page of provider. Here, admin can update the specific provider.

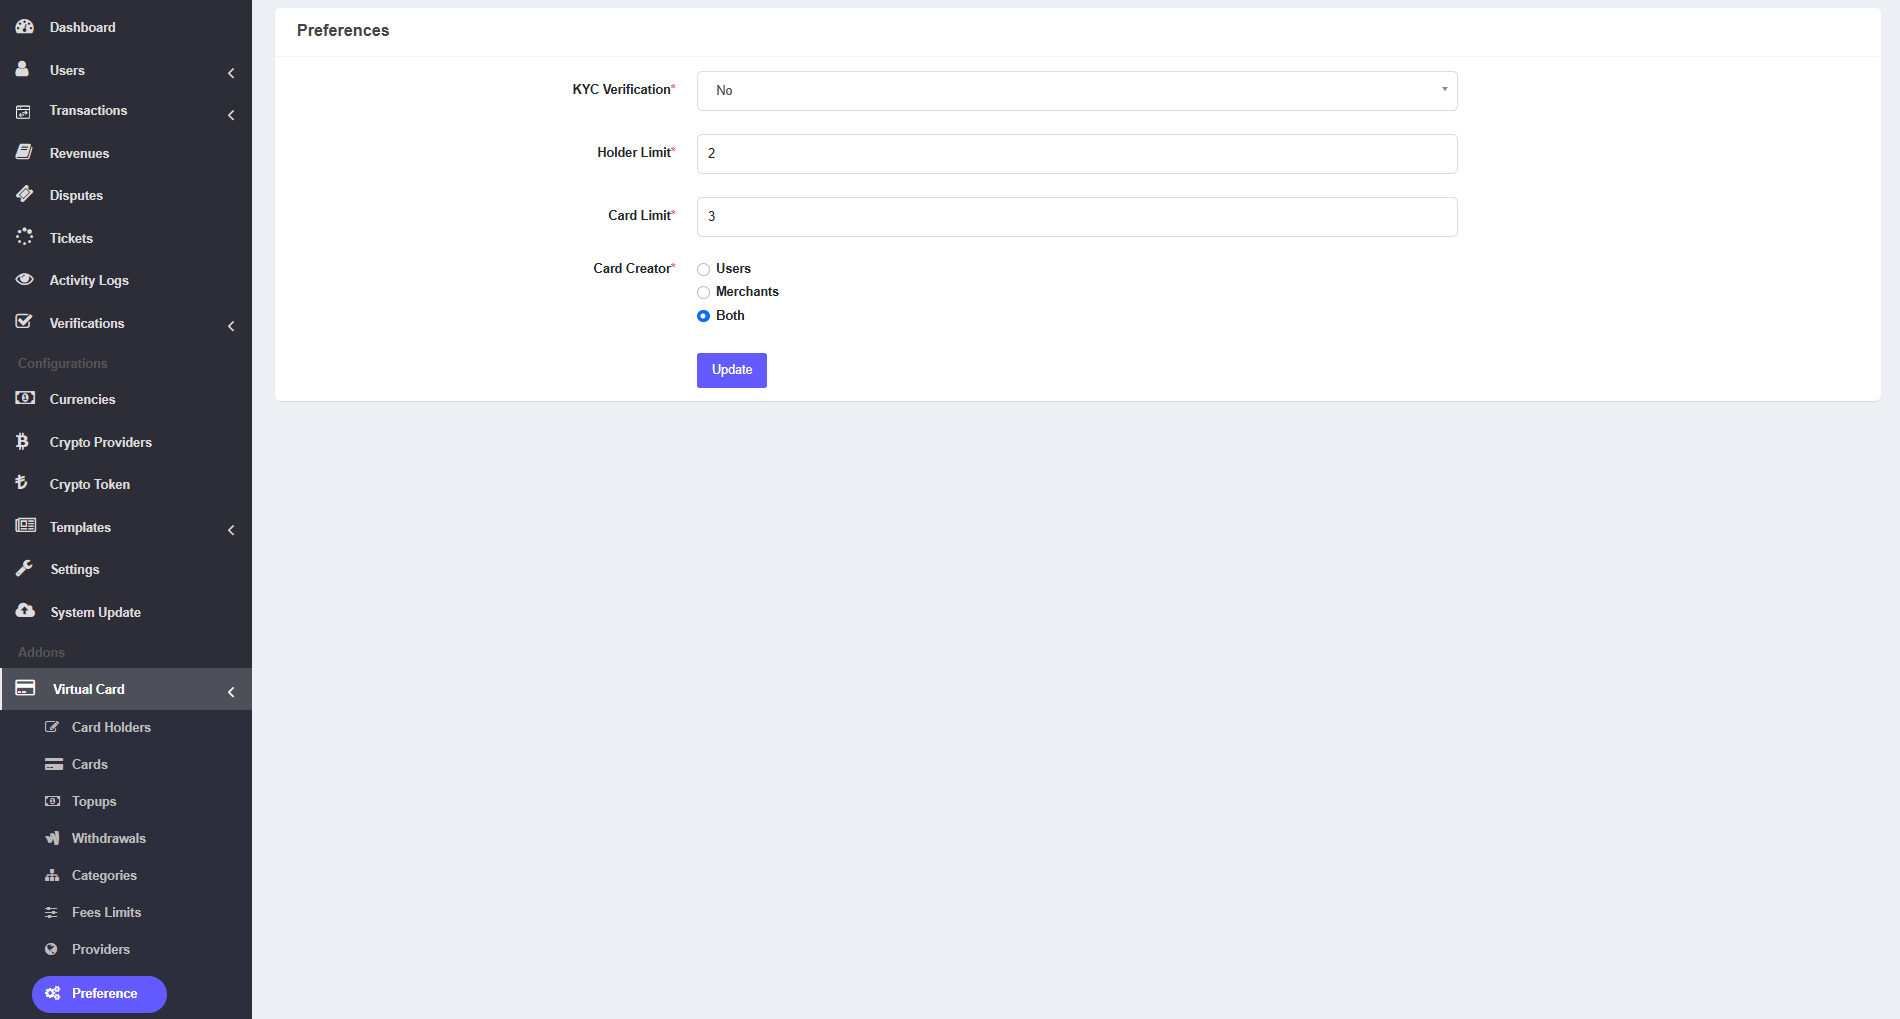
Preferences
From this page admin can set some settings and restrictions for users. To access this menu please navigate Virtual Card >> Preferences.
KYC Verification: If KYC verification is set to yes, users must approve their identity and address verification to access the virtual card feature.
Holder Limit: Admin can set that how many card holder can have by users.
Card Limit: Admin can set that how many virtual card can have by users.
Card Creator: This field determines what type of users can use the virtual card feature. Is it Merchant users, Normal users, or both types of users?
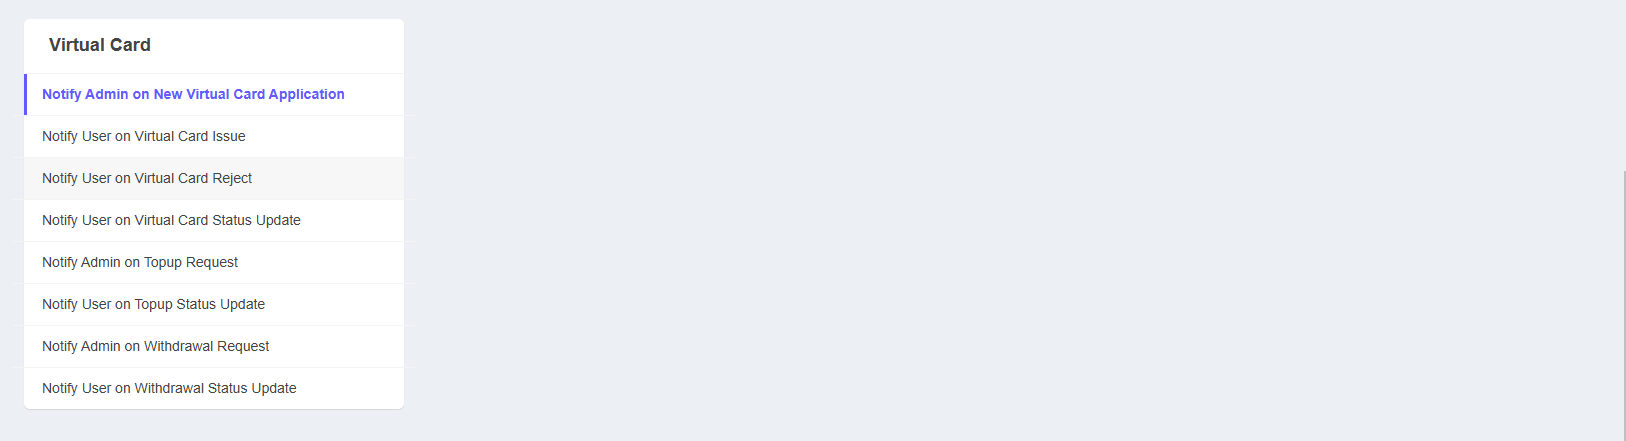
Virtual Card Email and SMS Templates
To locate the virtual card email and SMS templates in the admin panel, navigate to Templates >> Email Templates or Templates >> SMS Templates. Scroll down to the Virtual Card section to find the relevant templates.

Virtual Card transaction in core transactions
1. Virtual card transactions are part of the core transactions section, where admins can view and manage them alongside other transaction types. Virtual card transactions can be identified by their transaction types: Virtualcard Withdrawal and Virtualcard Topup. Each transaction row includes an edit icon; click it to view the details of a specific withdrawal or topup.
![]()
2. After clicking the edit icon, the admin can view the details of the specific withdrawal or topup. If the transaction's status is not Approved, the admin can change its status. This status change will affect the related withdrawal or topup.
![]()
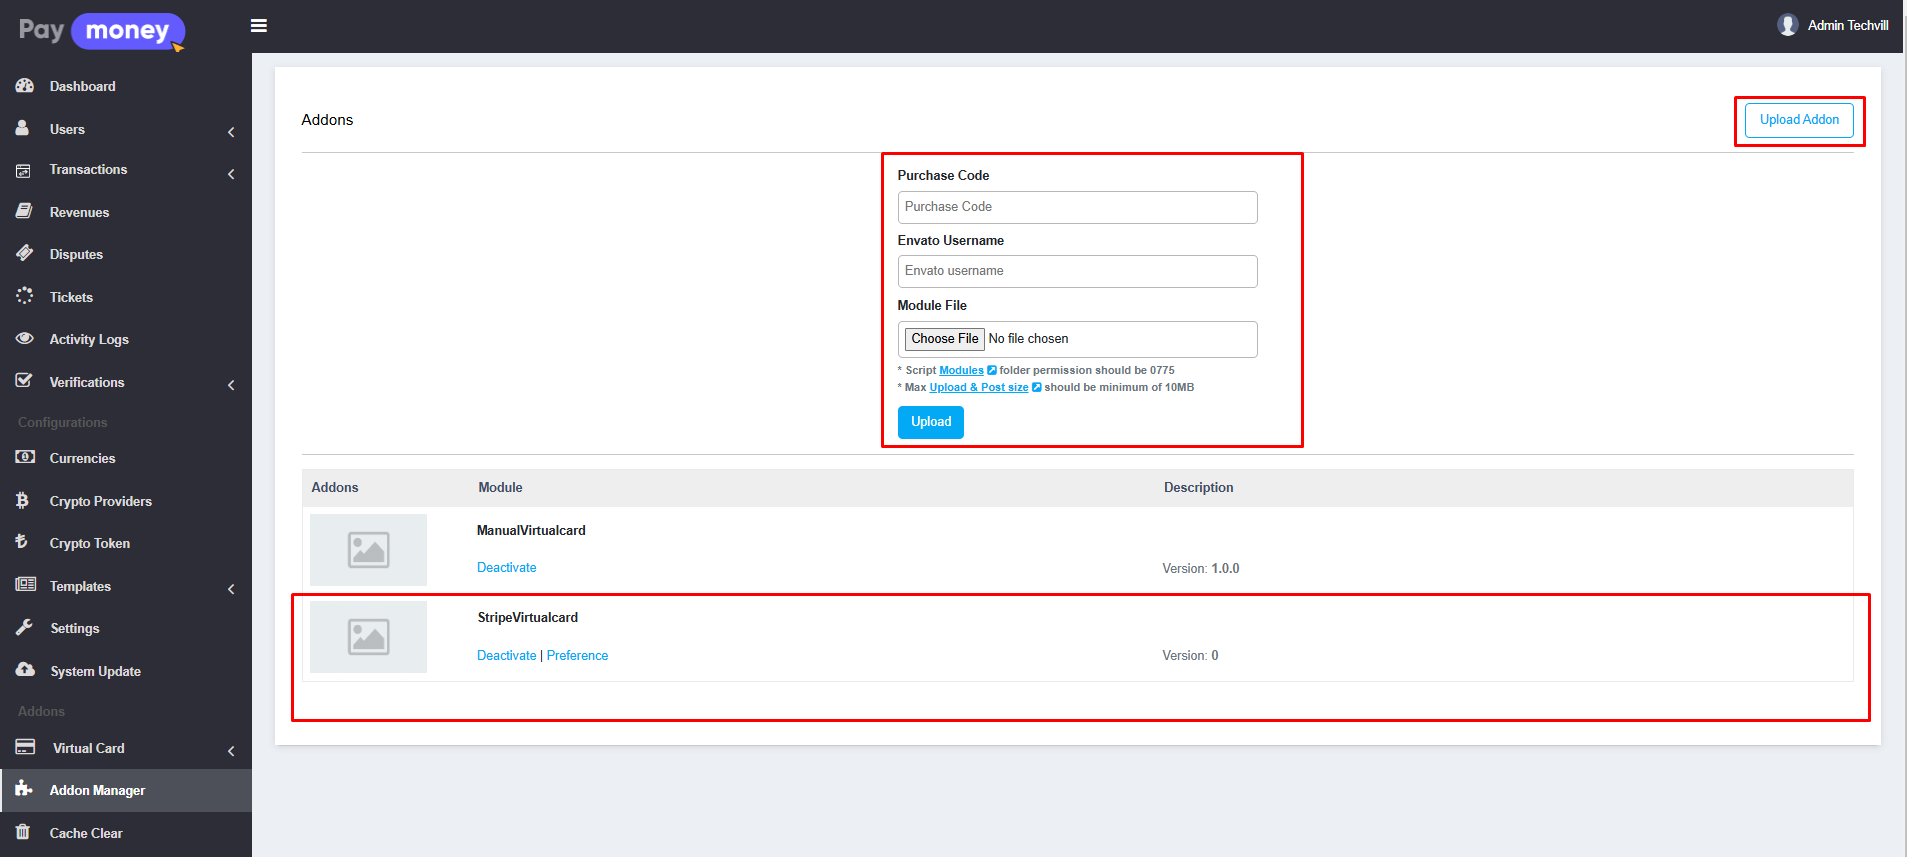
Virtual Card Automated Provider Setup
To setup Automated virtual card provider. First of all, Navigate to Addon Manager to install the addon in Paymoney System.
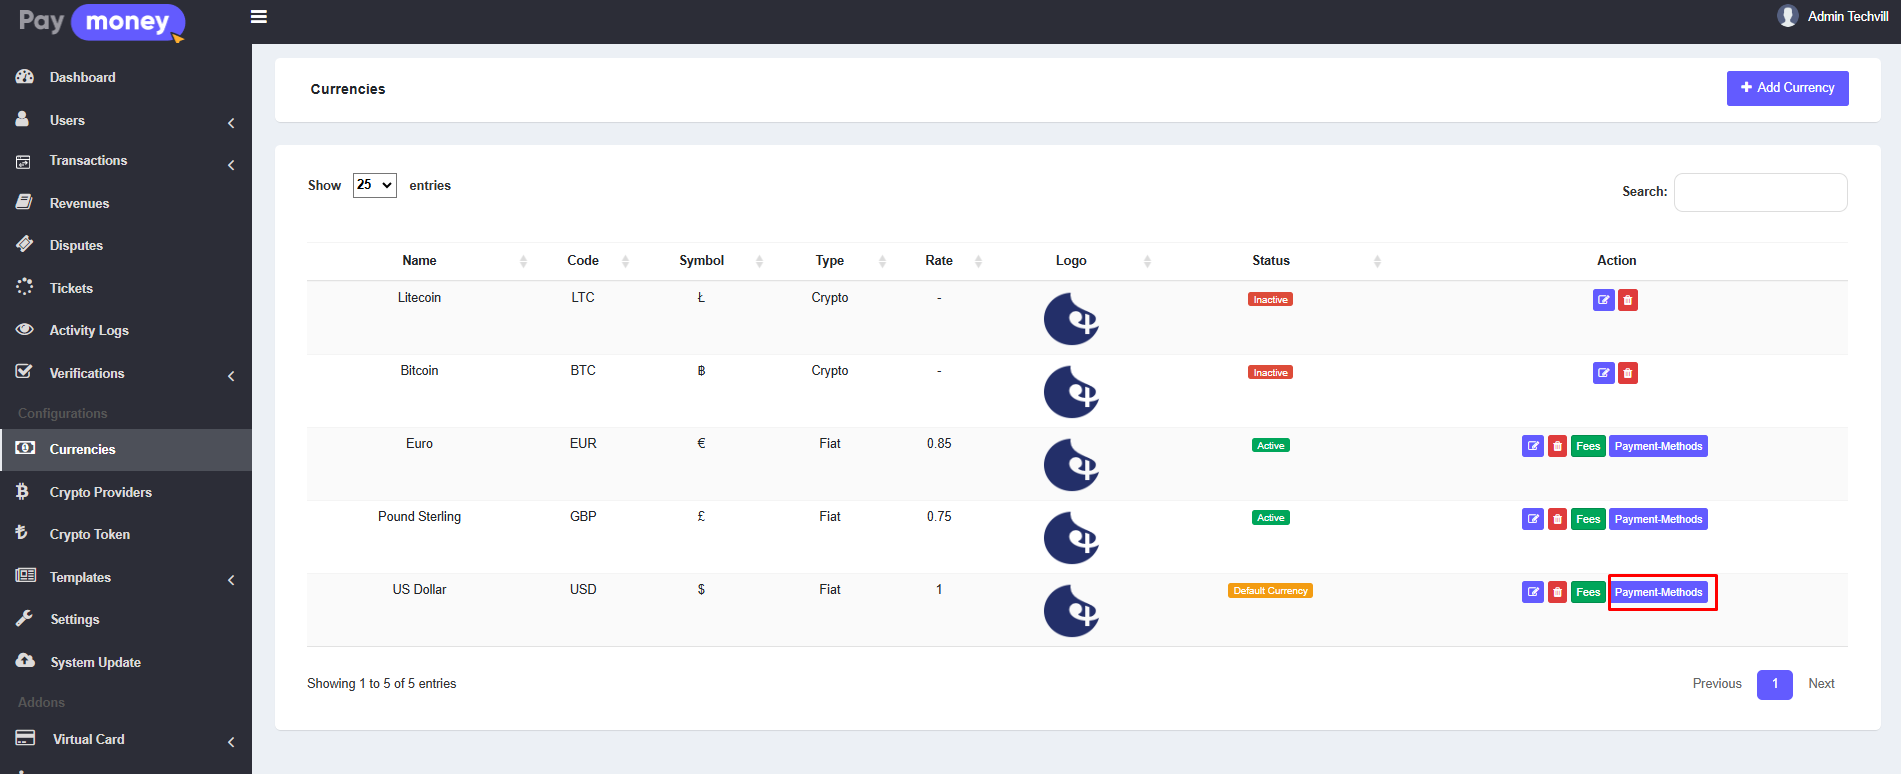
 After that, navigate to Currencies menu from sidebar. Click on the Payment-Methods button of your preferred currency.
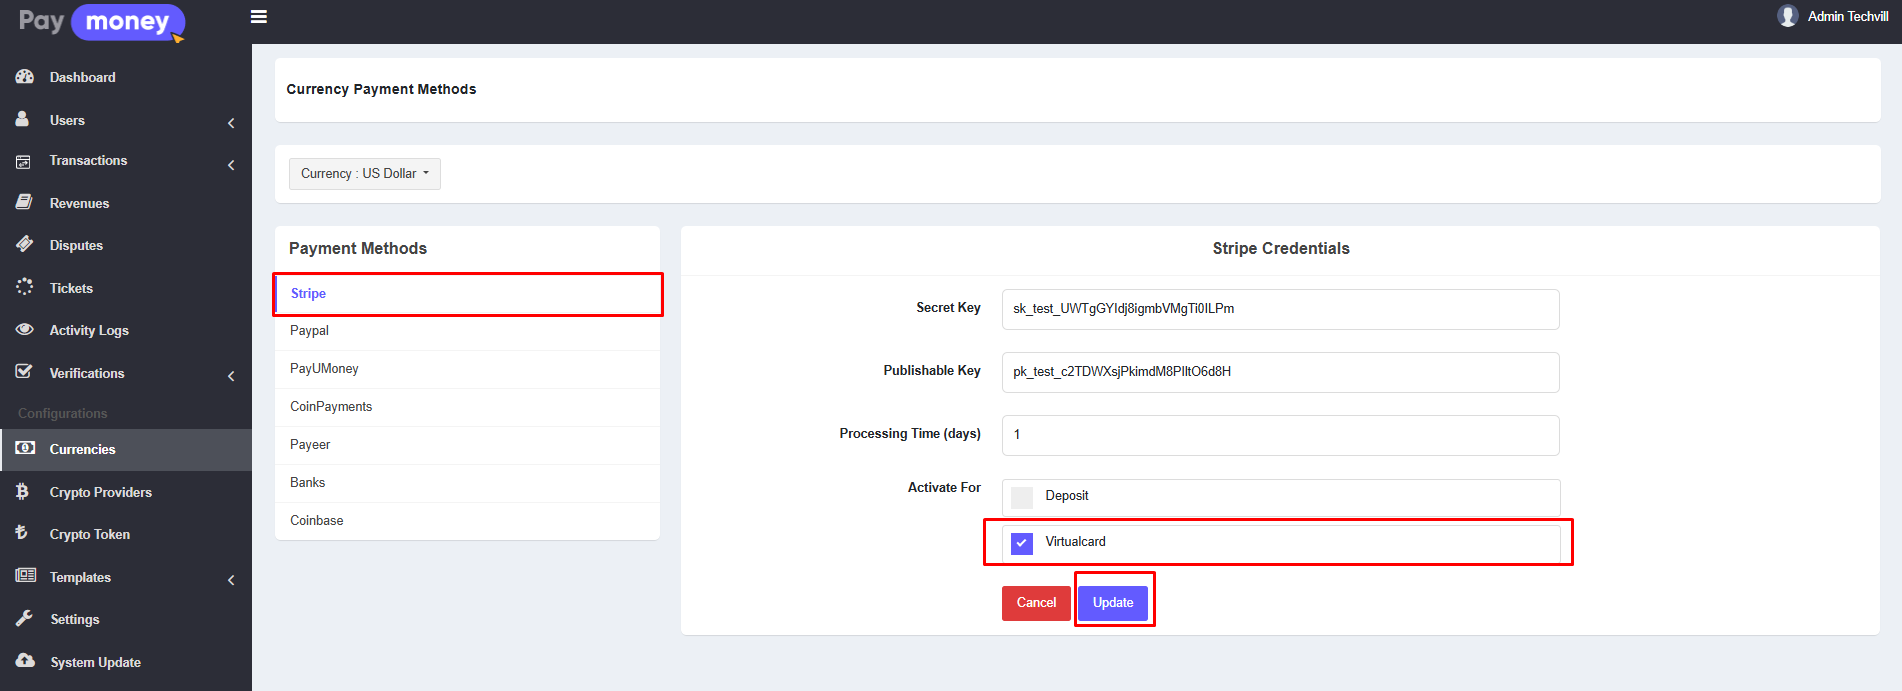
 Here, check the Virtualcard option under Activate For. Then click on update button.
User Panel
Card Holders
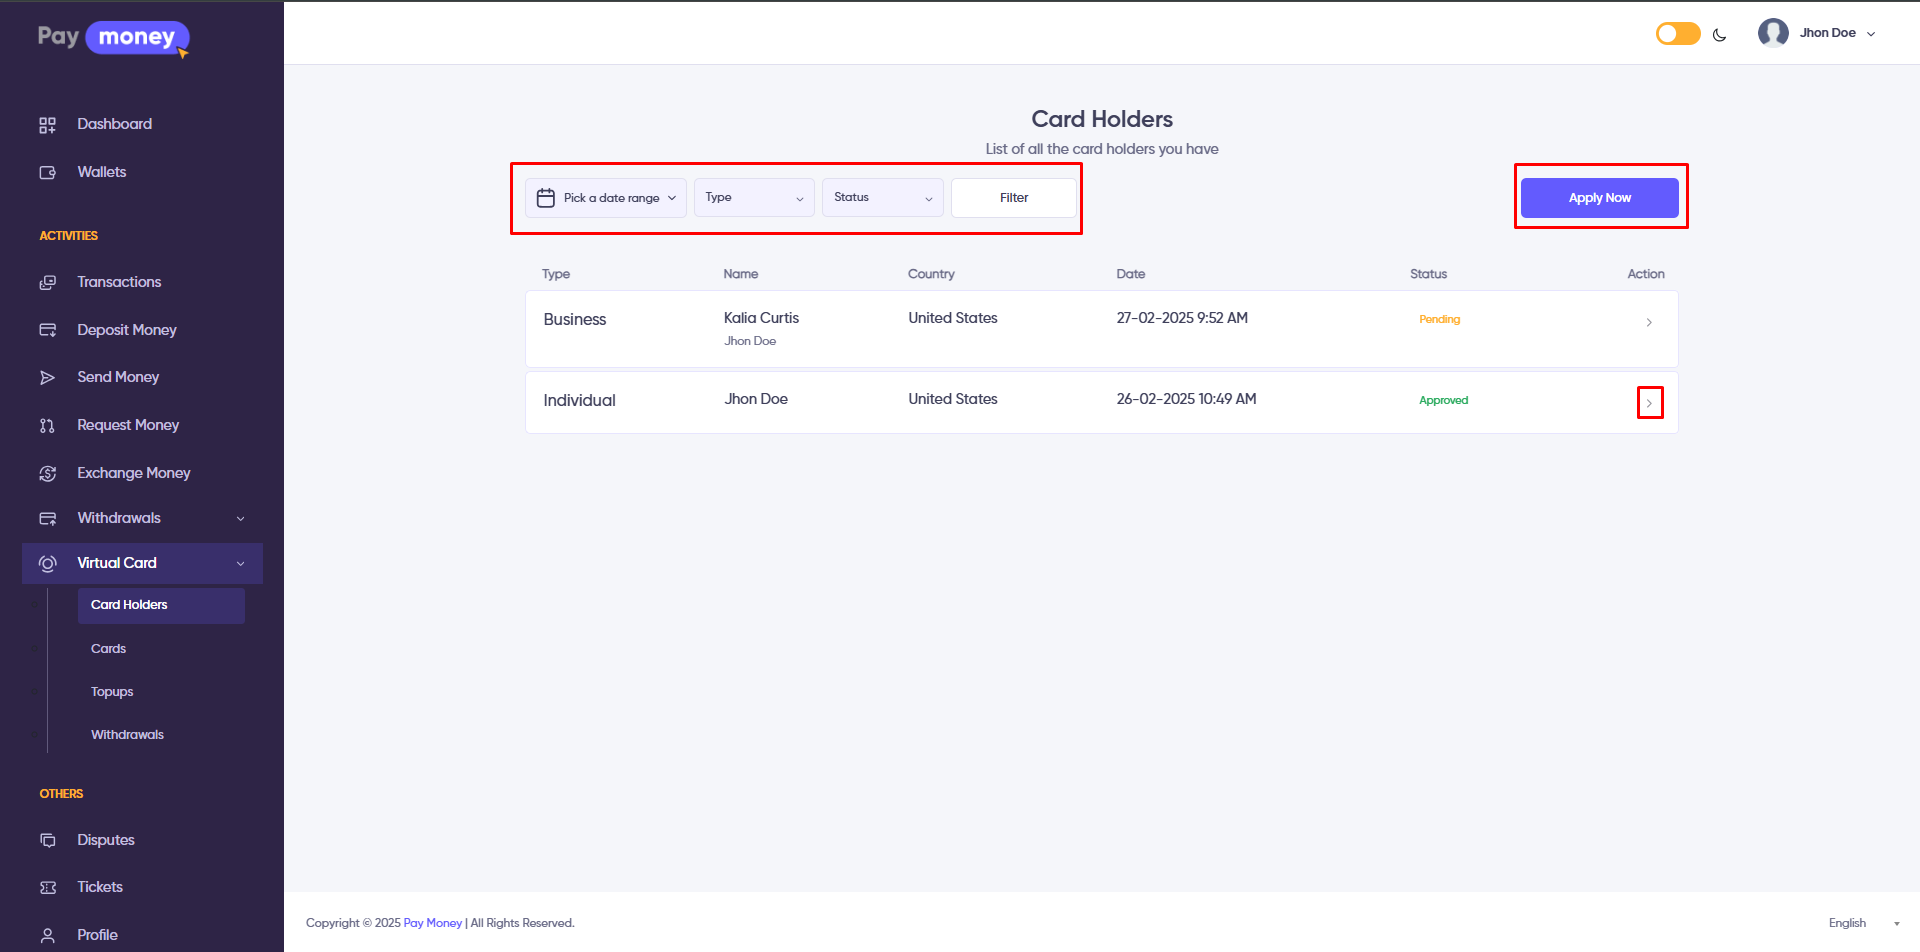
1. The user's can view their own list of virtual card holders from user panel. To access the list, navigate to Virtual Card >> Card Holders. The list can be filtered using various options, including Date Range, Type and Status. Each card holder in the list has an arrow icon; clicking on it displays the details of the specific virtual card holder. Additionally, by clicking the Apply Now button, the user can request a new virtual card holder.
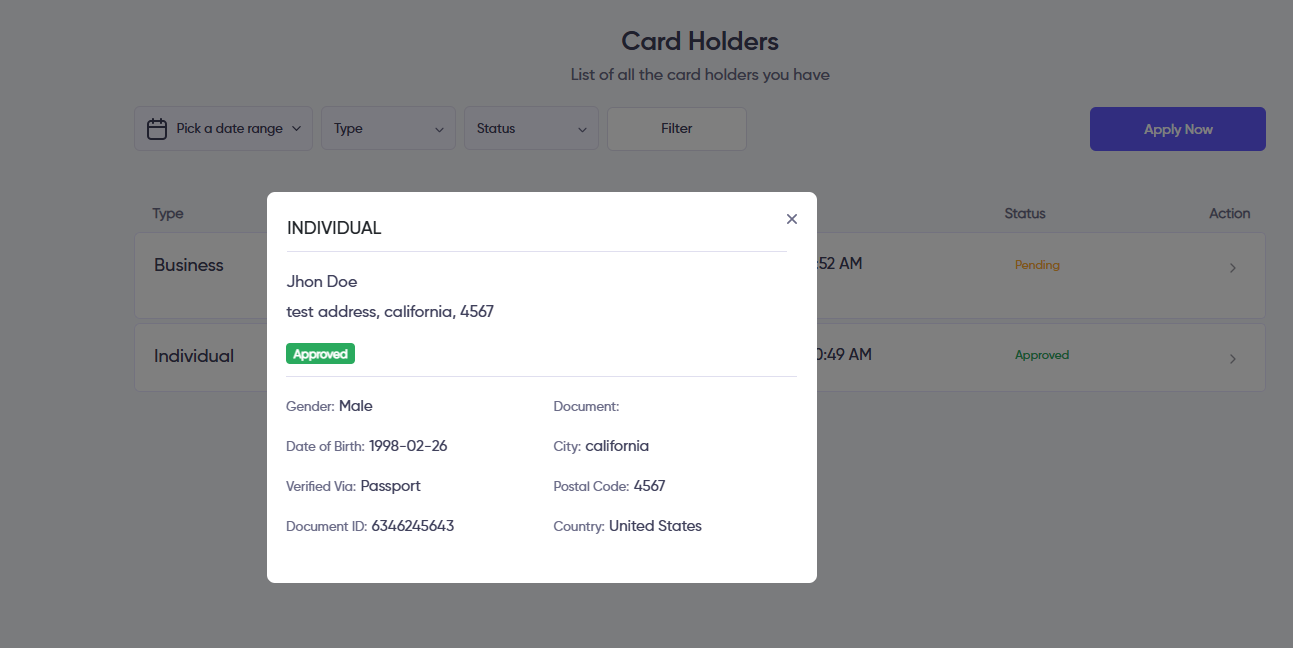
 2. The user can view the details of that card holder.
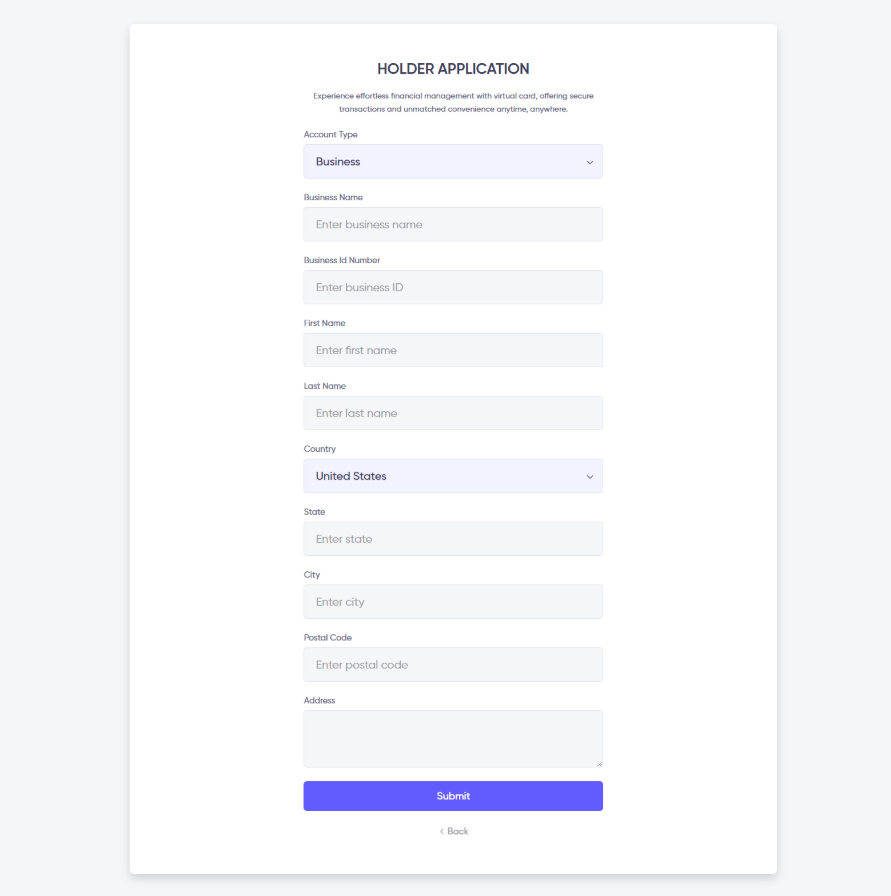
 3. After clicking the Apply Now button, the user will be redirected to the Holder Create page. Here, users can create their own virtual card holder. They can choose between two types of card holders: Individual and Business, based on their preference.
Cards
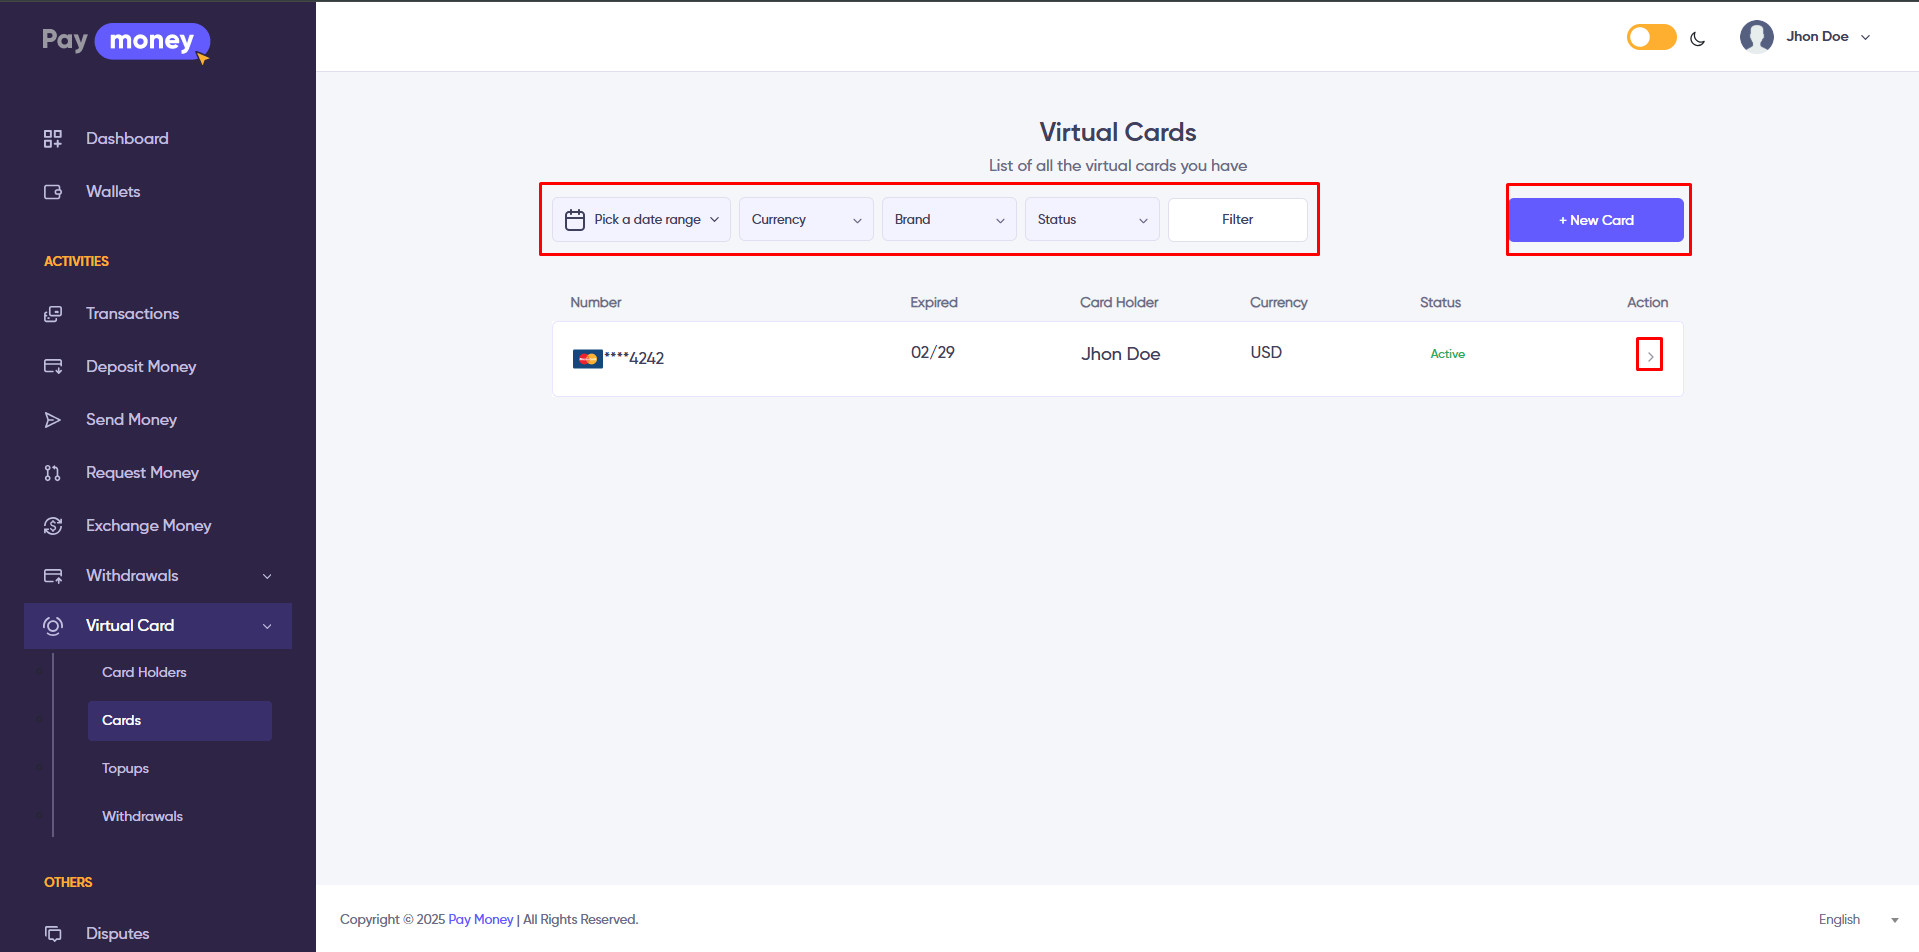
1. The user's can view their own list of virtual card from user panel. To access the list, navigate to Virtual Card >> Cards. The list can be filtered using various options, including Date Range, Currency, Brand and Status. Each card in the list has an arrow icon; clicking on it displays the details of the specific virtual card. Additionally, by clicking the New Card button, the user can request a new virtual card.
2. After clicking the arrow icon icon the user can view the details of the card. By clicking the Topup or Withdrawal button, they can directly initiate a Topup or Withdrawal using this specific virtual card. Additionally, users can view the transaction history of both Topups and Withdrawals from this page.
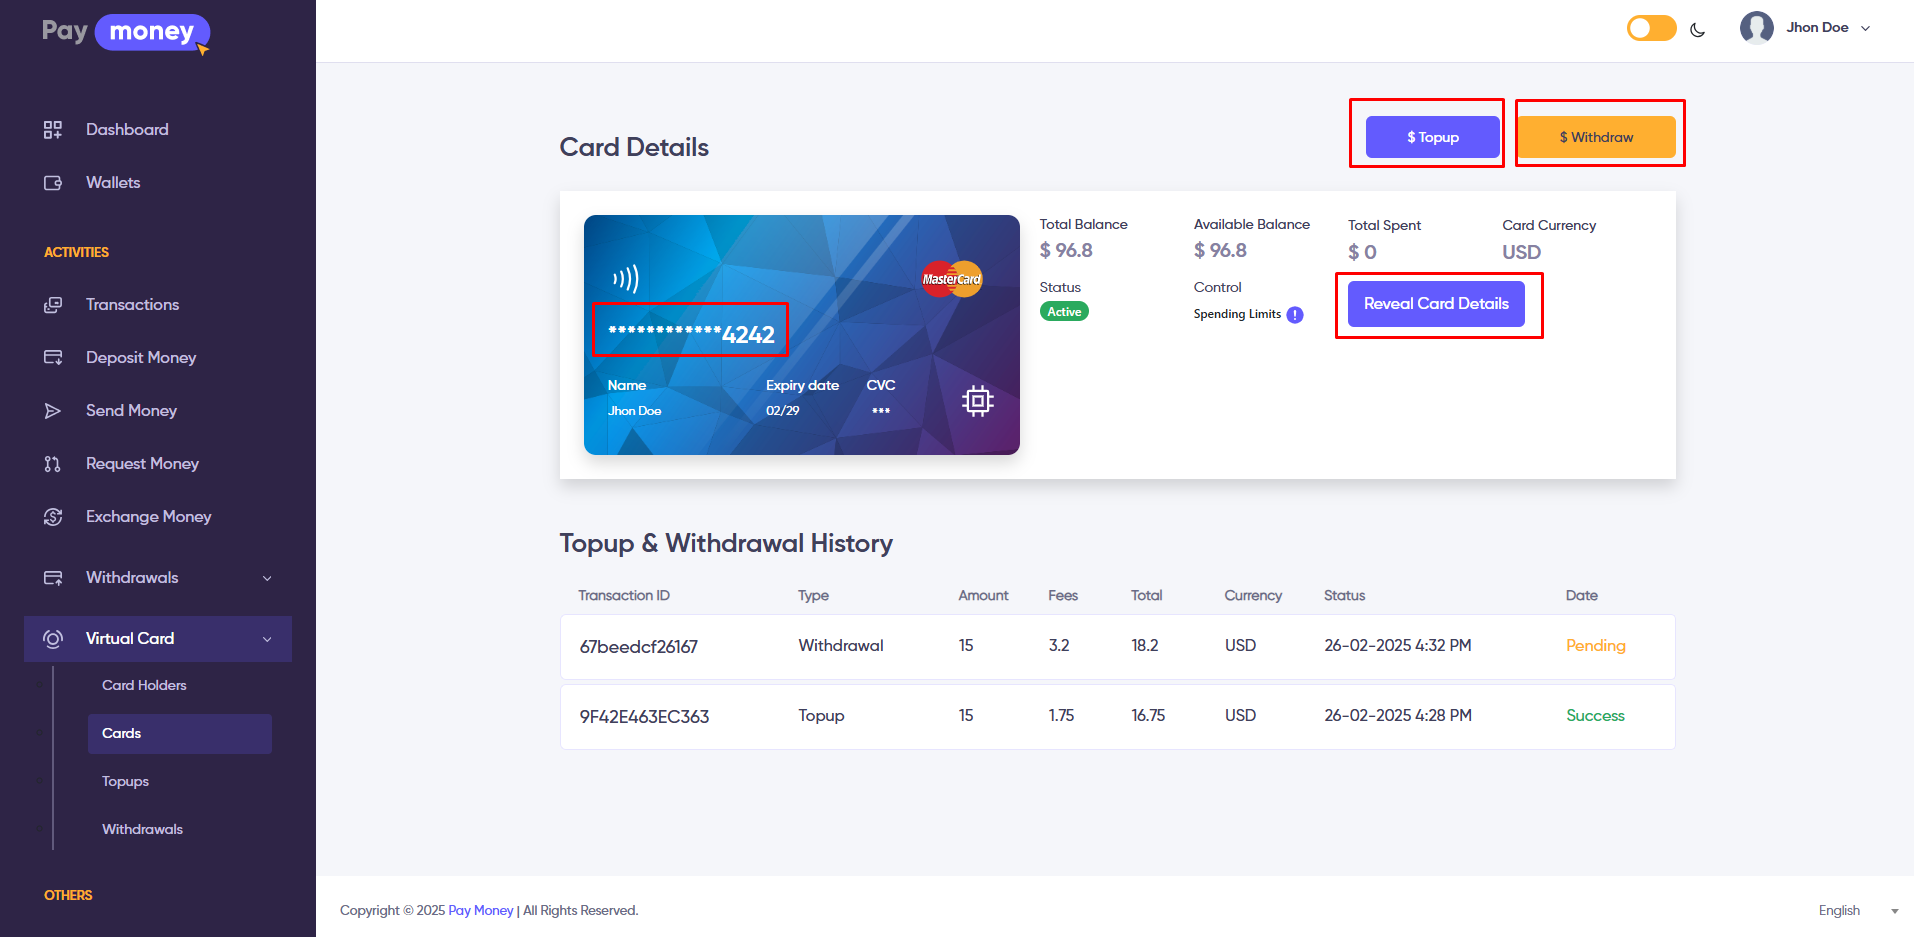
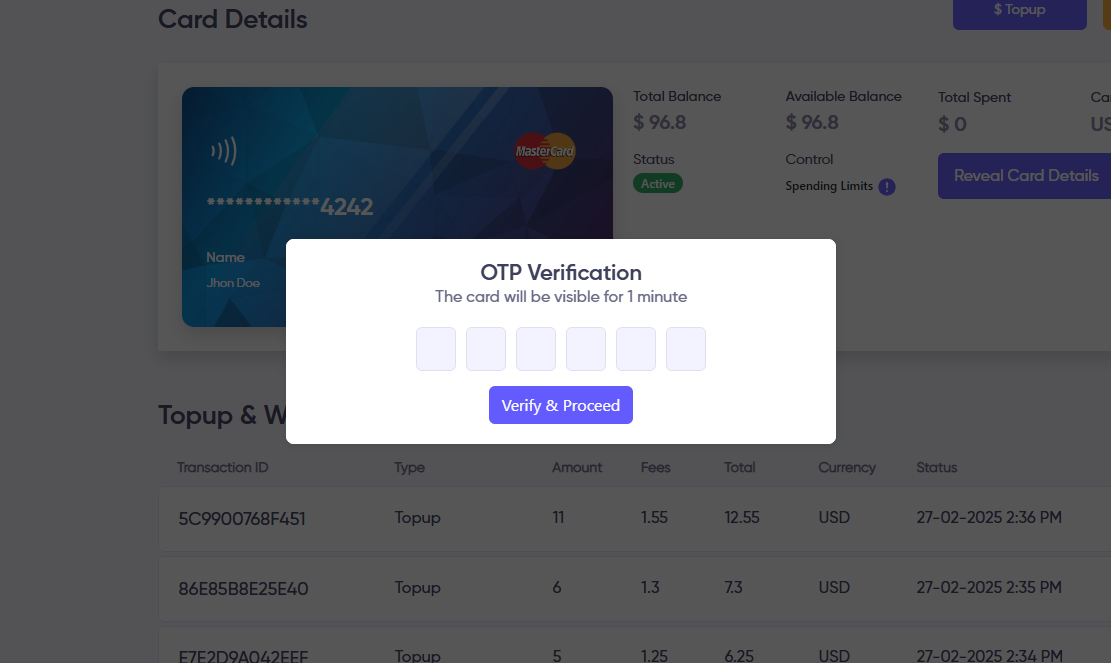
To view the card number, click on the eye icon on the card body. A verification code will be sent to the user's registered email. The user must then enter this code in the OTP Verification form. Once verified, the card details will be visible for a limited time.
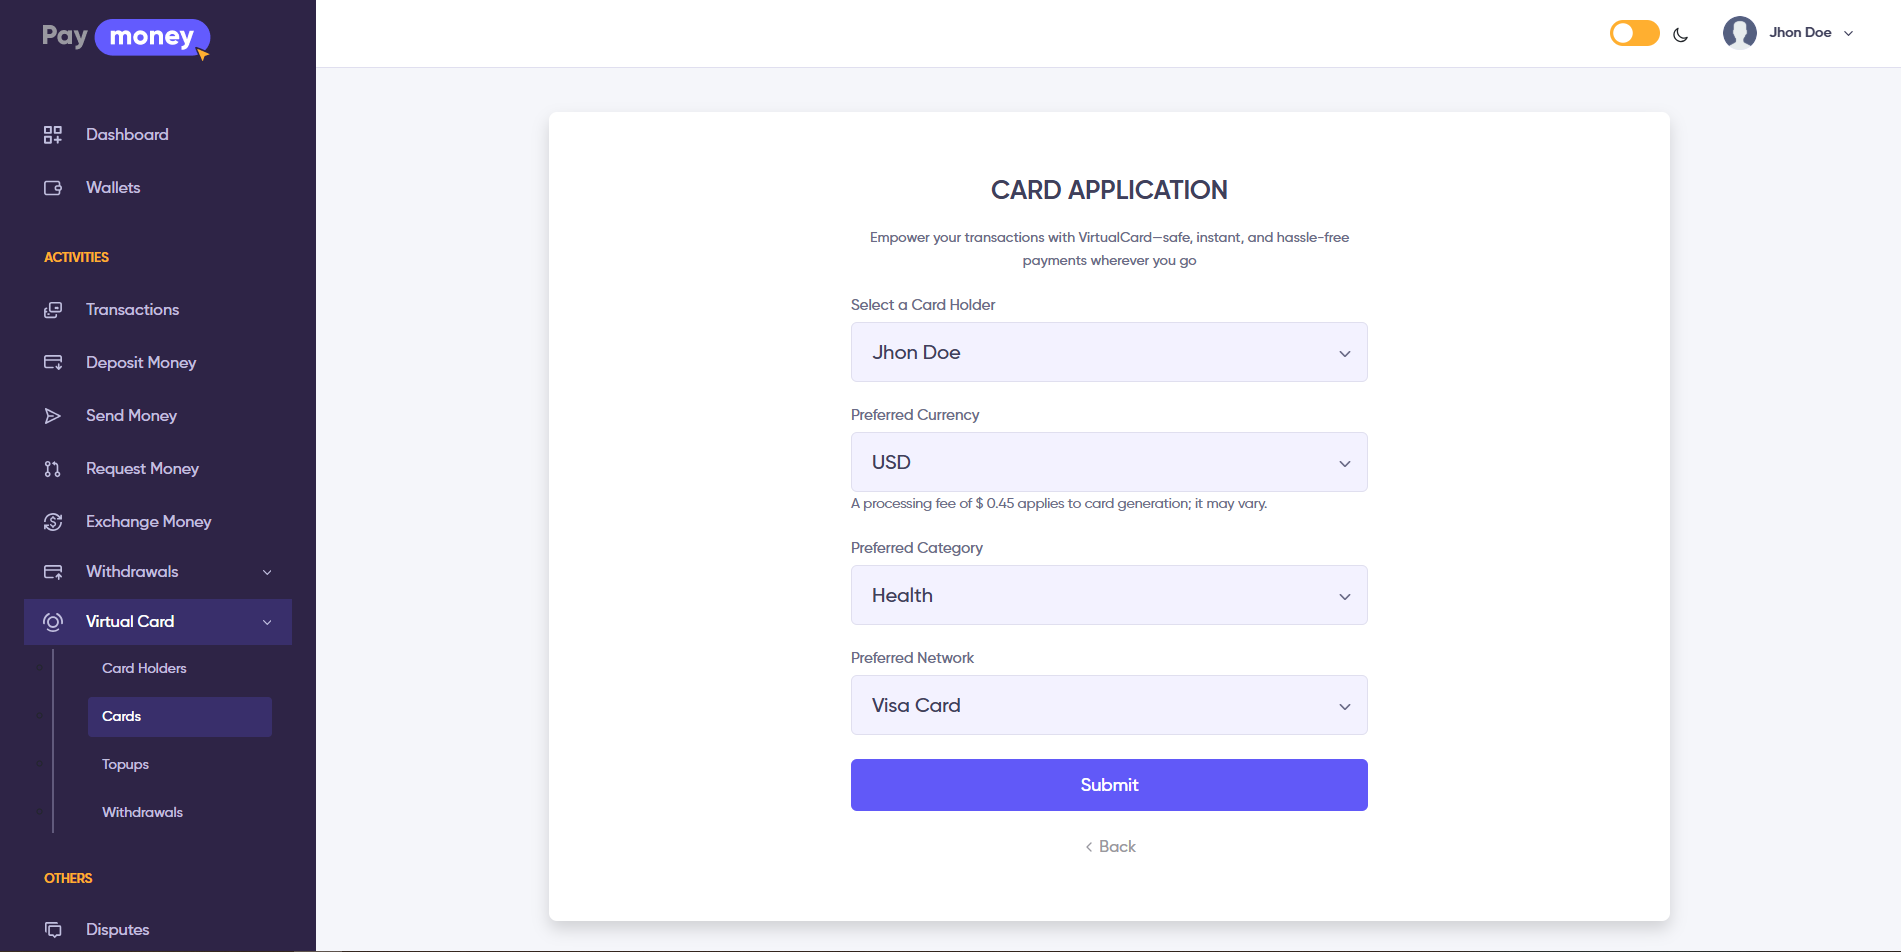
3. After clicking the New Card button, the user will be redirected to the Card Create page. Here, users can create their own virtual card.
Topups
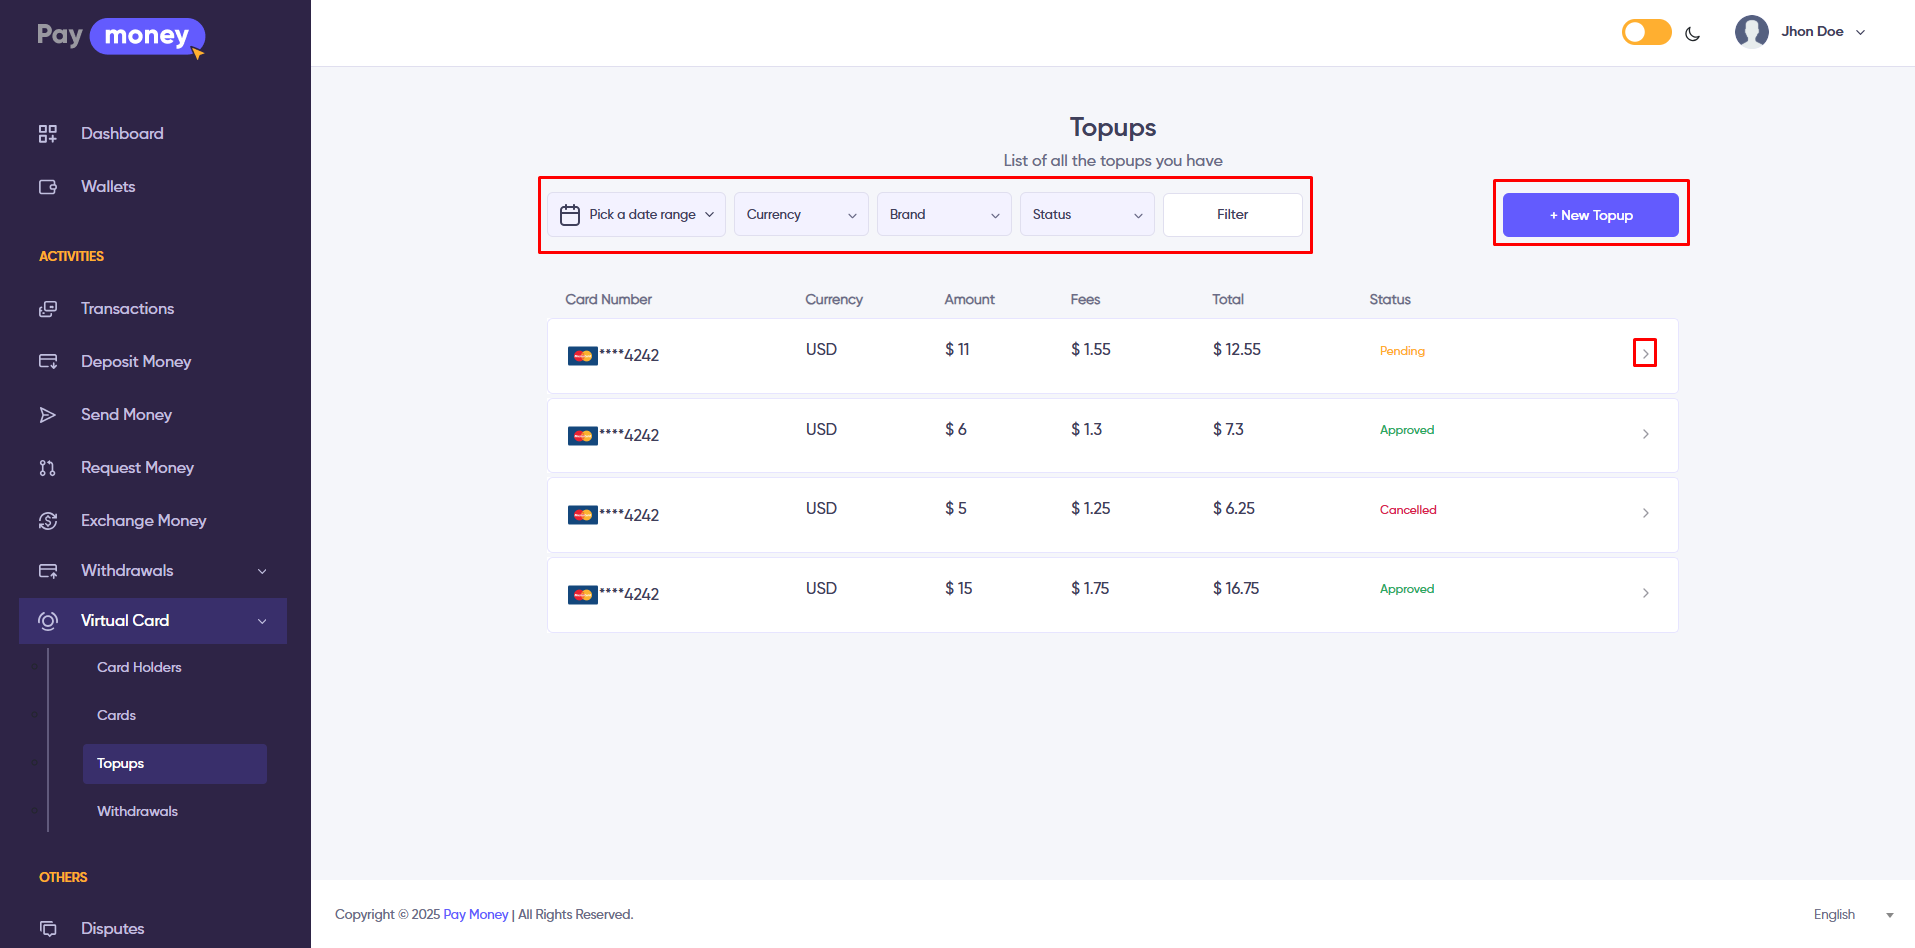
1. Here, users can view all topups for their virtual cards. To access the list, navigate to Virtual Card >> Topups.
- Use filters like Date Range, Currency, Brand, and Status to refine the list.
- Click the arrow icon to view details of a specific virtual card.
- Click New Topup button to create a new topup.
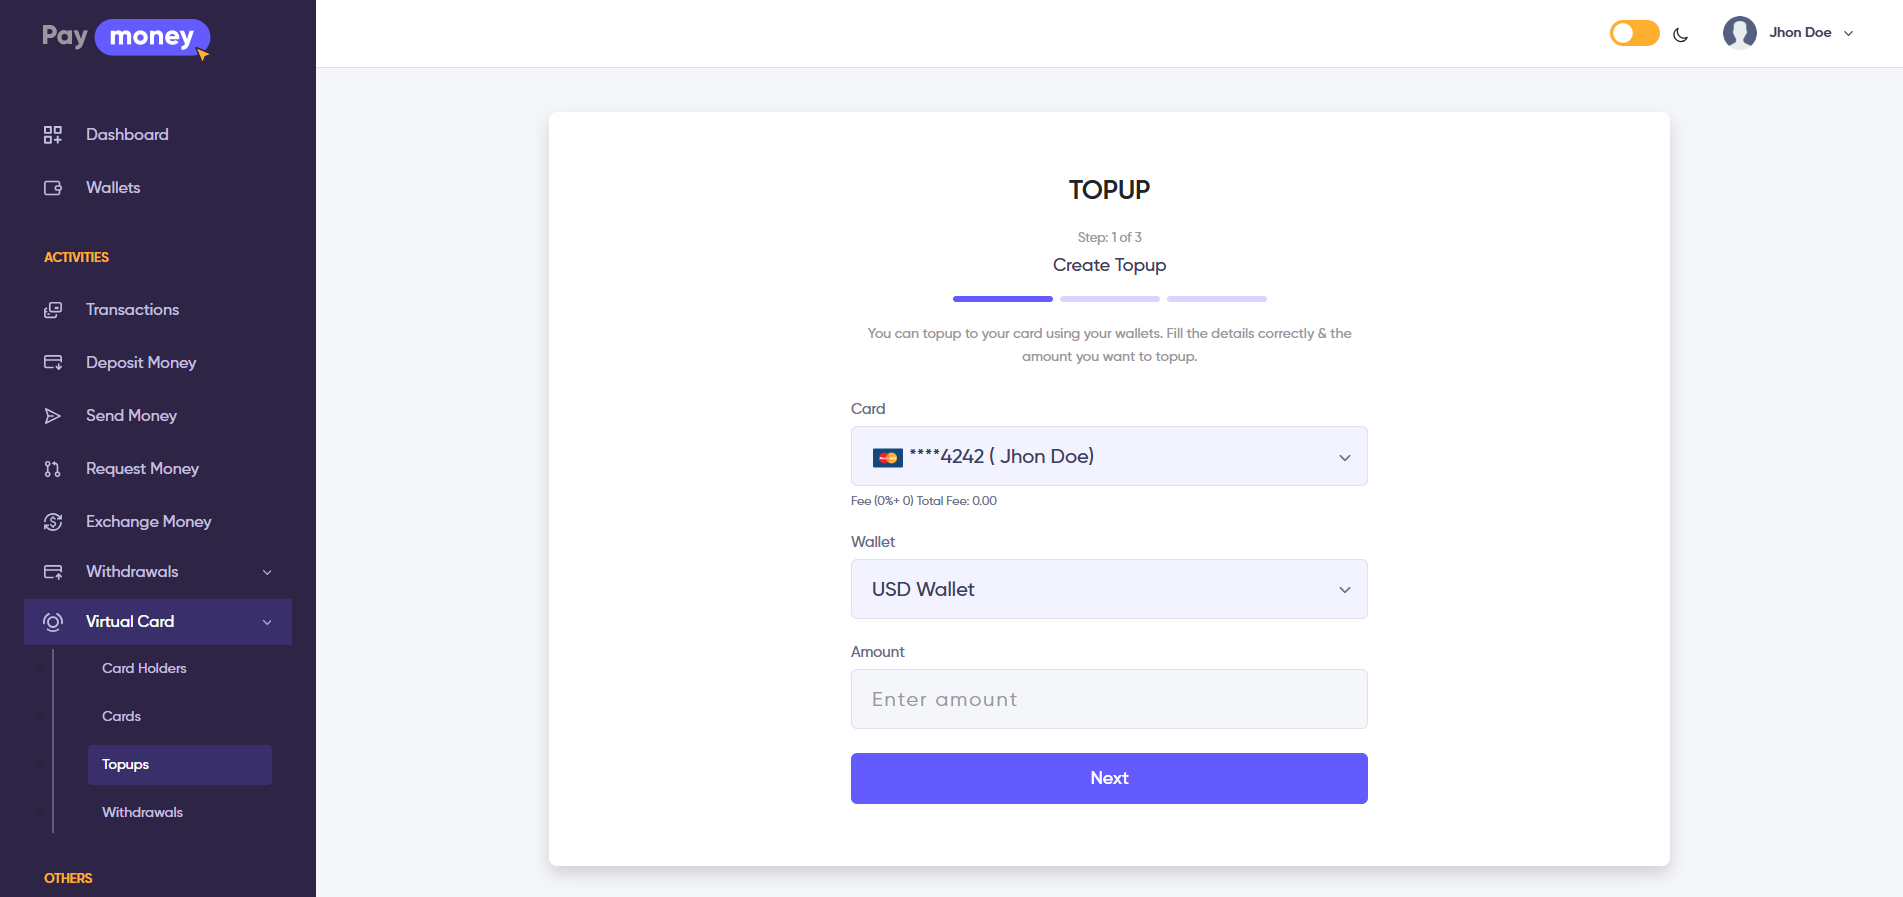
2. After clicking the New Topup button, the user will be redirected to the Create Topup page, where they can initiate a topup.
- In the Card option, the user selects an active virtual card.
- In the Wallet option, the user will see the specific wallet linked to the selected virtual card.
- In the Amount option, the user enters a suitable topup amount and clicks the Next button.
Note
To initiate the topup, the user must have enough balance in the selected wallet to transfer funds to the virtual card.
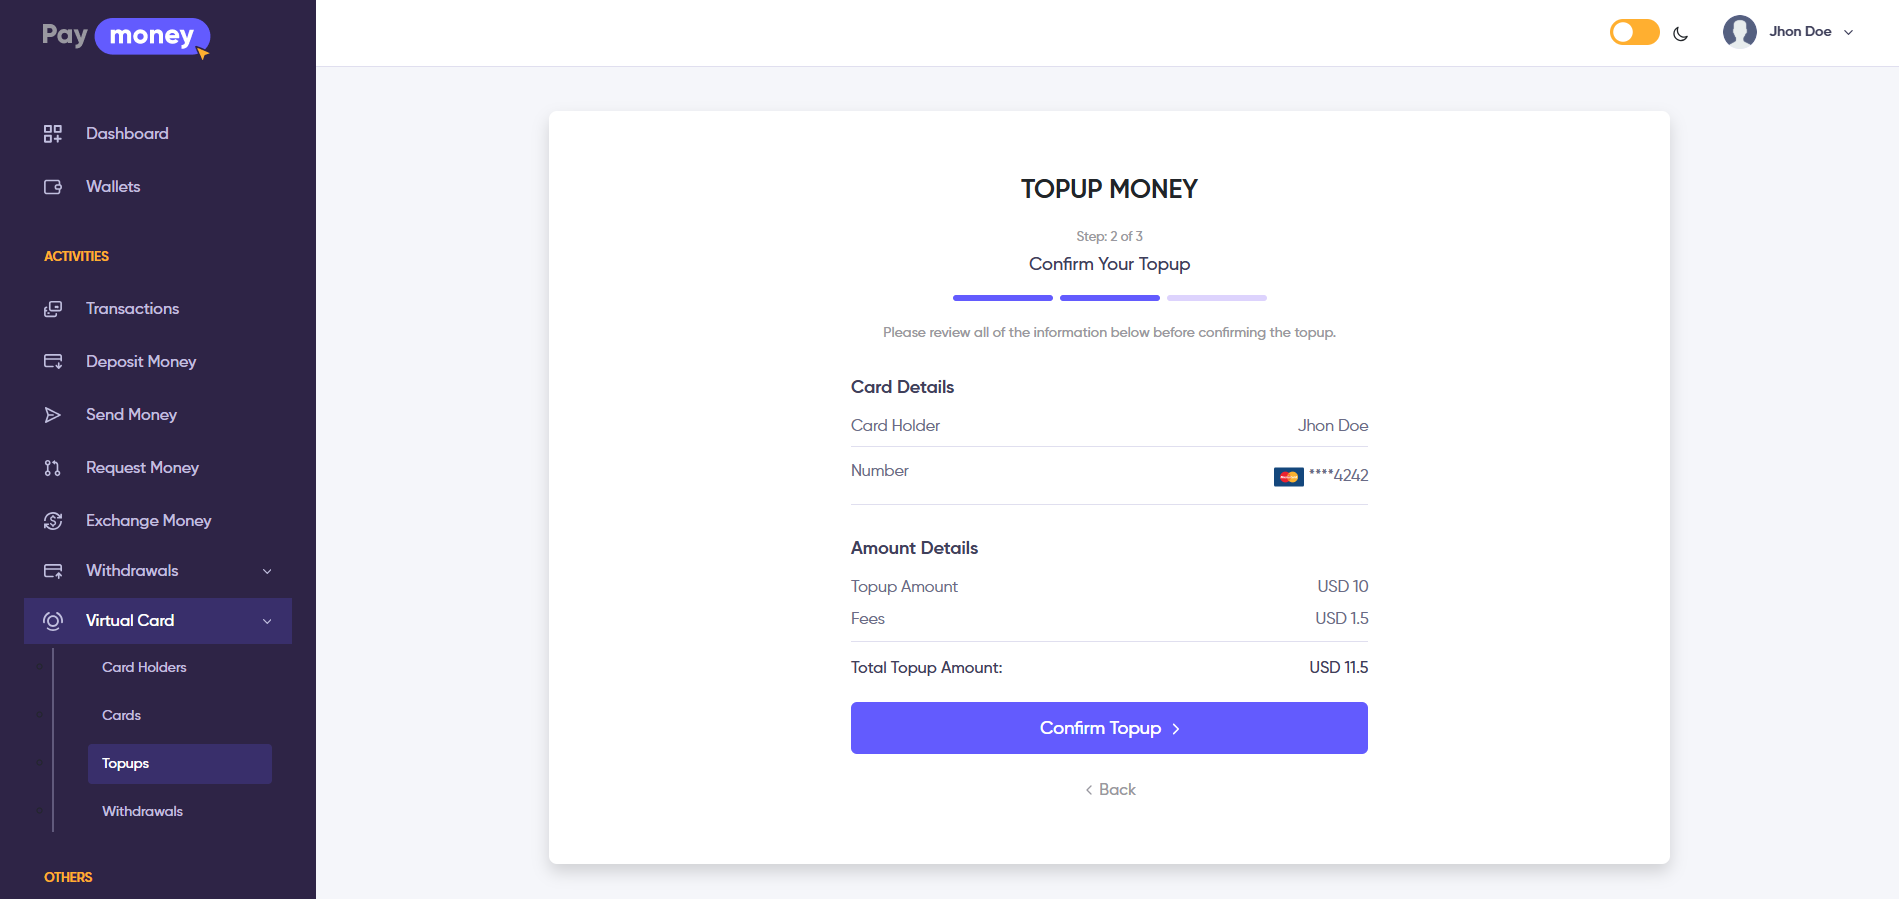
3. After clicking the Next button, the user will be redirected to the Confirm Topup page. Here, they can review the selected Card Details and Amount Details. To complete the topup, the user must click the Confirm Topup button.
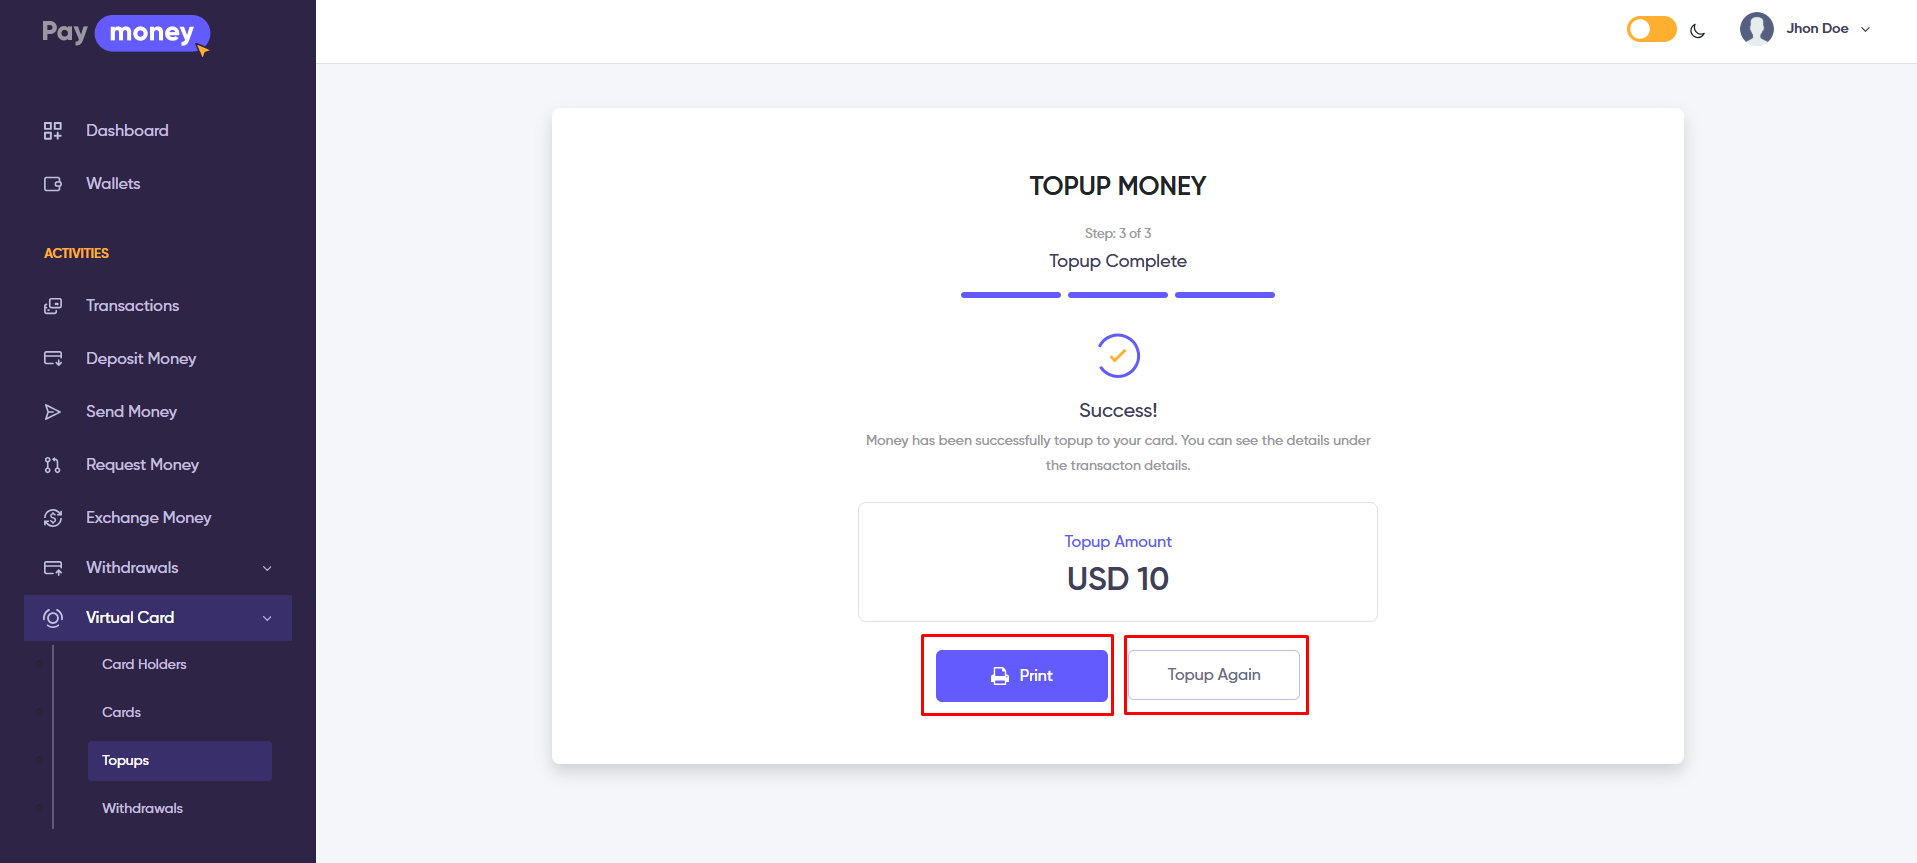
4. After clicking the Confirm Topup button, the topup will be submitted, and the user will be redirected to the Topup Success page. Here, the user can see the confirmed topup amount.
- Click the Topup Again button to initiate another topup.
- Click the Print button to view the PDF invoice page, where the user can print or download the invoice.
Note
If the card is manual, the topup status will be Pending. The admin must manually approve the topup to complete the transaction.
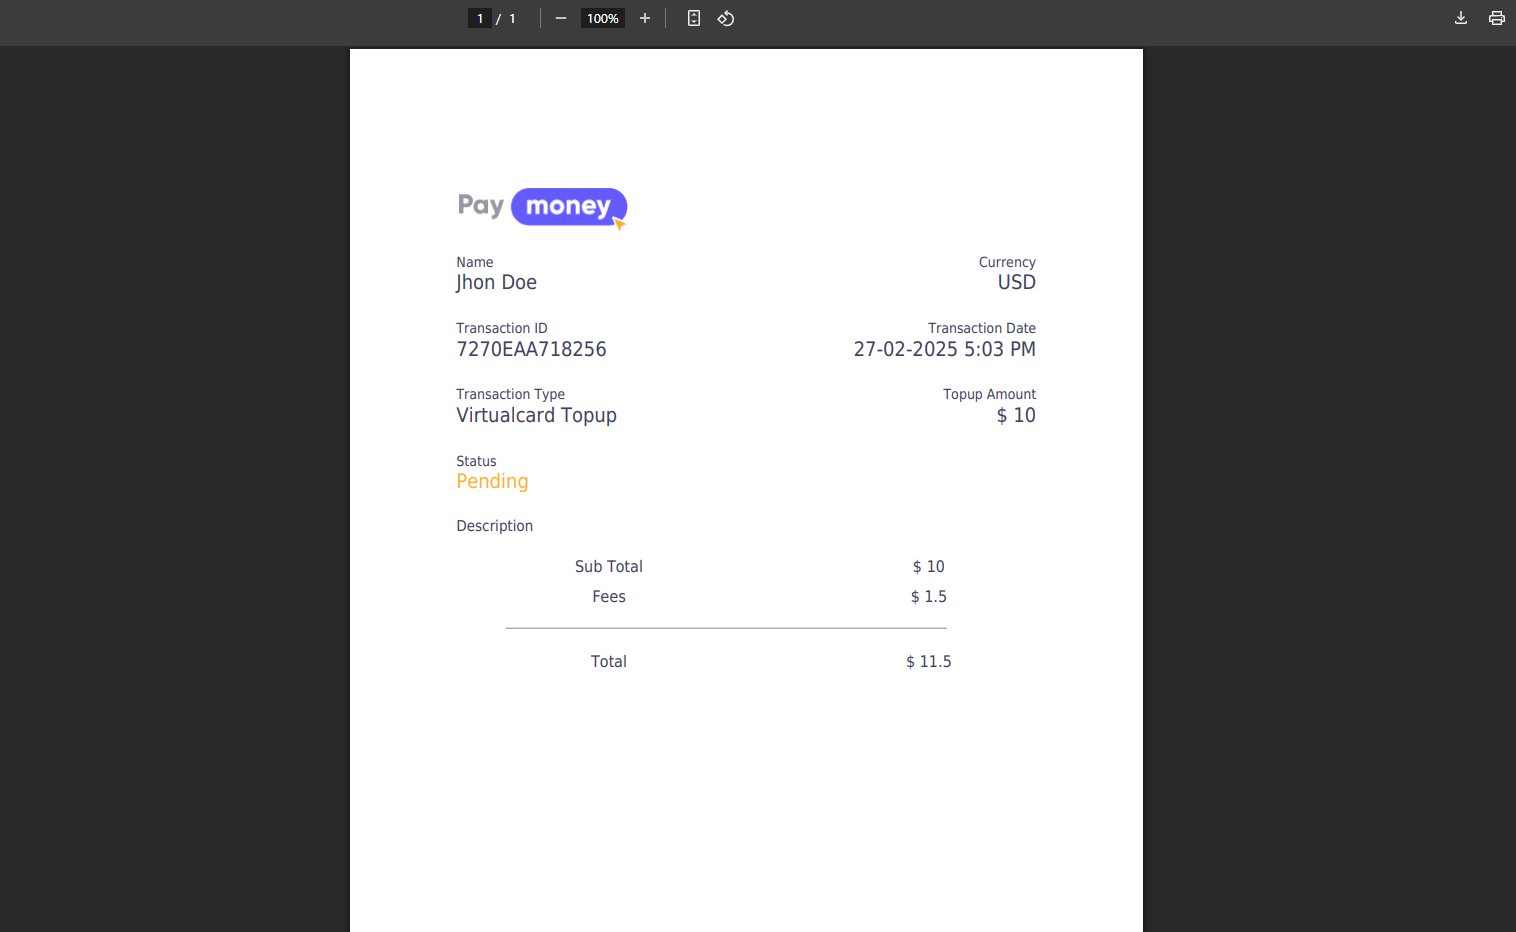
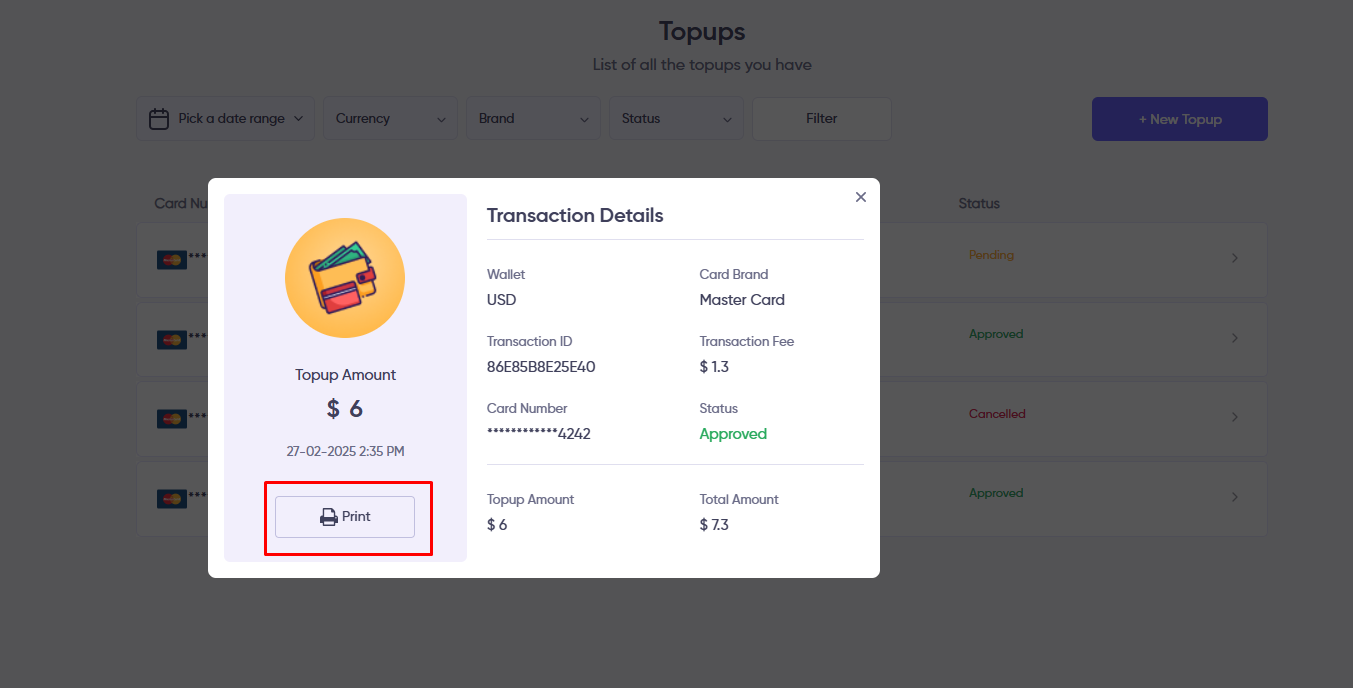
5. After clicking the arrow icon icon from the list, user can view the details of the Topup. By clicking the Print button, they can print the invoce of that topup.
Withdrawals
1. Here, users can view all withdrawals for their virtual cards. To access the list, navigate to Virtual Card >> Withdrawals.
- Use filters like Date Range, Currency, Brand, and Status to refine the list.
- Click the arrow icon to view details of a specific virtual card.
- Click Withdrawal button to create a new withdrawal.

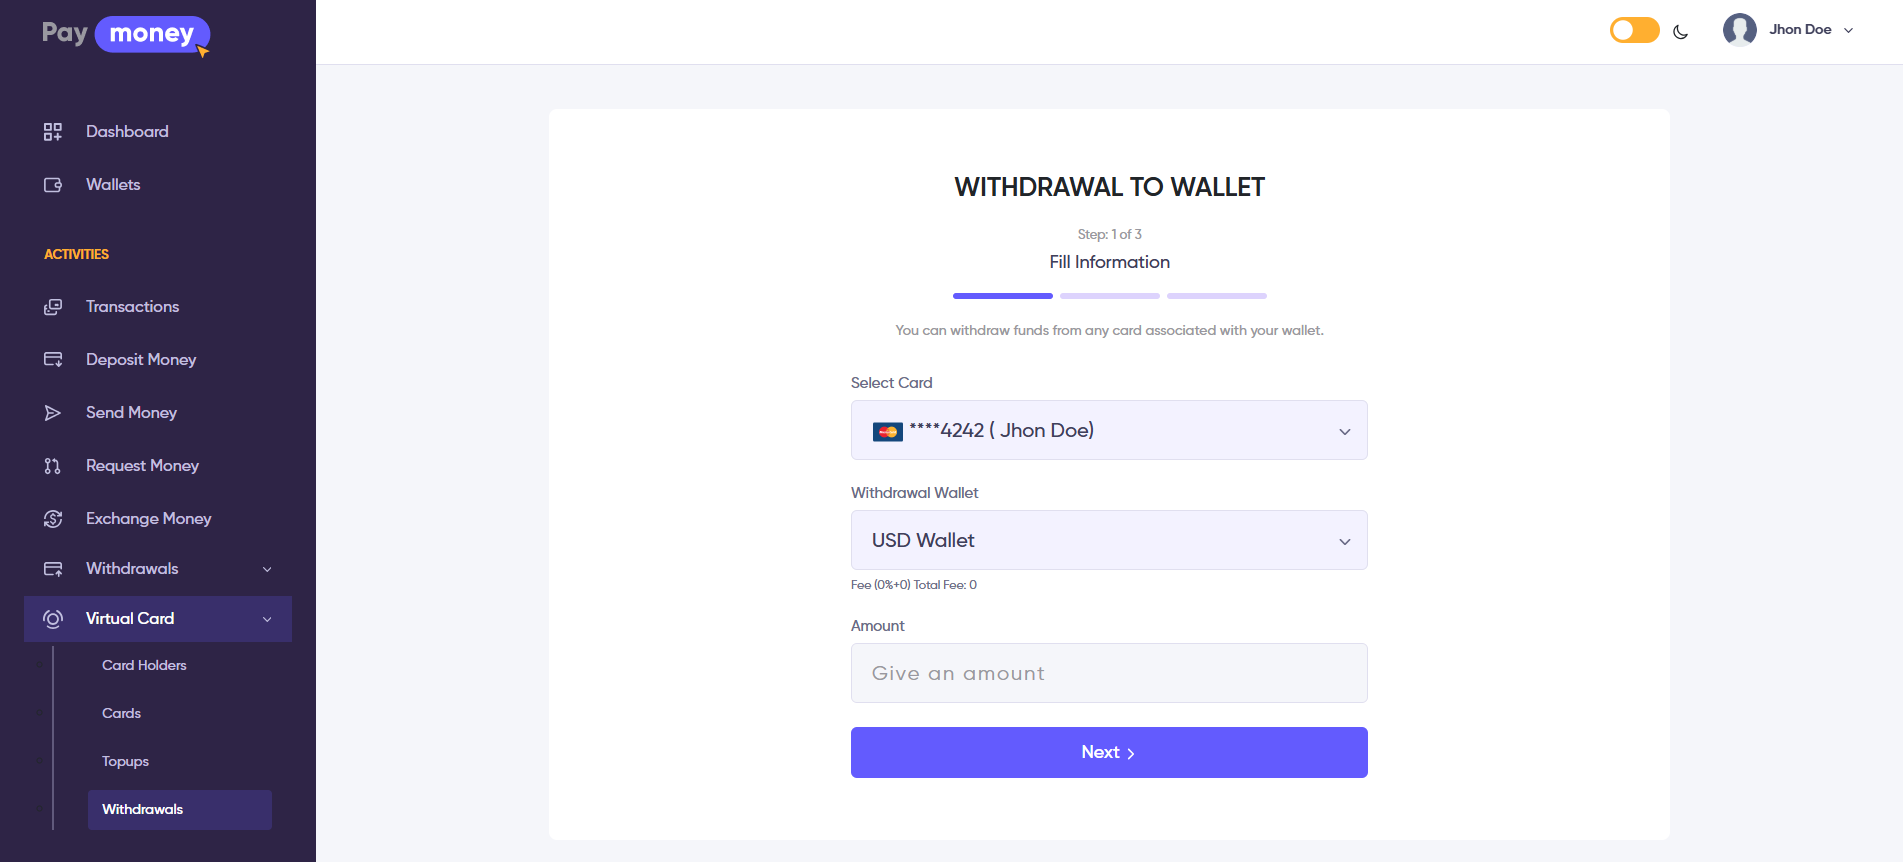
2. After clicking the Withdrawal button, the user will be redirected to the Create Withdrawal page, where they can initiate a withdrawal to wallet.
- In the Select Card option, the user selects an active virtual card.
- In the Withdrawal Wallet option, the user will see the specific wallet linked to the selected virtual card.
- In the Amount option, the user enters a suitable withdrawal amount and clicks the Next button.
Note
To initiate the withdrawal, the user must have enough balance in the selected virtual card to transfer funds to the wallet.
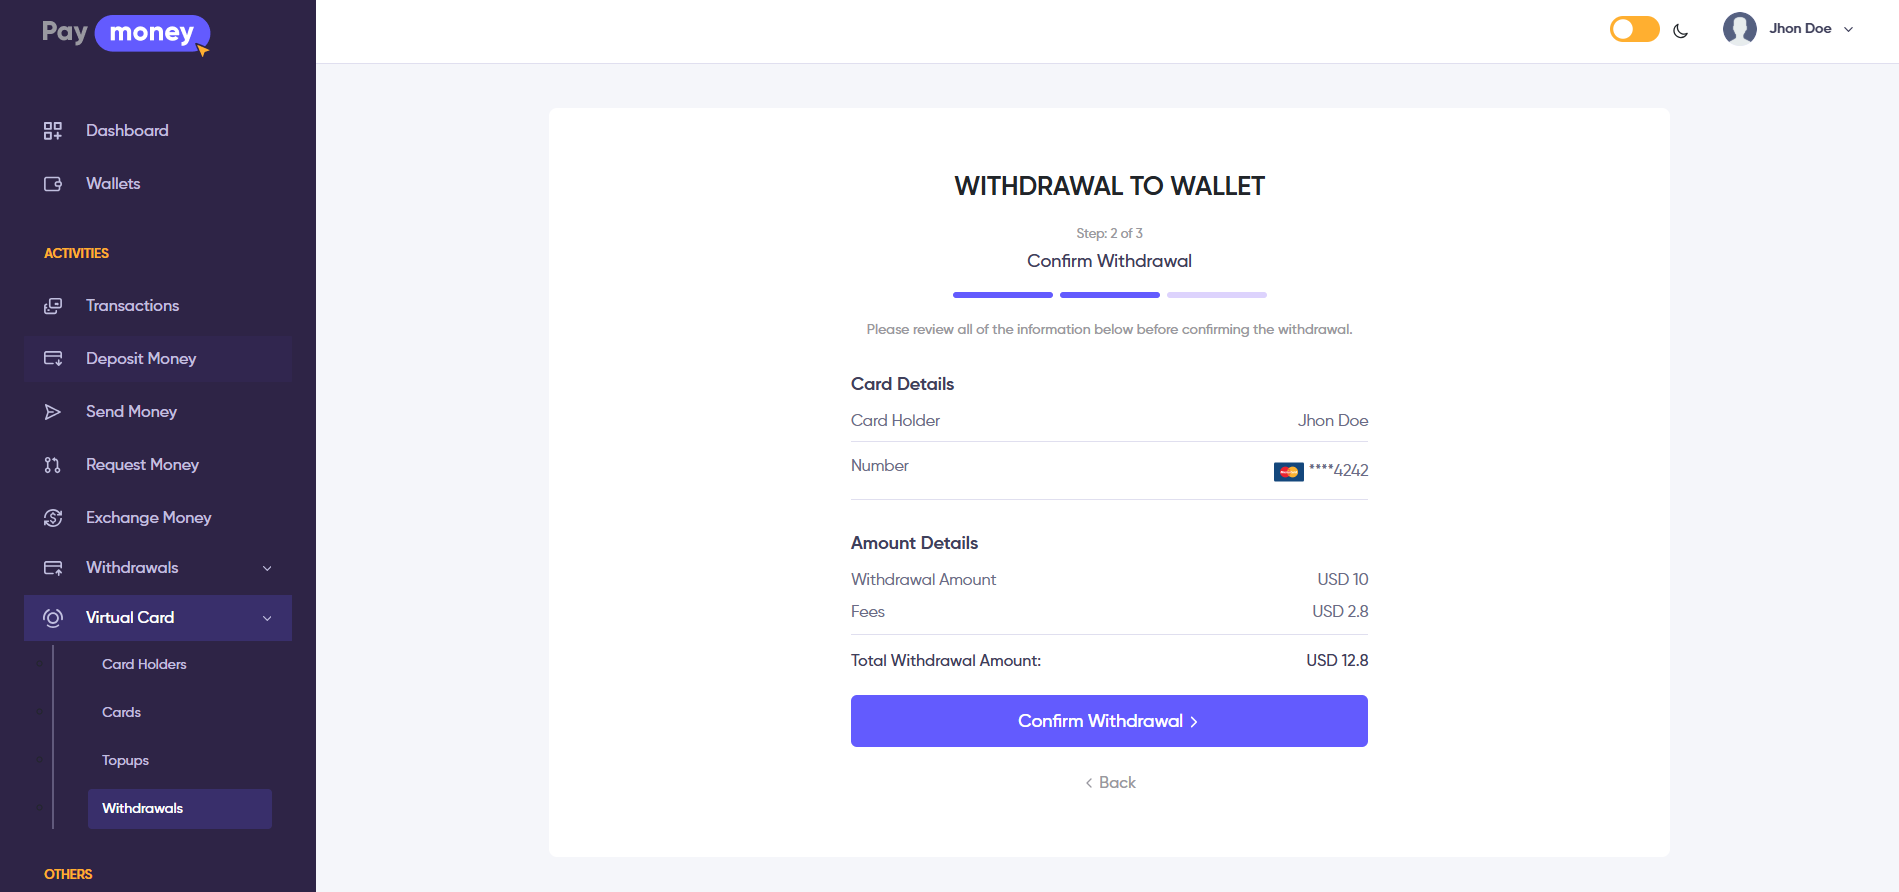
3. After clicking the Next button, the user will be redirected to the Confirm Withdrawal page. Here, they can review the selected Card Details and Amount Details. To complete the withdrawal, the user must click the Confirm Withdrawal button.
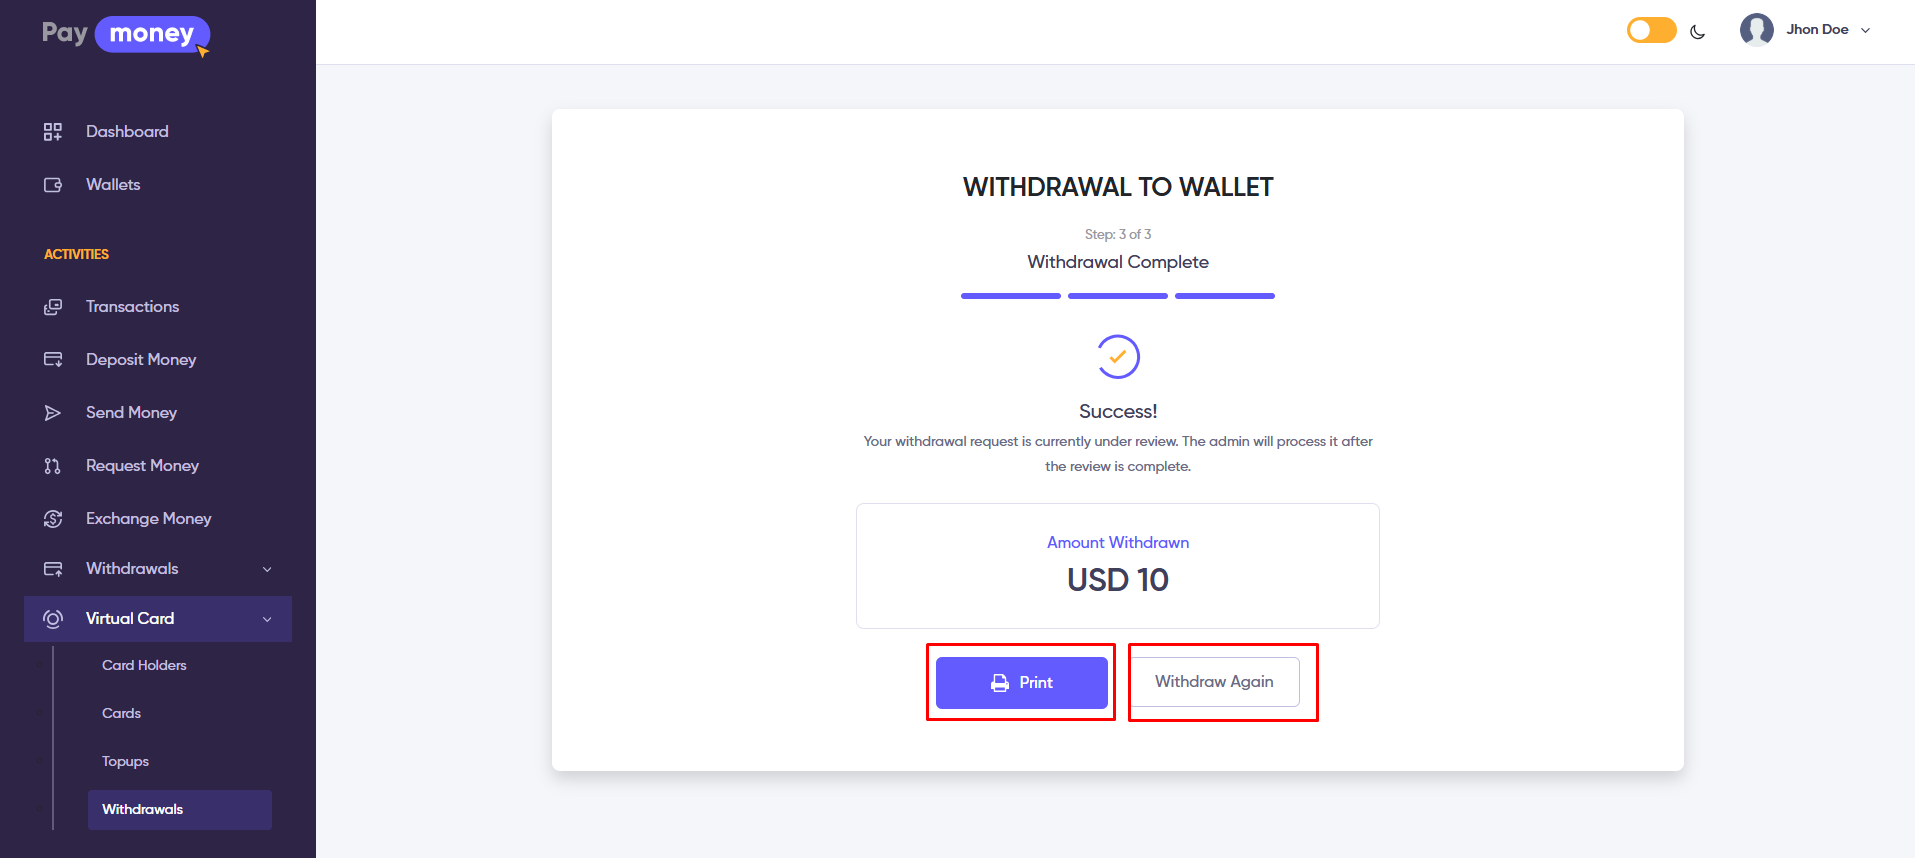
4. After clicking the Confirm Withdrawal button, the withdrawal will be submitted, and the user will be redirected to the Withdrawal Success page. Here, the user can see the confirmed withdrawal amount.
- Click the Withdrawal Again button to initiate another withdrawal.
- Click the Print button to view the PDF invoice page, where the user can print or download the invoice.
Note
If the card is manual, the withdrawal status will be Pending. The admin must manually approve the withdrawal to complete the transaction.
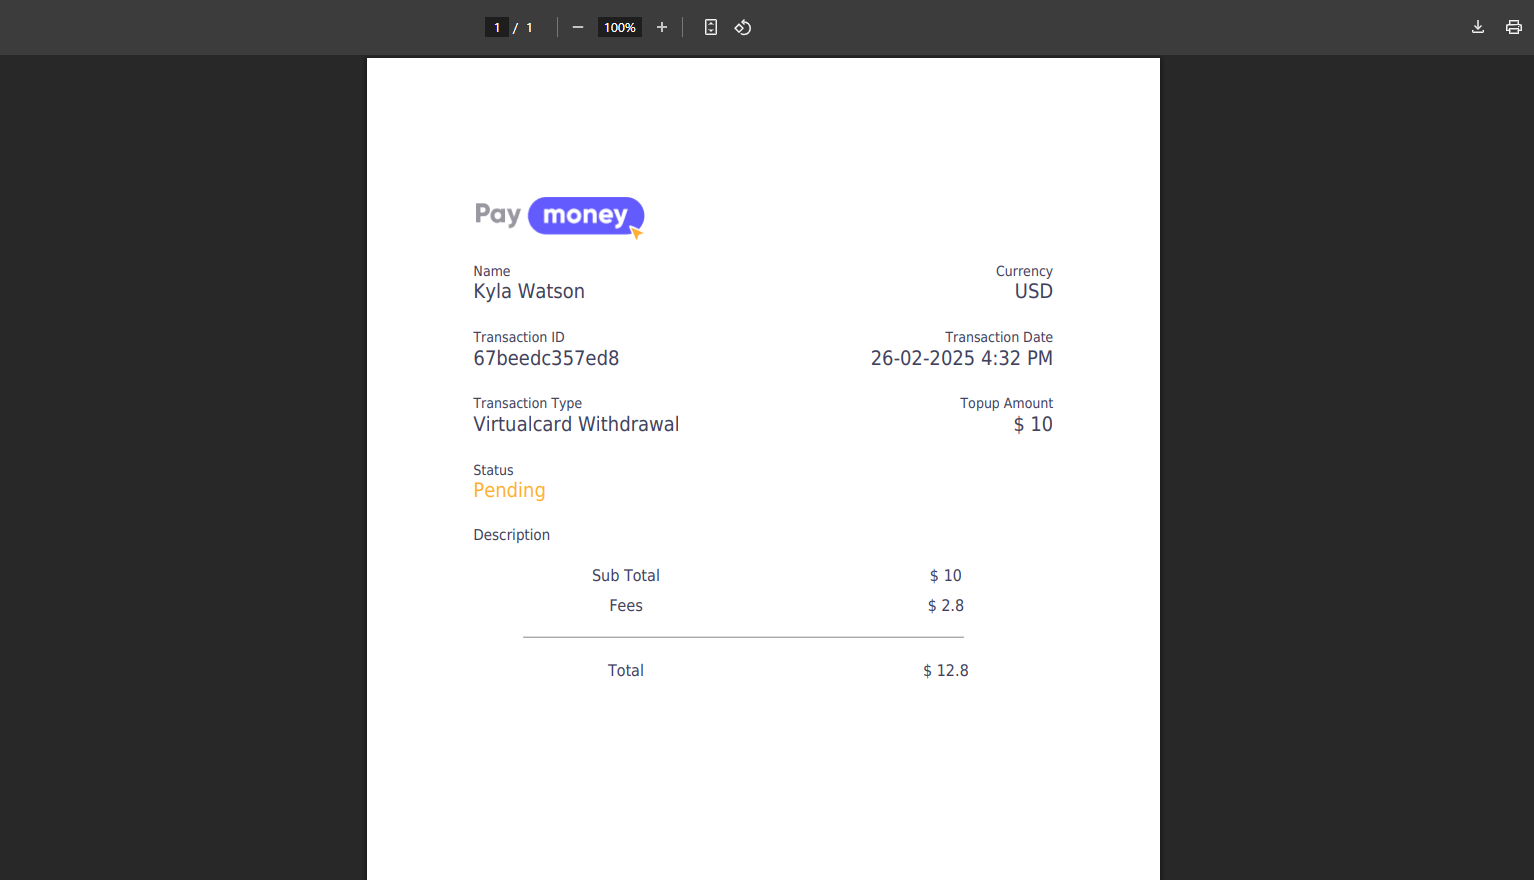
5. After clicking the arrow icon icon from the list, user can view the details of the Withdrawal. By clicking the Print button, they can print the invoce of that withdrawal.

Topup and Withdrawals Transaction
To view all topup and withdrawal transactions, navigate to Virtual Card >> Transactions. Here, users can see a complete list of topup and withdrawal transactions. Click on a specific transaction to view its details.
![]()
![]()